
Precision Editing with Adobe Premiere Pro’s Trim Mode

In this video tutorial, learn how to improve your editing workflow with precise edits using Premiere Pro’s Trim Mode configuration.
Many editors might not even know that Premiere’s Trim Mode exists, mainly due to the fact that it’s so well hidden. Nevertheless, this helpful display will allow you to quickly and precisely adjust an edit point, using a variety of different trim tools along the way. Use it to tweak dialogue scenes, change the pacing of an action sequence, or simply wow your colleagues. Let’s take a closer look at what you can accomplish in Premiere’s Trim Mode.
Trim Mode Configuration
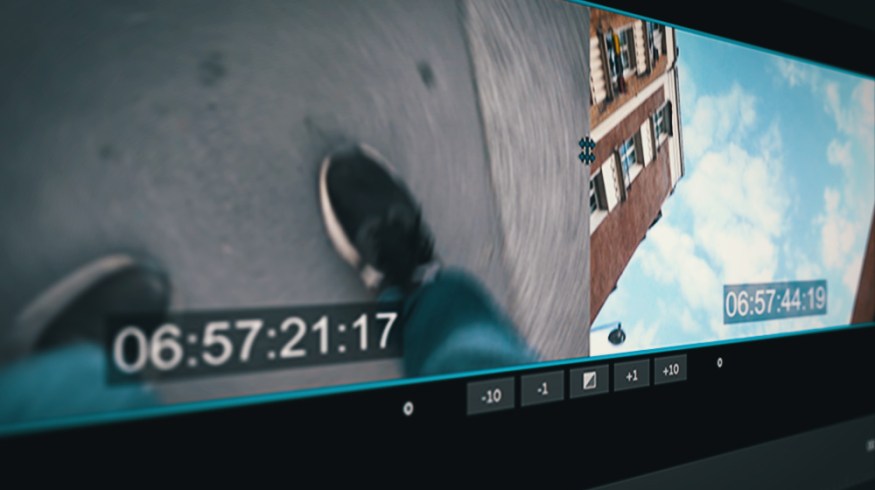
If you want to fine-tune an edit point, you can put the Program monitor into Trim Mode configuration. To do this, select Sequence > Trim Edit, or simply use keyboard shortcut T. Once open, the playhead on the timeline will snap to the closest edit point, and the Program monitor will switch to a two-screen display. These two screens show you the In and Out points of the adjacent clips along with their source timecode.

Playback will loop when Trim Mode is active, giving you the opportunity to view changes to the edit point as you make them. Several buttons are available in this mode, including trim forward/backward options and an apply default transition button. Change the amount of frames in the trim forward/backward buttons in Preferences > Trim.
Trimming in Trim Mode
The great thing about Trim Mode is that you can trim by clicking and dragging directly on the display. As you move your mouse over the panel, various trim tools become active, including the Rolling and Ripple edit tools. Use these tools by clicking and dragging on a particular window in the Program monitor. Again, the left display shows the Out point of the previous clip, while the right shows the In point of the upcoming clip.

For more precise controls, use the trim forward/backward buttons or use Ctrl+Left to trim backward and Ctrl+Right to trim forward (use the Option modifier key on a Mac). To perform a Slip edit, first select the In and Out points of your clip with the Ripple Tool. Next, enter Trim Mode and adjust the clip accordingly. For a Slide edit, select the Out point of the previous clip and the In point of the next clip, open up Trim Mode and adjust accordingly.
Looking for more Premiere Pro tips? Check out these articles.


