FCP X Audio Tutorial Part 1: Adding Sound and Music to Your Final Cut Pro X Projects and Using Snapping to Control Placement on the Timeline

In this Final Cut Pro X tutorial, we’ll explore three ways to add music and sound effects to your video projects as well as how to use the snapping function to align music in the timeline.
Among the “updates” in this latest incarnation of Final Cut Pro, there have been some changes about the way the application imports and handles audio in project timelines. Like in previous versions, you can still bring audio into your project by using FCP X’s import function or dragging in audio from the Finder / Desktop. However, FCPX also includes a built-in “Music and Sound” browser to, perhaps more quickly, find audio elements for project use. Let’s take a look at each of these import methods.
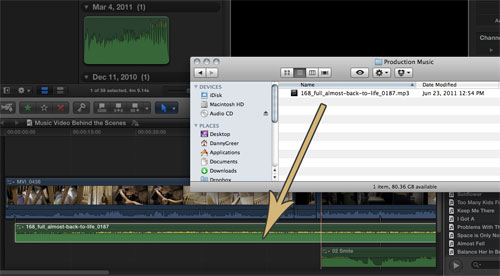
- Drag File from HD: Navigate to the audio file on your system (in the Desktop or by using Finder, for instance). With Final Cut Pro X open on your system, you can drag the file directly onto the timeline.
- Use the Import Menu: Navigate to the menu bar and choose File > Import > Files (or better yet, use the shortcut SHIFT + COMMAND + I). You can choose from several audio options from this menu. However, for music and sound effects it may not be necessary to check any of these options.

- Music and Sound Browser: In the toolbar, click on the music note icon to bring up the “Music and Sound Effects” pane. In this window you can choose a song from your iTunes library or use some of the sound effects that come packaged with iLife and Final Cut Pro X (this can be achieved by changing the file path in the dropdown). Want to make sure you’ve got the right track? Preview it by hitting the play button. Or maybe you know the name of the track you’re looking for… use the search box at the bottom of this pane.


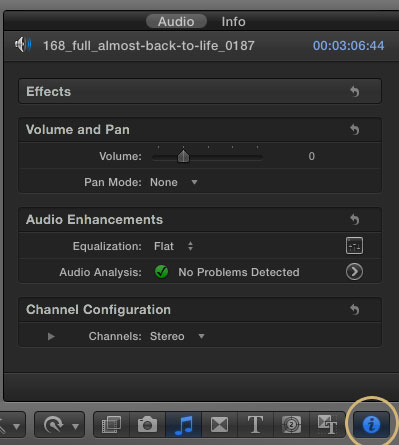
When you bring in audio to FCP X it will automatically be copied into the Library for the active event (the “Browser”). Here you can access the file for future use in your project. Clicking on the file in the Library and then activating the Inspector (choosing the “i” icon or by the shortcut COMMAND + 4) will show additional info about any audio file.
After importing footage into your Final Cut Pro X project, you can take advantage of the snapping feature to bring in the audio exactly where you want it in the timeline.
- Before placing the audio media in the timeline, park the playhead where you would like the audio to come in. Oftentimes, this may be at the beginning of a clip.
- Now, enable “snapping.” This can be done using the shortcut “N” (same as in previous FCP versions) or click the snapping button on the top right of the timeline.

- The beginning of the audio will now snap to the playhead when brought into the timeline (works with each of the above import methods). You can either drag the media into the timeline or use the shortcut “W”.

Do you like the new Final Cut Pro X Music and Sound Browser? Do you have tips for working with audio in FCP X? Let us know in the comments!
Stay tuned to the Premiumbeat blog for more tutorials and tips, including this ongoing series about working with audio in Final Cut Pro X.