Final Cut Pro X Video Tutorial: Advanced Audio Features

Learn the fundamentals of audio track management, EQ and roles, in this Final Cut Pro X tutorial.
![]()
For many projects, you may find it best to complete all your audio editing in Final Cut Pro X to avoid syncing issues or to work within time constraints. Fortunately FCPX has powerful audio features, from taking advantage of your Logic Pro AU plug-ins to built-in noise reduction algorithms.
In this video tutorial by Michael Horton, video editor Michael Wohl speaks at the L.A. Final Cut Pro User Group (now called LA Creative Pro User Group), covering advanced audio features in FCPX:
This video was created and shared by Michael Horton. Thanks for sharing!
Track Management in FCPX
To manage audio channels, select the audio clip in the timeline. In the Inspector window, you can quickly scan through the audio channels, de-selecting what is not needed. Drag the cursor over any of the tracks to scan for preview.

Let’s say you recorded a boom mic and an on-camera mic onto one stereo track. To separate the boom mic from the reference audio, we must first separate the stereo track into two mono tracks. From the Channels pop-up menu, choose Dual Mono. The stereo track is now two mono tracks.

Next, de-select the on-camera audio track, leaving the other mono track selected.

FCPX EQ & Filter Parameters
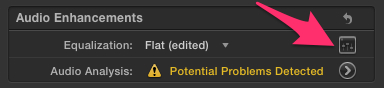
Final Cut Pro X features expansive, versatile graphic equalizers and filters that previous versions did not. These are great for a quick fix to enhance your audio or for simply removing noise/hum. There are a number of included presets for the EQ, all fully customizable. In the Inspector window, click on the Audio Analysis arrow.

In the Audio Analysis window, note Final Cut’s recommendations for the Loudness, Background Noise Removal and Hum Removal sections. Take a particular focus to Background Noise Removal and Hum Removal, experimenting with the perimeters to fit your needs.

Graphic EQ in Final Cut Pro X
Final Cut Pro X additionally features an expandable graphic EQ to dial in on specific frequencies. In the Inspector window, click on the EQ Icon in the Equalization section of the Audio Enhancements to open the Graphic Equalizer.
Click on the 10 Bands drop down selector to reveal 31 Bands for additional control.

By clicking on a specific frequency, drag your mouse to group any number of bands together in unison.

Roles in Final Cut Pro X
The Roles tool was created to allow editors accustomed to working with multiple audio tracks the resources to create soundscapes in Final Cut Pro X. Roles allows the editor to mix, edit and organize into groups the audio clips used for dialogue, sound effects, foley, and music.

For an aural and linear demonstration of how Roles works, check out the tail-end of the video tutorial above in which Michael Wohl demonstrates his sound design using Roles in Final Cut Pro X.
How do you work with your audio in Final Cut Pro X?
Share in the comments below.