A Detailed Guide to Capturing Video Game Footage on a PC
Start creating video game content! Learn the basics of video game capture, and take a look at the gear and software you’ll need to pull it off.
Capturing video game footage from an external source or a PC is a simple process, and knowing how to record video game footage is the first step toward starting a video game YouTube channel. Plus, it’s also fun to capture footage to show off to friends.
While professional video game streamers and YouTubers have expensive setups for recording, it doesn’t take much to start. Some software and a computer are all you need to start recording game footage from a PC. A video capture card is also necessary, but only when capturing footage from an external source, such as a game console.
Before you hit the record button, do yourself a solid and look through this guide. You don’t need the fastest PC or the best video capture card, but there are some things you should know. And, if you’re stumped as to which software to pick, that’s an easy choice that I’ll cover in-depth.
Whether you want to record Apex Legends clips from your PC or record a Breath of the Wild speedrun on the Switch, the sections below have all the information you need.
(Heads up: This guide is for capturing video game footage on a PC, so macOS users will have to sit this one out.)
Do You Have the Right PC?

Most PCs can capture video game footage, even if they don’t look like this. For best results, think about upgrading your PC to handle simultaneously playing and capturing video game footage. Image via Gorodenkoff.
Though you may be anxious to start recording after reading this article, I’d be remiss if I didn’t point out that not all PCs can handle capturing footage.
Capturing footage can impact gameplay, causing stuttering (that’s when the framerate drops) and crashes. When you record video game footage, the game and the recording software are both using the CPU and the GPU, though recording software mostly draws on the former.
Games rely heavily on the GPU nowadays, but they still need the CPU. The video recording software uses the CPU to encode the recorded gameplay as it’s happening. Those with a powerful CPU may not experience a drop in performance, but those with older or not-as-powerful CPUs may experience severe framerate drops, freezes, and crashes. Sometimes, not having enough CPU power may impact the recorded footage.
When I first started recording video game footage on my PC, I didn’t know what I was doing, so I cranked the recording settings as far as they could go. The game played fine, but when I looked at the footage, it was choppy and unusable. Instead of playing back 60fps game footage, I was watching gameplay with a framerate of about 10fps. I have a pretty good CPU, but it couldn’t handle playing a game at high graphics settings while also recording at max settings. I kept the game at the same settings, but I lowered the recording settings, and it worked out fine.
You’ll have to strike the right balance of settings and performance when you record game footage, but some PCs may not be up to the task. If your PC struggles to play a game at 30 or 60fps, then recording may be out of the question. I can’t offer specific advice on which parts to upgrade since it varies by system, but if you’re having trouble, you may want to upgrade your PC, or at least your CPU.
Recording Footage on a PC
Recording video game footage from the same PC where you’re playing the game is straightforward. There’s no need for any extra hardware, so you can keep your wallet tucked safely in your pocket — at least for now. To capture footage, you’ll only need software, and while there are many options, each of them executes the same basic task — they record whatever is being displayed on your monitor.
I like to use the recording feature built into the Radeon Software that’s responsible for managing my AMD GPU, but it’s not available for everyone. Those who own an NVIDIA GPU, for example, have access to the GeForce Experience software, which has a feature called Shadowplay that’s responsible for capturing game footage. Windows has the Xbox Game Bar for video game capture, and there are many others. So, instead of focusing on either one, and alienating either half of the PC population, it’s better to go with Open Broadcaster Software, or OBS for short.
We’ve covered OBS extensively, and it’s a software used by many popular streamers and YouTubers for a few reasons. The primary reason to use OBS, however, is that it’s free. Also, because of its widespread use, there are myriad tutorials if you need help.
The software may look intimidating, and the UI leaves much to be desired, but the software is straightforward. Other capturing software can only capture footage from the same computer it’s installed on, meaning you can’t use it to capture anything but what’s being displayed on the screen. OBS is different — it can also capture footage from an external source (with the help of a video capture device).
Recording Game Footage on OBS
As previously mentioned, I use the Radeon Software to capture PC game footage, and while it’s convenient, it’s not nearly as versatile as OBS. Any PC user can download OBS and use it for various reasons, and the program doesn’t tax the system as much as others. If you’re planning on streaming or spicing up your Zoom video feed, learning how to use this free software is a must.
So, to start recording, download and install the software. Though the UI looks uninviting, setting up a recording preset isn’t complicated.
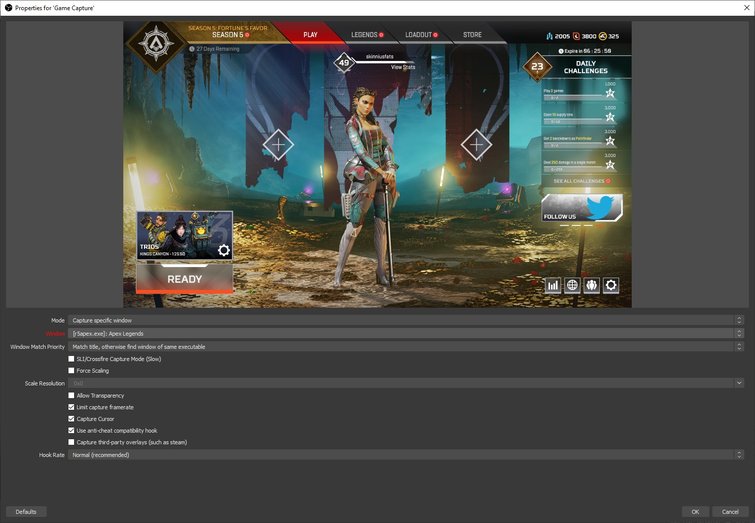
When selecting the Capture Specific Window option under Mode, you’ll have to pick the window. In this example, I chose to capture footage from Apex Legends. This option isn’t limited to games.
- In the bottom left corner of the software, there’s a box named Scenes. Go ahead and click the + button on the bottom of the box.
- A box will pop up, asking you to name the scene. Just give it a recognizable name for future reference such as Game Capture.
- To the right of the Scenes box is another box called Sources. Click the + button on that box.
- When the menu with sources pops up, select the one titled Game Capture.
- A Properties box will appear. Click on Mode. Select either Capture Specific Window or Capture Any Fullscreen Application. If you just want to record the game, choose the former.
- If you choose Capture Specific Window, a new dropdown menu will appear under Mode named Window.
- The title of the game should appear in this dropdown menu, if it’s already open. If not, open the game, then return to the Properties menu to select the game in the Window dropdown.
- Click OK to save your settings for the source, and the video game should appear in the OBS window.
- Click on the Start Recording button on the bottom right side of the window, and click it again to stop the recording.
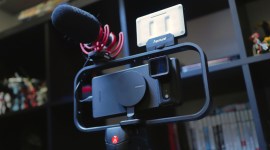
Those are the basic steps to begin recording gameplay on your PC, but OBS is rich with features that allow you to do much more. You can set up a camera and record yourself as you play, and you can set up a microphone, too. For more on how to set up your camera, follow our guide.
The steps for capturing footage from an external source are simple as well, but it’s only possible with a video capture device. You’ll have to spend $100-$200 for a decent video capture device, but it’s worth it if you want to capture footage from an Xbox, PS4, Nintendo Switch (in dock mode), and even next-gen consoles releasing this fall. Below is all you need to know.
Recording Video Using a Video Capture Device
Video capture devices, such as Elgato’s HD60 S, exist in that Goldilocks zone of capture device cost — not too expensive, not too cheap, and with just the right amount of features for the price. Elgato is the biggest player in the capture device market, but they’re not the only one. Video capture devices are external so that you can take it with you anywhere. Say, for example, you went to a friend’s house and wanted to record some footage, all you’d need to bring is the capture device, a laptop, and the HDMI cables.
To start recording, you first need to do a few things. For starters, it’s best to download the software for the video capture device. I don’t use the Elgato software on my computer, but I’ve used it before, and it’s perfectly fine for recording footage. The real reason why you want the software is so that the computer can recognize the device, which is how you’ll be able to record footage with OBS.
Setting up the Device
With the software installed and OBS open, it’s time to set up your video capture device.
- Plug an HDMI cable from the source’s video Output port to the Input port on the video capture device.
- If you want to use the device as a passthrough (which you probably do), connect an HDMI cable from the capture device’s Output port to a monitor.
- Finally, the capture device should have a port that connects it to the PC. This final cable is what communicates with the computer and the software. On the HD60 S+, for example, there is a USB-C port.
Setting up OBS
With everything properly connected, all you have to do is create a new source in OBS, as we did above.

After adding a video capture device in the Sources box, select the device in the Properties menu of the source. You can access the Properties menu by double-clicking on the source.
- Open OBS.
- You can create a new scene, but you don’t have to.
- Click the + button in the Sources box.
- Select Video Capture Device.
- In the Properties menu, select your video capture device in the first dropdown menu.
- If you want the audio to pass through to the desktop so you can listen and record at the same time, select Output Desktop Audio in the Audio Output Mode dropdown located at the very bottom of the Properties box.
- Turn on your external source, which should output video directly to OBS.
- Click OK to save your settings and exit the Properties menu.
- Hit the Start Recording button.
If you experience any issues, make sure all cables are connected correctly in the right ports.
Recording Video Using a Video Capture Card
Video capture cards are better, in many ways, because they’re installed directly onto the motherboard, which improves stability and speeds up data transfer.
Capture cards use the PCIe interface to connect to the computer via the PCIe slot, making it the fastest way to transmit the footage to the CPU for encoding. A video capture card is always connected and powered, which makes the whole process much more comfortable, and since it fits within the computer, no extra space is required.
Once the video card is installed onto the motherboard, setting up is a breeze. Just connect an HDMI cable from the Source to the Input port of the video card and connect another HDMI cable from the video card’s Output port to a monitor to view the video coming directly from the source.
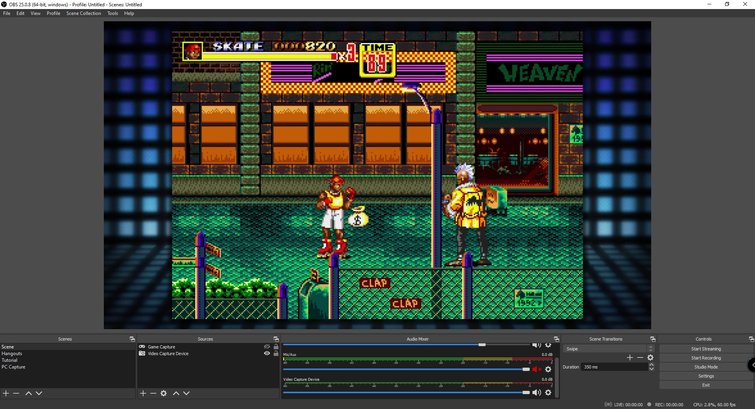
I could pass through the video coming from the Genesis Retro Mini to a second monitor, but OBS lets me see and hear the game on my computer with no perceptible lag. I can even go into full screen mode.
When I’m recording footage from an external source, such as my Genesis Mini retro console, I play the game through OBS. The latency from the game console to OBS is so insignificant that I don’t feel it’s necessary to purchase a second monitor. If you have two screens and want to record and monitor the footage on one and play the game on another one, that’s fine.
Follow the above guide to set up your video card to record with OBS, as you’ll need to add the video capture card as a new source.
Which Settings to Tweak for Recording
Typically, the settings that change resolution, frames per second, and bitrate are the most important, but everybody’s process is different.
The Output tab of the Settings menu is where you can make big and small changes to the recording process. At the top of the Output tab is a dropdown labeled Output mode that defaults to the simple option. However, you can choose the Advanced option that provides a lot more settings.
For most people, the Basic option is the best, and this where you can select the recording path of the file — i.e., where the file saves to once the recording is finished. You can also make changes to the file type and the recording quality.
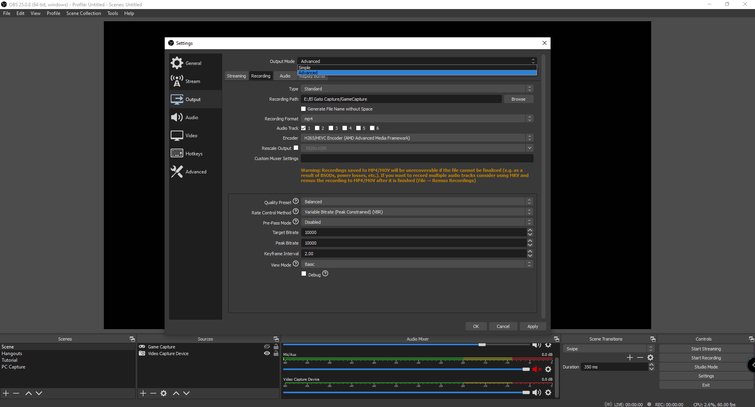
The Output in the OBS settings menu provides even more ways to enhance and tweak your recording setup. Choosing Basic in the Output Mode dropdown box shows users a streamlined view, while selecting Advanced reveals myriad settings.
The Advanced tab is where you can delve into the minutiae of the recording process, but I tend to stay away from most settings. While most of the Advanced tab settings hurt my brain, it’s worth knowing about bitrate, resolution, and framerate because they make the biggest impact. Once you understand the concept, it’s easier to make changes.
Bitrate
The one thing that I do recommend changing is the bitrate, which you can do in the dropdown labeled Target Bitrate. Bitrate affects the quality of the video. Recording a video in HD with low bitrate can create a lack of color and a loss in sharpness. Setting the bitrate too high incrementally improves the video quality at the cost of file size. It’s a balancing act, pitting quality against storage.
I played Hyper Scape the other day, a new Battle Royale game from Ubisoft that’s currently in open beta, and I recorded my gameplay at three different bitrates: 10, 20, and 30Mbps.
At 10Mbps, the quality of the footage was much better than I expected. The difference in quality was noticeable, especially between 10 and 30Mbps, but not so much that it was like night and day. If anything, it was more like sunrise and dawn.
After seeing all the footage and comparing, I’ve made the realization that 10Mbps is more than plenty. Recording at a lower bitrate keeps file sizes down, without sacrificing too much quality.
I compared two of the videos, which were both twenty minutes long and recorded with the same settings, except the target bitrate. The 10Mbps video had a file size of 1.41GB, while the 30Mbps video was more than twice as big at 4.21GB. Sure, the 30Mbps video may look slightly better, but the difference in quality doesn’t warrant the massive file size, especially in the long-term as video game files accrue on your hard drive.
I recommend starting at 10Mbps, and, if you feel like it lacks quality, make incremental changes until you find the sweet spot. YouTube recommends a bitrate of between 8 and 12Mbps for uploading 1080p files. There’s no need to record video with a bitrate of 30Mbps if you’re only going to downscale the bitrate to 10Mbps when you export to YouTube.
Another bitrate-related setting worth considering is whether to choose between constant bitrate (CBR) or variable bitrate (VBR) encoding under the Rate Control Method setting. Constant bitrate is more stable, but according to Encoding.com, it “limits the image quality in most cases.” However, variable bitrate encoding “allocates a higher bitrate to the more complex segments of media files and lower bitrates to the simple segments.”
Resolution and Framerate
For resolution, I tend to record at 1080p because it’s the standard these days. If your PC struggles with gaming and recording simultaneously, it might be better to step down the recording resolution to 720p. Those with beefy PCs may want to record at 4K, but that’s unnecessary unless the game is being played at 4K resolution.
Even then, recording, editing, and uploading 4K footage is a different beast altogether, and, in my opinion, it’s just not worth it. The percentage of people who can watch 4K footage is growing every year, but it’s still a smaller audience compared to 1080p.
Regarding framerate, you may have heard that 24fps is the standard for cinema because it more closely resembles how the human eye perceives motion, and I agree, but recording game footage is different.
The gold standard for PC games, these days, is 60fps, though PC gaming snobs will tell you that number is closer to 144fps. The truth is that the human eye stops noticing after a certain framerate, and 60fps provides just enough frames per second to make gameplay appear silky, buttery smooth.
When you’re recording game footage, go with 60fps if you’re playing a game at 60fps. If anything, you can always insert the 60fps recorded video into a 24 or 30fps editing timeline, but make sure you don’t accidentally slow down the footage. And, if your computer struggles with playing and recording at 60fps, change some stuff around or lower the recording framerate to match gameplay.
I recorded the Hyper Scape gameplay above at 1080p 60fps, and I exported with the same settings. With a higher framerate, the gameplay looked smooth, even when running, sliding, shooting, and jumping. Setting the framerate lower would’ve created too much blur, which would’ve resulted in blurry, choppy video. You’ll notice that there are some dropped frames in the video, but that’s because the game is in beta still and had nothing to do with the recording process.
Streaming to Twitch via OBS
Setting up a basic stream won’t take long if you’ve already set up a recording scene in OBS. Follow the steps above to create a scene and add sources. Everything is the same except, instead of hitting the record button, you’ll click on the Start Streaming button.
Before you start streaming, you’ll need to create an account on Twitch and create a profile. Once you’re done, head back to OBS and open up the Settings menu to link Twitch to OBS. In the Settings menu, open up the Stream tab, and select Twitch in the Service dropdown. Back on Twitch, open the Creator Dashboard and click on Channel, which is located under preferences. There, you’ll find your stream key, which you’ll need to copy/paste into the Stream Key box in the Stream tab of the OBS settings menu.
The stream key connects OBS directly to your Twitch account, so when you click on Start Streaming, your scene on OBS will appear on Twitch.

Open the Stream tab, select Twitch then copy and paste your Stream Key into the box.
What You Need to Know About Bitrate for Twitch
There are not as many settings to tweak on OBS when it comes to streaming, but you’ll want to pay attention to bitrate. Twitch recommends not exceeding 6000Kbps because it’s too high and may prevent viewers with slower internet connections from watching your stream. Rather than alienating viewers, it’s best to set a lower bitrate.
Twitch says that for non-gaming channels streaming with a resolution of 720p, it’s possible to set a bitrate of 1500Kbps without impacting image quality. To stream games at 1080p, however, Twitch suggests setting the bitrate starting at 4500Kpbs, but you can increase the bitrate, if necessary, to improve video quality.
Something else you should know about bitrate is whether to set the rate control method to constant bitrate or variable bitrate. Twitch recommends using CBR, which, as the name suggests, maintains a constant bitrate throughout the stream. Twitch says that setting a variable bitrate drops the image quality during slower portions of the stream, such as when the game is paused. In the end, selecting the rate control method is up to you, but Twitch knows what they’re talking about. It is, after all, their platform.

According to Twitch, setting a variable bitrate will drop the image quality of your game.
To change the bitrate and rate control method, head to the Output tab of the Settings menu and click on the Streaming tab. Select the Advanced option in Output Mode to specify bitrate and rate control.
Stay tuned in the coming weeks for a deep dive into streaming. We’ll go over PC hardware for an ideal stream, accessories, and how to improve on a basic stream.
Download OBS and Record
Recording gameplay and using OBS is nothing too hard, but the best way to learn is by doing. Play around with the software and record any gameplay. You’ll eventually settle on the ideal setup for your system. Remember, you don’t need the best PC on the market to start recording video game footage, but there’s always room for improvement.
If you feel like your computer could use an upgrade to record and play video games, maybe it’s time to start looking at parts. You don’t have to build a new PC to record video game footage, but a new CPU or more RAM can’t hurt. Check out our PC parts guide to get up to speed on the latest hardware.
As you accumulate video game recordings, you’ll want to edit the videos and upload them to YouTube. It’s only natural. But instead of relying on the game’s audio, why not set a music track in the background to set the tone? PremiumBeat has a ton of royalty-free music for all kinds of creators and projects — we even have a playlist created specifically for video game content.
Cover image via Gorodenkoff.