Building The Ultimate Budget Mobile Camera Setup
Turn any mobile phone into a professional-grade camera with these essential (and affordable) tools and gear.
Phone cameras seem to improve every year, and while they won’t replace dedicated cameras completely, there is no denying how powerful and convenient they can be. With features like slow motion, time lapses, and 4k ready at any moment, your phone is ideal for recording something quickly. Still, phones are lacking in the videography department.
Although most modern phones are equipped with a microphone, stabilization, and possibly a zoom lens, there is always room to improve. For example, while a phone’s microphone is fine for talking or shouting voice commands, the microphone on the phone can’t compete with the quality of a dedicated microphone.
And with some phones using digital zoom instead of a proper telephoto lens, an external zoom lens could do wonders. Additional gear will extract the ultimate performance from your phone, especially if it’s a few years old and is missing some bells and whistles. With some help from relatively affordable gear, you can turn your phone into a portable videography powerhouse.
Cage or clamp: Moment Mobile Filmmaker Cage
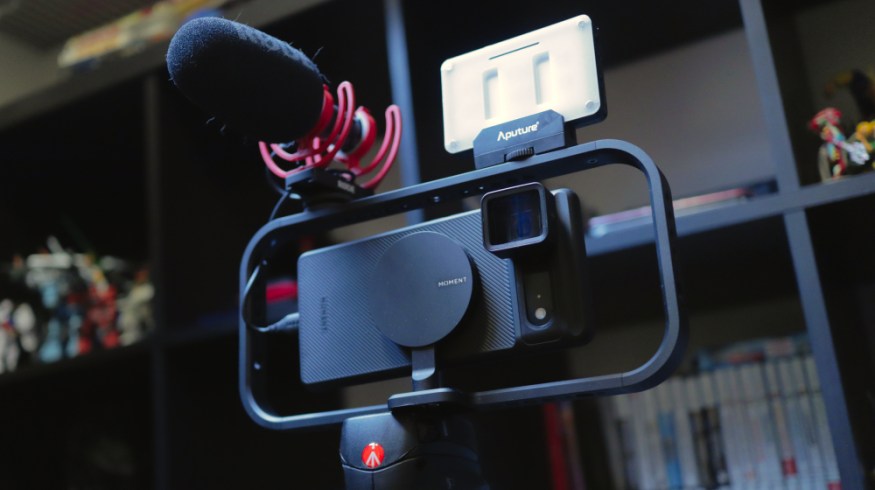
Unlike DSLRs or mirrorless cameras, phones don’t have the luxury of cold-shoe mounts for attaching gear. So if you want to use most of the equipment listed below, getting a proper cage or mounting device is a top priority. I recently got Moment’s Mobile Filmmaker Cage, which I recommend. The cage uses MagSage to attach the phone, and it’s wide enough to use the edges as handles for steady shots. If you don’t have an iPhone, you can still use the cage with a MagSafe-compatible case, like Moment’s Pixel 6 (M)Force case.
These MagSafe-compatible cases are available for other Google, Samsung, and OnePlus phones. Alternatively, the circular (M)Force magnet on the cage can be replaced with a phone clamp bearing a 1/4″ -20 thread. Buying a clamp instead of a compatible cage is the cheaper option, though you’d be missing out on the convenience of the magnet.

Moment’s cage has two cold-shoe mounts for microphones and on-camera lights, 28 1/4″ -20 mounts, and 4 3/8″ -16 mounts. You can add a top handle via the threaded holes, which is excellent for low shoots and run-and-gun scenarios. Side handles are also an option, though a bit overkill since the cage already has handles.
You can also mount the cage on any tripod thanks to the threaded holes on the bottom. The width of the cage’s base means it can also stand on its own.
The one downside of Moment’s cage is the price: $120 ($100 on sale). And if you don’t have an iPhone, it’s at least another $50 for an (M)Force case.
For a more affordable alternative, look to Smallrig. You can find several cage and clamp options from Smallrig for around $50. I own quite a few Smallrig accessories and can vouch for their quality. Finally, if you’re after the most budget-friendly option, Neewer has a plastic cage for only $10.
Microphone: VideoMic Go II
I probably don’t need to say this, but the microphone on your phone is trash for shooting video. What you need is a shotgun microphone.
Here’s why: they’re easy to set up and use. I recently reviewed the VideoMic Go II, and the TLDR version is this: Rode’s $100 microphone is highly versatile and a great addition to any budget setup.
The apps are why this microphone is a solid choice. You get accurate sound from a decent distance thanks to the microphone’s directional pickup pattern and high sensitivity. It’s also a reasonably quiet microphone with a self-noise rating of 15dBa, meaning you won’t pick a lot of static unless you’re recording with a high gain level. This microphone has a 3.5mm TRS port to which you can connect a pair of monitors to check audio levels.
You can also hook up your phone to the microphone via the USB-C port, which powers the microphone and allows you to adjust settings on Rode’s mobile apps. You can change settings via the app, such as gain, and apply features like a high-pass filter, high-frequency boost, or a -20dB pad.
If you want these features to work with any recording app on your phone, like the stock camera app, download Rode Connect. Rode Reporter only applies these settings while on the app.

Apart from the VideoMic Go II, I recommend Deity’s V-Mic D4 Duo ($49 on sale). The smaller microphone is half the price and has a unique dual-microphone setup that can record from both ends. You can capture audio from the front or both ends by toggling a switch. If you shoot a lot of interviews, this is an excellent choice at an affordable price.
Depending on your needs, other microphone options, such as lavalier and wireless microphones, might be better. In that case, Deity’s Pocket Wireless Microphones and Smallrig’s W60 ($200) offer wireless transmitter and receiver microphones.
You can connect wired lavalier microphones to the transmitters if you prefer. Additionally, wireless Bluetooth microphones, like the Razer Seiren BT I reviewed earlier this year, beam audio directly to your phone and are small enough to hide anywhere.
On-camera light: Aputure Amaran AL-MX
I’ve talked a lot about the Aputure Amaran AL-M9 ($30) on this site because it’s incredibly cheap for what it offers and it’s reliable. The small, rectangular light is bright at a close-to-medium distance with nine brightness levels.
The 5500k color temperature outputs a neutral light suitable for most settings, though it’s bundled with blue and orange gel filters that can alter the color temperature. The one drawback of the AL-M9 is the battery life, 1.5 hours at max brightness. But with a price of only $30, it’s easily forgiven for the low battery power.
While the Al-M9 is excellent for the money, its bigger sibling, the AL-MX, is the better pick. It’s bigger, much brighter, and has five built-in color temperature presets. It’s also three times more expensive ($90). If you want a stylized look, the AL-MC ($90) has adjustable RGB LEDs that can output any color you want.
Moving on from Aputure, the Lume Cube Panel Mini ($70) or the Godox C5R Knowled RGB ($90) are other options. For a compact, cube-shaped light, Joby’s Beamo LED ($90) and LumeCube’s 2.0 Portable LED ($90) light are great if you want a lighter setup.
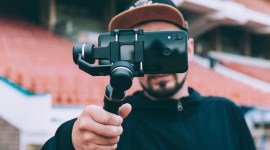
Stabilizer gimbal: Osmo Mobile 6
DJI practically created the smartphone gimbal, and they’ve been perfecting it ever since. The latest iteration, the $160 Osmo Mobile 6, makes minor improvements on last year’s model. Though the Osmo Mobile 5, which I reviewed back in 2021, was already excellent, the OM 6 adds a side wheel to adjust focus and zoom and a status panel for checking the battery and current mode.

The OM 6 is the ultimate Osmo Mobile experience, but the OM 5 is nearly identical and more affordable. Whichever you pick, both of them include a detachable tripod base perfect for talking head videos and solo recording. Both of them also collapse to a compact shape, making it easier to stow in smaller camera bags or even your pocket.
When I wrote a guide to smartphone gimbals two years ago, I recommended two of Zhiyun’s gimbals. The Zhiyun Smooth-X was one of them. This gimbal is more limited than the others, sporting a 2-axis, rather than 3-axis, stabilization. The upside is that it’s under $100, with a small profile and concealed telescoping rod for selfies or vlogging. Finally, there is the Zhiyun Smooth 5, a gimbal that gives the OM 6 a run for its money.
Lens: Moment Blue Flare Anamorphic
With higher-end phones packing a three-camera array, a lens seems like the last thing you need. The iPhone 14 Pro, for example, has a 48MP primary camera, a 2x telephoto lens, and an ultrawide lens. That covers you for pretty much anything, but the right external lens can still be beneficial.
If your phone is already equipped with ultrawide and telephoto lenses, you can pick up a fisheye, macro, or anamorphic lens. Each of these lenses will alter the image in a specific way.

I recently picked up Moment’s 1.33x blue flare anamorphic lens, and it’s incredible. Yes, lens flare is cool, but the wider aspect ratio will give you that cinematic look you’re looking for. The one downside is the extra work involved with using an anamorphic lens since the image will appear squeezed until you stretch it out.
Other than that, however, I’ve had a blast using this lens. The blue flare anamorphic lens from Moment will run you $150, though it’s often on sale for $100. Moment’s gold flare anamorphic lens is more expensive at $150 ($140 on sale). The latter is better if you’re aiming for a warmer tone.

Moment also offers fisheye and macro lenses and lens filter adapters for applying CPL or ND filters to your lens—ND filters are a lifesaver in the daytime and outdoor shooting. But if you’re looking for an affordable alternative, Smallrig’s 1.55x anamorphic is a good pick. The lens can attach via Smallrig’s mobile video cage or with a clamp. However, Moment’s lenses require an (M)Force case.
Camera app
Unless you’re snapping a quick video, you should use a professional video recording app on your phone. FiLMiC Pro is the app that immediately comes up. The hype is deserved. It offers virtually every feature you could want from a phone camera, and it’s been used to shoot entire films like Sean Baker’s Tangerine.
The reason it’s hard to recommend it is that the merger of FiLMiC and Bending Spoons has brought about a significant change to the business model. Instead of a one-time fee to use the app, users will soon have to pay up to $4.99 per week to access the base app, with additional features locked behind more paywalls.
The price change is a big hit to the mobile filmmaker scene, especially since so many had become accustomed to the app’s ways.
It’s not all bad news, though. For example, Beastgrip’s Beastcam Pro app costs $2 (one-time fee) and has many features for getting the most out of your camera. Moment’s Pro Camera app ($7) is another option with built-in anamorphic support that stretches footage to the correct aspect ratio as you’re recording.
However, those are iPhone-only options, of which there are many more. Android users don’t have it as well.

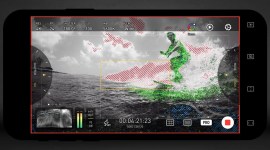
One app that is available for both iPhones and Android phones is Protake. It’s free to use the app, but the pro features are locked behind a $20 per year subscription. After using the app for the past month, I don’t regret paying for it since I get everything I need.
Though I initially bought it for the 1.33x anamorphic support, I’ve come to rely on the zebra lines, focus peaking for manual focus, manual shutter angle control, manual white balance, and shooting in Log C. I can even monitor my audio levels and keep an eye on waveforms. There’s no way I’m using the Pixel 6’s camera app again to shoot video.
Get the most out of your phone.
Speaking from personal experience, I’ve been gravitating more toward my Pixel 6 because it’s better at certain things than my mirrorless. The Pixel 6 has built-in stabilization, a crisp 4k sensor, and better battery life than my mirrorless camera.
And, now that I have a cage, setting everything up is so much easier. Adding an anamorphic lens gives me more options, like if I want to shoot cinematic b-roll (cue the Chill Study playlist) or pretend I’m doing an episode of Star Trek: Discovery.
For more on mobile filmmaking, check out these articles:
The Best Mobile Filmmaking Gear for Making Videos on Your Phone
The Top Mobile Editing Tools for Filmmakers on the Go
A Look at Vimeo’s Mobile Shooting and Editing App
Lighting in a Pinch: Five Tricks Using Your Mobile Phone