Improve Your Masks with Hue, Saturation, and Luminance Qualifiers
In this article, we take a look at the basics of HSL qualifying and keying — and how to incorporate it into your next masking job.
Masking is one of the fundamentals of video editing, but masks used in isolation have a lot of drawbacks and limitations. The most efficient way to improve the quality of any mask is by using hue, saturation, and luminance qualifiers.
In this article, we’ll cover the basics of HSL qualifying and keying, and we’ll take a look at how to incorporate it into your next masking job.
HSL Qualifying and Keying
One of the most common ways to select specific regions of a frame in a video is by using the hue, saturation, and luminance qualifiers. Different programs lay these tools out differently, but the functionality is mostly the same across the platforms. You simply specify in and out ranges for the hue, saturation, and luminance values of the parts of the footage you want to adjust.
The best way I’ve found to approach a shot is to determine if the area I want to select stands out due to color, intensity, or brightness. Once I’ve made this determination, I apply similar logic to each of the three sliders in order:
- What color/color range is the area I want to select?
- How intense are those colors?
- How bright or dark is the region?
Or you could just use the eyedropper . . . but you learn more doing it manually!
Using HSL Qualifiers to Make Better Masks
We’re going to look at example scenarios from four movies. In each, I’ll take you through some methods for changing selected parts of the frame.

Image via Ant-Man (Disney).
Let’s pretend that after the completion of principal photography for Ant-Man, Baskin Robbins undergoes an extensive rebrand, shifting its brand color from purple to bright red — and they want the movie to reflect this update.
Rather than relying on expensive reshoots, our imaginary post-production team must make the change. Luckily, it should be a pretty quick and easy one.
Analysis
Using only the HSL qualifiers, adjusting the purple to another color should be no problem at all.
Process
To change all of the shot’s purple to red, we’re navigating back to the Lumetri Color panel and into the HSL/Secondary tab. Rather than manual selection, this time we’re using the eyedropper tool to select an area that looks the most representative of the color we want to change in the shot.

After a few tweaks to the HSL values, we’ve got a good selection on the purple in the shot.

Now we simply push the purple to red. To enhance my results, I am using the three-way color wheels to adjust shadows, mid-tones, and highlights.

And just like that, I think we’re done.
Let’s take a look at using HSL qualifiers in conjunction with masks.
HSL + Mask

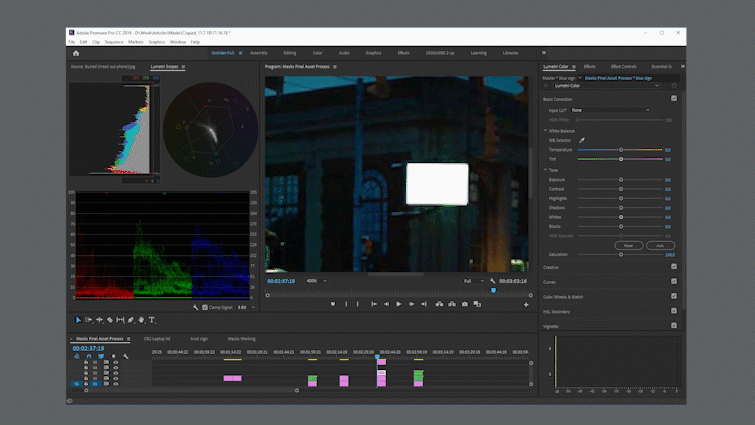
Image via Buried (Lionsgate).
Our next still is from the 2010 film, Buried. I am going to illustrate the process of removing the phone and (hopefully) any trace that it was there in the first place.
Analysis

Beyond the phone itself, we are going to have to deal with the strong blue light from the illuminated screen. This could prove a bit tricky since the light from the phone is the key light for this shot.
Process
When removing an object from a shot, the first step is usually duplicating the clip you’re working on. This offers you a fair degree of flexibility and saves time when masking objects using only your editing software.

After we’ve duplicated this shot, we will create a rectangle mask under the opacity controls and then adjust and rotate it to roughly fit the outline of the phone. We will create four new points between each of the existing ones, and then we’ll adjust the bezier to match the curvature of the phone.

Now that our mask is set, we will select the bottom clip and reposition and resize an area of the sand that can replace the hole left by the phone.
All that’s left before dealing with the light cast by the phone is to adjust the feather and mask expansion sliders to hide the parts of the sand illuminated by the phone.

Inside of the HSL/Secondary tab, I will use the qualifiers to select blue highlights.

When we’ve got a good selection, we’re just making some small tweaks to the color balance to find a tone that closely matches the rest of the character’s skin tones.
I increased the sharpness on the character’s face to draw the eye away from the patched-out phone.

A keen eye can spot the work, but for the average viewer, this should be more than adequate.
Qualifying with a Single Channel
Image via Casino Royale (Sony).
Let’s take a cinematic hop into the world of James Bond, where we’ve got another product sponsorship!
Let’s pretend Sony wanted to distance itself from the Vaio line and wants the logo removed from this shot.
Analysis
The logo is in the middle of a laptop hood that is entirely black — or, at least, would be acceptable visually as entirely black if we needed to make it that way. Thanks to this detail, removing the logo is going to be a breeze.
Process

First, we’re duplicating the video before enabling a rectangle mask in the opacity section of the second video’s effect controls. After we’ve aligned the points with the corners of the laptop, we’re headed back to the HSL panel in Lumetri.

We’re selecting for the white because it has a more consistent luminance than the black of the laptop lid. For this reason, we are going to disable the hue and saturation qualifiers and select with the luminance qualifier only. After selecting, I am adjusting levels to further crush the shadows and pull the highlights down as low as possible.

Once we have a good selection, we simply align the cropped lid with the one bearing the logo. From here, we drop all of the levels, de-saturate, and de-sharpen the selected Vaio logo until it blends with the black lid indistinguishably.

To blend the mask into this shot a little more, I’m shrinking the mask expansion and raising the mask feather by the same amount.

That’ll do!
Masking with HSL and Color Mattes

Image via The Place Beyond the Pines (Focus Features).
Let’s say that the bank in this still from The Place Beyond the Pines refused to sign a location release, so the post team needs to swap the logo out for something cleared for release.
Analysis

This shot is really moody, with strong contrast between the illuminated sign and its surroundings. This separation should help to isolate the sign, but it could present problems as we work to blend the replacement with the rest of the image.
Process

As usual, we’ve duplicated our video and masked out the sign. I scaled our isolated sign up a bit to help separate it a little more.
I’m going to need to create a new sign to replace the one in the shot, so I zoomed the viewer in to 400 percent and measured the sign at 3×2 centimeters. 3×2 aspect ratio — easy!

From here, we just create a new color matte, setting its dimensions at 300×200 and giving it a light teal hue before scaling and positioning over the sign.
We’ve got a logo that is cleared for use in the film, so we bring the .png into the shot and adjust its position and perspective to match the original sign’s. Once we’re happy with the results, nest the color matte and replacement logo to make final tweaks to blend the new sign into the original shot.
For this shot, I changed the opacity blend mode to “Screen” and lowered the opacity to 55 percent.
While this is probably passable in its current form, it’s lacking a bit of the authenticity of the original. I think that adding the dark regions from the dead florescent bulbs in the original sign (as well as tweaking the glow of the sign) will really help sell the change.

For the fluorescent bulbs, I brought the original cropped sign in for reference before adding two layers of a color matte that I thought matched the sign most closely. After that, I just applied opacity masks to both and arranged them in roughly the same position as the original frame, adjusting the feathering to sell the look.
For the glow, I duplicated the same color matte, size, and position before adjusting the feathering until I felt like our fake sign was interacting with the original shot a little bit more.

I could probably get this a little closer with a bit more tweaking, but I can safely report back to the post team that this method is going to work.
Next time you’ve got a big change to make to your footage in post-production, don’t fear! Combining masks with HSL selections cleverly can save you hours over many of the less efficient alternatives at your disposal.
Looking for more post-production tips and tricks? Check out these articles.