
How to Properly Pancake Timelines in Adobe Premiere Pro

This tutorial will take a look at how to set up a custom workspace in Premiere Pro that will significantly speed up our post work.
Depending on the kind of content you create, sometimes you will find yourself with hours of raw footage, from which you have to pull good takes. If this is the case, loading individual clips into Adobe Premiere Pro’s Source Monitor can be tedious. And once you find those good takes, how do you keep everything organized? Never fear — the pancake technique is here.
Pancake Timeline was a term first coined by Vashi Nedomansky, ACE, of Vashi Visuals. The method derives its name from the vertical stacking of timelines within the interface. Stacking timelines will not only speed up your workflow, but it will also help you keep a bird’s-eye view on everything. Let’s take a closer look at how to use this technique to quickly sort through a project’s raw footage.
How to Edit in Pancake Mode
1. Prepare the Sequences

In the first step, I’ll prepare two sequences — one titled Raw Footage and the other Rough Cut V1. Next, I’ll open up the Raw Footage sequence and drag all of my clips in.
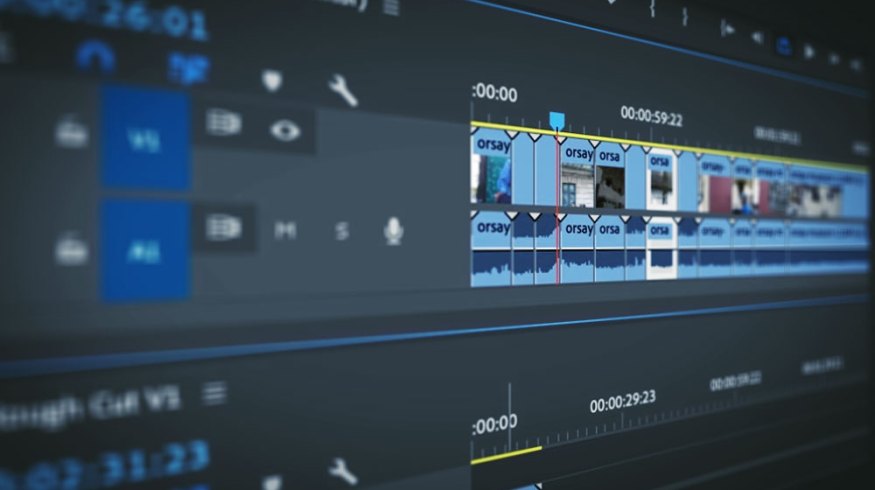
2. Open the Source Timeline

The key to making the pancake method work is to open up the source material, in its own timeline. To do this, I’ll drag the Raw Footage sequence from the Project Panel to the Source Panel. Once loaded, I’ll click on the Source Monitor’s wrench icon and select “Open Sequence” in timeline. Now, I can see “(Source Monitor)” in the name of my Raw Footage sequence. The current time indicator has also turned red, instead of the standard blue.
3. Stack the Timelines

Now, it’s time to pancake the timelines. I’ll grab the tab of the Raw Footage sequence and drag it around, inside of the frame, until the top of the panel turns purple, then I’ll release it. Now the source sequence is on top of my Rough Cut V1.
4. Editing from Timeline to Timeline

With my sequences stacked, I can now bring clips easily from the Raw Footage sequence into my Rough Cut sequence, via a simple drag and drop. To perform insert and overwrite edits, I can deactivate Insert and Overwrite Sequences as Nests or Individual Clips. Once deselected, I can add in and out points in the Source Monitor, or directly on my Raw Footage timeline, then perform insert and overwrite edits to the rough cut.
Reasons to Use This Technique
The pancake technique isn’t just for pulling good takes from raw footage. Let’s say, for example, you’re creating a demo reel. You open up multiple Premiere Projects at the same time, pancaking three to four timelines from varying projects. Then, you can quickly shuttle through numerous source sequences to pull clips for your reel. This technique will also be quite useful for sporting event highlights. Whatever the case, pancaking timelines is a powerful skill set to add to your Premiere Pro tool belt.
Looking for more video tutorials? Check these out.
- Video Tutorial: Determining The Best Lens for Your Project
- Tutorial: Removing Audio Pops and Recording Audio Differently
- How to Change the Color of Exterior Lights in After Effects
- Video Tutorial: Harness the Power of Presets in Adobe After Effects
- Changing the Audio Editing Game with PremiumBeat’s Track Stems


