Tutorial: Removing Audio Pops and Recording Audio Differently

Need to eliminate (and prevent) popping sounds in your audio track? We’ll show you how in this video tutorial.
You’re editing a life-changing documentary narrated by an incredible voice actor; the poetic dialogue flows effortlessly over cinematic B-roll, stimulating every one of your film editing senses. The scene plays out like an Oscar-winning masterpiece until . . . a loud popping sound from the voiceover interrupts everything. If you know what I’m talking about, then you’ve heard it before. These pops are an editor’s nightmare, so we’re going to show you how to get rid of (and avoid) them.
In this tutorial, I’ve divided my solutions into two sections: on set and post-production.
On Set
Dead Cats and Pop Filters

For those of you recording audio on set without a wind diffuser, like a dead cat or a pop filter, stop what you’re doing and go pick one up. These will save your audio and (most likely) your film! Placing screens in front of or on your mic will diffuse any strong winds or hard pops.
When recording voiceovers, I recommend situating a pop filter in front of your microphone, and when recording on set with a boom or shotgun mic, I suggest picking up a dead cat or a windsock.
The Shirt off Your Back

If times are tough and you can’t access a professional diffuser, then I recommend using your shirt. Yes, your shirt. This is a dynamite hack that has saved my skin multiple times. You lift the front of your shirt so that it covers your mouth and acts as a barrier between you and your microphone.
Turn Your Head

When recording voiceovers, hard pops and wind sounds come from — you guessed it — your mouth. By angling your mouth away from the microphone, your exhalations will not hit the microphone’s sensors.
In Post-Production
The Inverted Mountain
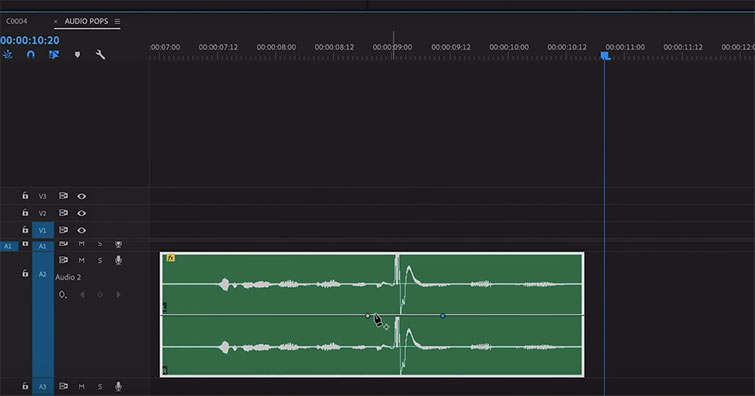
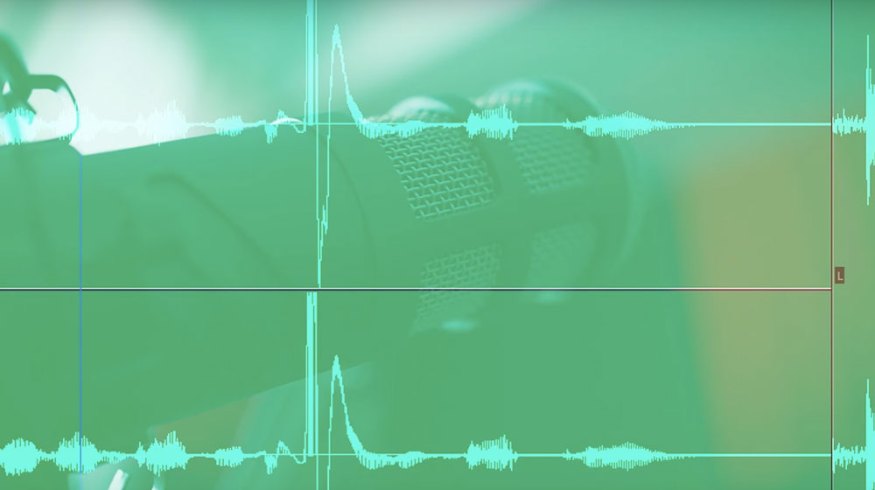
If you’ve recorded a hard popping sound, the waveform will display a significant peak in the audio track. To remove this, create a three-point keyframe fade that looks like an inverted mountain.
Create the first point just before the pop, the second during the peak, and the third shortly after.
In the second keyframe, fade the audio out to -50DB — this will eliminate any harsh peaking.
Fewer Effects = More Effective

Sometimes audio pops result from over-processing bass-heavy files. For example, if I apply a cinematic boom effect, then reverse it and add some reverb, chances are it will pop. This happens because my editing software is processing a lot of data in one clip. The best solution is to strip away some of the effects and add a subtle fade. Yes, you heard me — apply a fade effect. This will ease your software into the clip and make it much more digestible for playback.
Interested in the tracks we used to make this video?
- “Violet Letter” by Aulx Studio
- “Something in the Light” by Oliver Lyu
- “The Portal” by Origami Pigeon
Looking for more video production tutorials? Check these out.
- How to Change the Color of Exterior Lights in After Effects
- Video Tutorial: Harness the Power of Presets in Adobe After Effects
- Changing the Audio Editing Game with PremiumBeat’s Track Stems
- DaVinci Resolve 15 Video Crash Course — Working with Audio on The Edit Page
- Video Tutorial: Which Microphone Should You Use?