

Simple Photo/Video Light Setups for Cinematic Looks

Most DPs are trained early on in their careers to learn the basics of a three point lighting setup. However, in this post I’ll make a case for why reducing your lighting setup can actually be more conducive to a cinematic look.
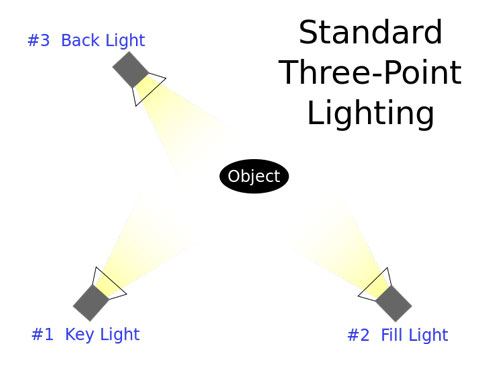
For any of you that don’t know how a typical three point lighting setup is executed, let’s get that out of the way first. The general idea is that three lights of varying intensities are used to give exposure to the talent and separate them from the background in a way that is pleasing to the eye. Typically a three point lighting setup will involve one key light that is set to a 45 degree angle away from the talent, a fill light (which is softer and not as bright) on the exact opposite side of the key to help fill in shadows on one side of the face (caused by the key), and a small rim light positioned above and behind the talent, hitting the back of their head to give a glow around their hair.
This type of setup is pretty well guaranteed to create an evenly lit shot. As long as the right lights are chosen and they are positioned in the right way, the final product will inevitably have shadows in the right places, and be three dimensional enough to pop out of the screen.
While this is all well and good, it doesn’t necessarily translate to a cinematic image. For the vast majority of cinematic work I would personally recommend staying away from a three point lighting setup, unless it is truly the best option for your scene.
Here’s what a traditional three point setup might look like on an actors face:
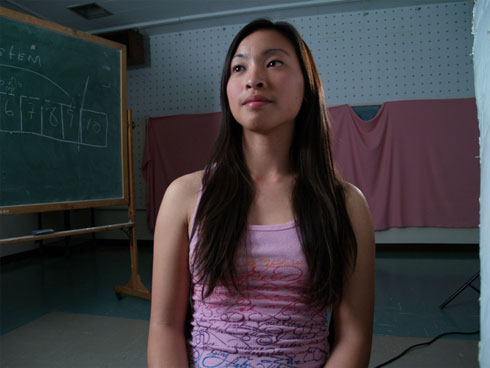
Image from Wikipedia
A three point setup doesn’t typically create a moody enough image for many genres of film. Not to mention the fact that the lights are so intricately placed and are nearly always set up in the exact same fashion (and using the same lighting ratios), means everything can start to blend together and look really similar. For this reason, especially for dramatic and genre based content which requires more of an edge stylistically.
So how do we get a moodier and more dramatic look? Well the good news is, it actually requires one less light on average than any given three point lighting setup. Drama is all about shadows and contrast, both metaphorically and in the visual sense. Watch any dramatic film and notice how defined the shadow areas of the image are. Then compare it to a sitcom for instance, which will have flat and unnaturally even lighting on everyone. This is clearly a very extreme comparison, but hopefully it helps to illustrate the point that the flatter the lighting, the less cinematic. This is why using one less light in your three point setup could actually help make your images far more filmic.
The next question that I’m sure many of you have is “which light to remove”? Again there is no exact rule or science to this and you will generally want to use your judgement, but nine times out of ten it’s the fill light that you want to remove (assuming we are referring to the three point setup described earlier). Rather than having a well crafted image that is using a fill light to brighten up the shadows, we want to eliminate that fill light to bring back those defined shadows. This creates more contrast in the image and generally just makes it more pleasing to look at. The key light of course is still illuminating the face from one side, and the rim light is still helping to separate the talent from the background, but now without the fill light in place the image becomes much more three dimensional and rich.
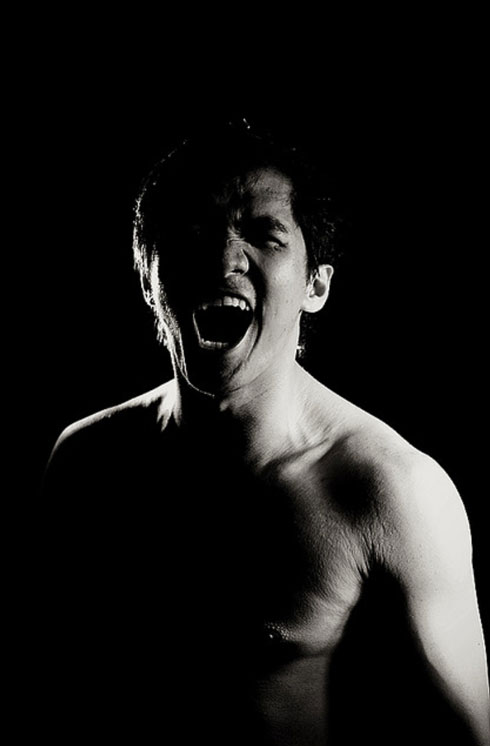
Image example from DJ Dark on DeviantArt
In more complex setups you may want to add more lights to the scene to accent certain parts of the set or possibly to illuminate the background, but even still the main lighting on your talent will likely follow the general principle outlined above. That said, there is another variation of a two point lighting setup that I find works well in many cases, and it actually involves just one light.
The idea in this case is to use a bright light source as your backlight and then bounce that light back onto the talent from one side or another. So you might have a 650w tungsten lamp behind the talent, giving them a nice hair light and separating them from the background, and then a white card or bounce board can be used in front of the talents face (usually off to one side) to give back some detail to the face. This type of lighting can be really dramatic and works well for more of an ultra stylized look, if that’s what you’re after:

Film is all about contrast, and in order to get contrast you need both light and dark spots on your image and talent. To do this you need to avoid over lighting your scene which can run the risk of making your image flat and lifeless.


