SnorriCam: When to Use One and How to Make a Rig
Shooting with a SnorriCam creates a wildly disorienting point of view and a skewed perspective that immediately grabs the audience’s attention. Let’s explore the rig and look at how you can make your own.
Cover image via Warner Bros.
With the advent of consumer action cameras such as the GoPro and Sony Action Cam, first-person perspective shots have only increased in popularity. They’re popping up in feature films, extreme sports, YouTube video, commercials — it’s a very popular trend.
Like all filmmaking techniques, there is, of course, an opposite to the fixed first-person perspective shot. While the shot itself doesn’t have a specific term, it commonly goes by the name of the device that makes it possible: SnorriCam, which is just the principle name for a chest cam or body mount.
The History of the SnorriCam
You’ve undoubtedly seen this shot many times in cinema, TV, and music videos. First created by two Icelandic photographers (Einar Snorri and Eiður Snorri, hence the name), the SnorriCam is a device that mounts the camera to the body of an actor. The camera, in more or less all circumstances, faces the actor.
It creates a fascinating visual effect. The perspective of the entire scene constantly changes, while the actor always remains in the same fixed position in the center of the frame. The world literally rotates around the actor.
The shot is very jarring and ultimately can’t be used for that long because of the following:
- It can disorientate the audience (much like overuse of shaky cam).
- Like a zoom in, the camera draws attention to itself, taking the audience out of the story.
Pick the Right Time to Use It
 Image via Sony
So, if the shot itself can cause disorientation, when is it best put to use? Well, it would be when the character is in some state of bafflement, whether that be due to illness, drugs, confusion, or injury. The technique, if used for a brief moment, can immediately bring the audience into the character’s disorientated state of reality.
Recognize Its Strengths and Weaknesses

Image via Protozoa Pictures
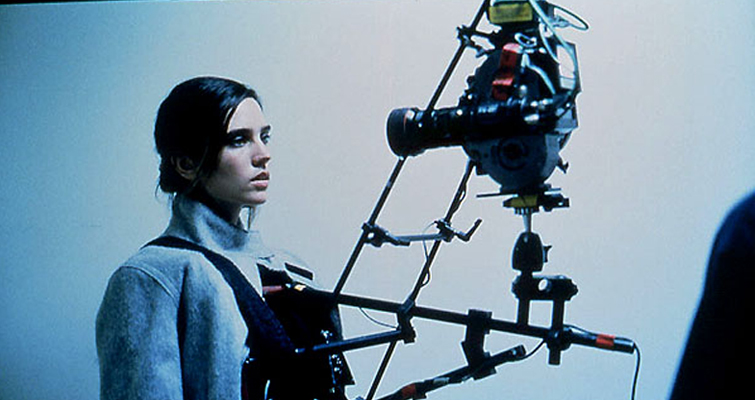
Much like most of the filmmaking equipment before the DSLR revolution, a body mount was incredibly expensive and quite strenuous for an actor to wear. Take the above behind-the-scenes still from Requiem for a Dream by Darren Aronofsky. Jennifer Connolly is wearing a sizable rig with a 16mm camera attached.
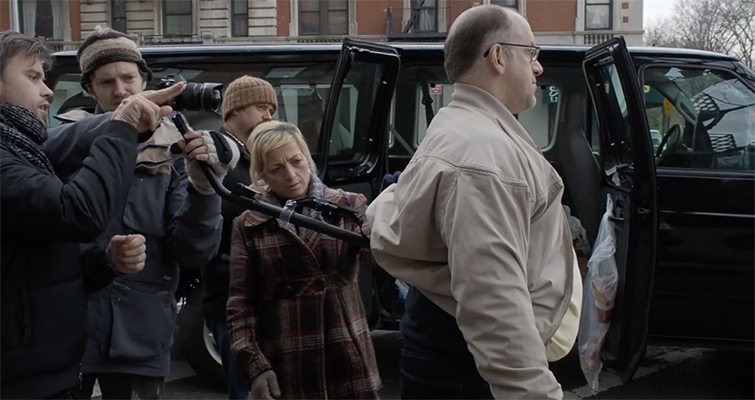
Compare that image to the one at the very top of this article, a behind-the-scenes shot from the CW TV show Arrow. Actor Stephen Amell is wearing a SnorriCam mounted with a Blackmagic Design Pocket Camera. It would be a safe bet to say that Amell is a lot more comfortable with that device versus the one Connolly had to wear.
Fortunately for us, with the abundant choices of pocket cinema cameras, DSLRs, and any other mirrorless camera, it’s never been a better time to create a SnorriCam with ease. All one needs is the mounting device — and thanks to YouTube, you are presented with many ways to make one (more on that below).
Understand the Equipment

Image via No Film School
These days, any small camera — like the GH4 or Blackmagic Pocket Cinema Camera — is going to work well with these DIY rigs. The lens will be the deciding factor in successfully capturing the shot. Apply too much zoom and your composition is going to consist of your actor’s eyebrows. Shoot too wide and you run the risk of having the rig enter the composition. 20mm-24mm is a safe choice for a Micro Four Thirds mount.
If you’re shooting on a full-frame DSLR, you might look at using a 30-35mm lens. If your camera is tilted toward the top of the actor’s face, or if your SnorriCam rig has a large arm which protrudes out at a sharp angle, you will have better luck using wider lenses.
It ultimately comes down to your camera’s sensor, the focal length of the lens, and the length and angle of your rigs arm. As your camera will be fixed in the same position at all times, you technically shouldn’t have to worry about focus, but I would recommend having quite a deep focus.
Tutorials for Building Your Own SnorriCam
I’ve taken the liberty of going through YouTube tutorials to pull the best demonstrations of DIY SnorriCam construction. Any of the below examples would make for a fun project.
This first one (from Indy Mogul) guides you through the process of building a SnorriCam out of wood.
Then there’s this tutorial from DIY Duke. This Snorricam is built from PVC, which might be easier for those who don’t have access to woodworking tools.
Have you used a chest-mounted device for a project before? Have you ever built your own SnorriCam? Share your experiences in the comments below!


