The Solo Operator’s Guide for Getting Perfect Wedding Shots

Shooting a wedding video on your own? Here’s how to be in the right place at the right time with the best equipment for those crucial shots.
Shooting weddings can be tough. Real tough. Especially if you are doing it solo. Unlike your typical film shoot, you can’t really ask the bride and groom to do a second take on the kiss because your ISO was at the wrong setting. Weddings take commitment, coordination, and a whole heck of a lot of planning. Let’s go over how you can prepare yourself so you can be cool, calm, and collected in a chaotic wedding environment.
The Gear You Need

One of the biggest parts of planning is making sure you have the right gear for the gig. Knowing you have the right tools for a shot you need is a huge weight off of your shoulders when it comes to showtime. Here’s my list of essentials in a camera pack:
- 2 DSLR cameras: one main, one backup. I prefer the Sony A7s as my main due to its low-light capabilities, which comes in clutch when there is no time or space to set up lights. The backup doesn’t have to be top of the line, but it’s great to have if you want a stationary shot on a tripod while still getting handheld shots with your other camera.
- Go-Pro with mounts.
- Backup batteries. All of them, charged. You can never have enough.
- SD cards. Again, you can never have enough. You do not want to run out of recording space.
- Tripod.
- Handheld stabilizer.
- Slider.
- Audio recorder.
- Camera lenses (my recommendation: a 35mm, a 50 mm, and a 70-200 mm).
- On-camera LED light.
If you need more help assembling your gear bag, check out this wedding gear article.
Scouting Your Location

Having a good grasp on your shooting location is crucial for a wedding shoot. You have your ceremony location, your cocktails location, and your reception location. All of these places offer varying degrees of lighting, size, and ambient sounds. To prepare adequately, arrive early, and go to each location if they are all available. Familiarize yourself with the layout for each of the main events — and the vantage points you’ll use. Talk to the wedding planner, and ask them to show you exactly where everything is and detail the order of the events that day.
While you’re there, form a game plan for your shots. Write down a list of shots you need for every location, and visualize a pathway to transition between positions. The best thing a wedding videographer can be is out of the way, so keep that in mind.
Pre-Wedding / B-Roll

Pre-wedding B-roll is a great way to establish your location and the aesthetic at the beginning of your video. Before the ceremony begins, walk around the venue and find things that would look great in a short clip, such as floral arrangements, surrounding scenery, and items bearing the bride’s and groom’s names. Use your 50mm lens for these shots since you will have time to focus up, prep the shot, and maybe even add a rack zoom. This is also when your slider will come in most handy. Since you are shooting mostly stationary items, sliders add depth to an ordinary shot and improve your production value.
The Processional

Now the processional is a bit tricky, since there will be a lot of moving parts. You are going to want to get a shot of the bride walking down the aisle, as you can see in the GIF above, but you are also going to want the groom’s reaction shot. That’s going to be your money shot — especially if you get the groom shedding a few tears. Everyone loves a happy, crying groom.

Image via Chip Dizárd.
Before you see both parties preparing to walk the aisle, take out your secondary camera with the 50mm lens and attach it to your tripod. Set that up at the left of the room fixed on the groom’s location — along with a few of his groomsman in the right of the frame. They won’t be on stage while you set up, so make sure you set focus on a reference item to get a clear shot.

Now it’s time to grab that stabilizer because we are now on the move! Set your camera up with your 35mm lens and attach it to your stabilizer. Set up where you see the green dot in the picture above, and set focus for the door. Now you are going to want to get shots of all the wedding party members walking in from that vantage point, but when the bride walks in, you will want to get a nice, stable shot of her entering. If you are feeling fancy, throw in a rack focus if you can pull it off.
Once she walks past you, follow the green line above and get a nice tracking shot of her walking up to the stage. Your other camera will be capturing the groom’s reaction on its own. Once the bride gets into place, it’s time to take the stabilizer off and adjust for the ceremony.
The Ceremony / Kiss

For the ceremony, you are going to want to grab your 70-200mm lens and attach it to your main camera. A zoom lens in this part of the wedding is integral; you will be moving around constantly, and it will produce a great shallow depth of field. Keep your secondary camera recording if you want to — just make sure to check on it occasionally to see if it is still rolling. One amazing safety measure you can rely on is attaching a wide-angle GoPro to the arch or floral arrangement behind the bride and groom. That way if you miss a shot with your first or second camera, you have a backup to save you in post. This technique has saved my wedding videos multiple times, and it doesn’t look too out of place.
Take your main camera with your zoom lens and start knocking out shots during the ceremony. Get some nice close-ups of the bride and groom, a medium shot down the middle of the aisle, and some shots of the parents and family watching in the crowd. Refer to your shot list, and get any shots the bride and groom specifically asked for.
Once the ceremony is coming to a close and the kiss is imminent, check on your secondary camera, then find a good vantage point for a close-up. Make sure your focus is crisp, and hold the camera steady. Be prepared for movement after the kiss, such as the couple giggling afterwards (which is adorable) or maybe the groom doing a fancy dip with his bride.
The Reception

Congratulations, you have successfully made it through the most stressful part of the day! Now, it’s time to party. Remember, this stage of the night features five events you need to capture: the announcements and speeches, the first dances, the cake cutting, the bouquet toss, and the exit. Snap on either your 35mm or 50mm lens (depending on how big the reception venue is) and attach your camera to the stabilizer. The reception usually starts off slow, so go around with the main camera and grab some shots of people talking or waving, as well as some B-roll of the reception venue.
This is when you should attach your on-camera LED to the top of your kit. You’ll never know when you will need it throughout the rest of the night, and it’s better to have it there than to have to run and grab it out of your bag.
Be ready for the bride and groom to walk in at any moment. Most of the time, they are either running late or the schedule has changed. Get a shot of them walking into the venue as the DJ announces the new couple (which you should pick up with your audio recorder). A cool shot you can get if you can get behind the couple before they walk in is a tracking shot from behind as they open the doors, that way you can get people applauding and cheering in the background.
Speeches

These are pretty simple. Set up your main camera and tripod with your 70-200mm lens directly toward the stage where the speeches will take place and start recording. The crucial part of this shot is the audio: set your audio recorder somewhere near a speaker, test the levels, and begin rolling. Since you have free hands now that your main camera is on a tripod, get out your secondary camera with your 50mm lens and record some reaction shots of the bride and groom. These can be great cutaways from the speech in your final video.
First Dances

The first dances are a great opportunity to pull out the stabilizer again. Use your main camera with a 35mm lens and prepare yourself for the action. When the bride and groom begin dancing, start getting some sweeping shots around them to add some motion. If you want to post up where there is good lighting for a minute, go right ahead! Try and get some close-ups of the couple while you are stationary; you will usually get some cute, loving gazes in there.
(Be sure to ask the bride and groom if the father-daughter or mother-son dances holds particular significance. For example, I once shot a wedding for a woman who was raised by a single father, and that dance meant a lot to her, so I was sure to be on point for those shots.)
Cake Cutting

This shot is, as one would say, a piece of cake. Grab your 50mm lens and go straight hand-held for this one. You are going to want to get some shots of the cake before the couple cuts into it, so be sure to sneak in a few shots before this part of the night approaches.
Once the couple starts cutting, get some close-ups of that knife going through the cake, because pleasing aesthetics are pleasing. After they have their slices, choose a shoulder to shoot over. Your best bet is the groom’s, since you will get better facial reactions from the bride (like the one in the GIF above). They will feed each other the cake, and if you are lucky, they will smash it into each other’s faces. What a great tradition. If the cake smashing does commence, make sure to do a quick slide back so you can get both the bride’s and groom’s reactions.
The Bouquet Toss

For the bouquet toss, you will be dealing with a large group of people, so take out the 35mm to get a wider shot. When the toss is being set up, get some shots of the crowd preparing to catch the bouquet. After that, fix your camera on the bride. Once she tosses the bouquet, track the flowers through the air all the way to the crowd. Keep your hand on the focus ring because you never know where that thing is gonna go. Once someone catches it, focus up on them, and keep the camera rolling for a minute. There’s going to be laughing, jumping, cheering . . . all the things you need for a great wedding video.
Bonus: if a child catches the bouquet, take a knee and get on their level for your shots. Their reactions are sure to be adorable.
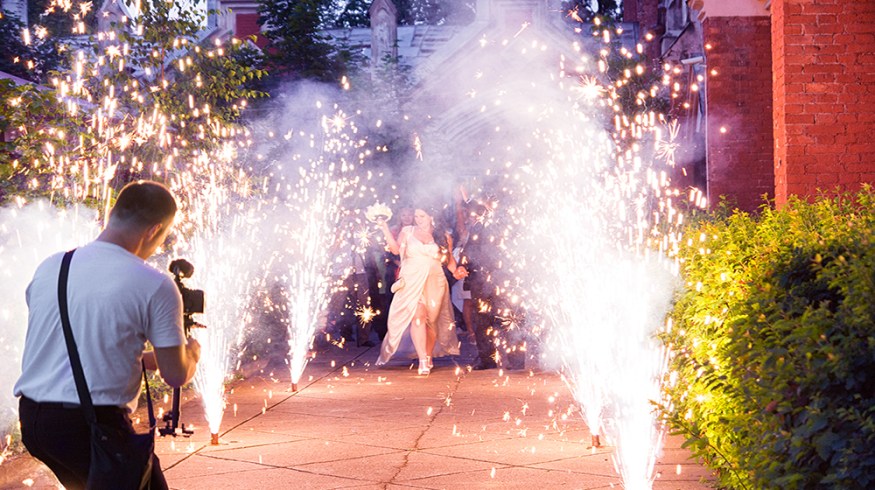
The Exit

So when the night is coming to an end, the couple will walk out of the venue through a line of people. If everyone has sparklers, perfect! They produce an awesome night light that glows really warmly, as you can see in the GIF above. If they don’t have sparklers, just turn on your LED light on top of your kit to add some fill. Attach your 35mm lens to your main camera on a stabilizer, and post up in front of the door they are leaving through. Once they exit, begin walking backwards and tracking their movements. Use the line of people to your sides to determine if you are walking in the right direction, and be sure to look back every few seconds to avoid any slips or trips. You don’t want to be that guy. Track them all the way into the car and driving away.
Phew! You finally made it through the entire day, all on your own. You’ve done the work of two people, and best of all, you get to keep all of the money! Compile all of the footage on a drive, and if you want to be extra careful, use a back-up.
If you found this article interesting, be sure to read up on the rest of our wedding video resources.