The Benefits of Storyboarding Your Next Film
Storyboarding is a commonly overlooked part of the indie filmmaking process. Here are some ways that your production can benefit from storyboarding.
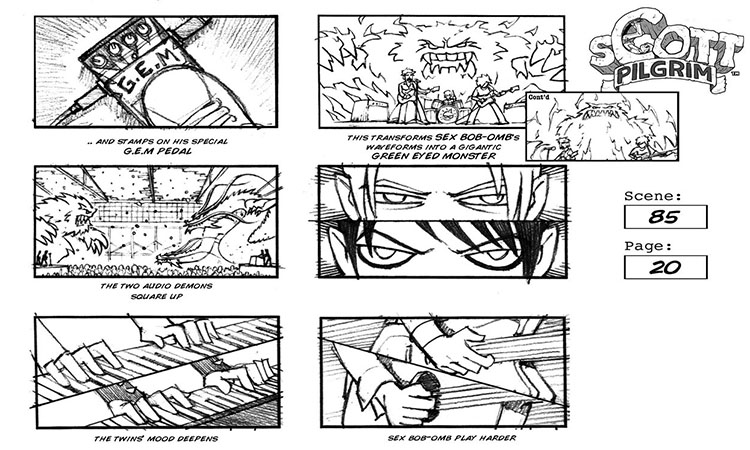
While it may be true that storyboarding is not necessarily a mandatory part of a filmmaker’s process, there is a reason why most major feature films still storyboard every last shot.
Storyboards not only let you and your collaborators “see” the totality of your film while in production, but they also help you get there in the first place by helping you sell your ideas more effectively to potential investors, producers, etc. When you consider all of the benefits of storyboarding, it will be hard to justify ever producing another film without properly storyboarding again.
Why You Need to be Using Storyboards

Image from Kyokuk
The greatest incentive for storyboarding is simply the fact that storyboard will help you make a much stronger film by allowing you to visualize your movie before it’s even made. This is essentially your chance to create a blueprint for your film that will help you identify any potential problem areas or missed opportunities while you still have a chance to fix them.
Technically speaking, you can include as much or as little detail as you want when storyboarding, as long as the ideas are accurately conveyed. By the time you get to post, your editor will be thanking you, as the film will have coverage in all the right places, proper transitional moments, and a slicker aesthetic.
You Don’t Need to Be an Artist or Designer

Image from Cranky Muse Project
It’s a huge misconception that storyboarding requires that you have the ability to draw/illustrate professionally. That’s not at all to diminish the role of the storyboard artist, as they are truly masters of their craft and will inevitably deliver the best results… But if you can’t afford a storyboard artist or need to do it yourself, that’s perfectly okay.
As an independent filmmaker, no one really needs to see your storyboards outside of you and your team, and once again, as long as your idea is conveyed that’s really all that matters. If you choose to storyboard by hand, your illustrations can be as simple as geometric shapes used to illustrate props/staging and stick figures for your characters. Or to make things even easier, you can use any of the vast number of storyboarding programs available to download on your computer, tablet or phone.
If you’re still unsure of your ability to pull off a storyboarding project, check out this video from Indy Mogul.
Storyboards Strengthen Your Vision

Image from Art of the Title
Your screenplay is the backbone of your film, but no matter how beautifully written it may be, it will never translate exactly as you might be picturing it to film. There’s a pretty common saying among directors: If your final film looks even 70% of the way you thought it would, you did your job really well. From my experience, storyboards play a huge part in getting to that 70%, as they help you to visualize your project in a way that is not otherwise possible.
The last thing you want is to get to set and realize that something about your shoot isn’t congruent with the script. Storyboarding will help you nip those issues in the bud, and keep your vision alive.
The Basics of Storyboarding
Having now gone over some of the perks of storyboarding, I want to very briefly break down the basics of storyboarding your film for those of you that have never done it.
Generally speaking, for every illustration (or storyboard) you create, there are five types of shots to choose from: master, long, medium, close-up, and extreme close-up. Sound familiar? Once you’ve decided on which of the 5 shot types you want to go with for any given shot, you’ll want to illustrate camera movement.

Image from Creative Uncut
To depict a panning or tilting shot, where the camera either moves sideways or up and down, you’ll want to create two frames to indicate where the camera will start and where it will wind up. From there, you can use arrows moving in both directions in order to portray movement. To illustrate a tracking shot, (which involves moving the entire camera in order to follow your continuously moving subject), you simply draw an arrow on the frame – indicating camera placement – and point it in the direction the camera will be moving in.

Image from Bungie
You can also illustrate zooming, which only involves a lens and no camera movement at all. To show zooming in (moving closer to the subject) and zooming out (moving away from the subject, taking in more of the scene in its entirety), you’ll have two frames on your storyboard, and depending on which direction the zoom is going in, you’ll either have arrows moving toward the interior frame or out toward the exterior frame.
These are some of the basics of creating a storyboard, and as you can probably gather it’s pretty easy to pick up. Just remember how critical storyboards are to the filmmaking process, and at the very least, understand some general rules/technique associated with creating them so that you can ensure they get done properly. Here’s one more video tutorial from Film Riot that covers the foundation of storyboarding.
Here are a few more articles from PremiumBeat that touch on the ins and outs of storyboarding:
- Storyboarding Your Film: Tips for Your Next Project
- 10 Tips for Creating Storyboards from Dreamworks
- Storyboarding Like A Pro
Do you incorporate storyboards into your creative process? Have any examples you’d like to share? Let us know in the comments below!


