
Tips for Working with Photos in Adobe Premiere Pro

In this tutorial, you’ll learn some nice and easy practices to simplify your life when working with images in Adobe Premiere Pro.
I’m putting together a short video piece about Abraham Lincoln, which will naturally consist of still images. Working with stills in Adobe Premiere Pro is a little bit of a different workflow than when you’re editing video. With images, you’re often dealing with a variety of resolutions, you’ll need to add some movement, and you might even perform some touch-ups.
Let’s take a look.
Check the Resolution
Photographs come in all different shapes and sizes. Many have a vertical aspect ratio, while others are square or rectangular. If you plan to scale up a photo, you’ll want to make sure you have a high enough resolution to keep the image sharp, once it’s scaled. In this example, I’m working with an image with a resolution of 2500 x 3000 pixels. If I bring this into an Ultra HD sequence (3840 x 2160), I’ll need to scale it up to fit it entirely in frame. In a 1920 x 1080 sequence, however, I have plenty of real estate with which to animate and scale this image.

For a sharp image, begin by checking the resolution.
Fit to the Frame
If you’re just looking to match an image to the sequence frame size, there’s a quick, easy way to do this. Once you have an image in your sequence, simply right-click, and select either Scale to Frame Size or Set to Frame Size. It’s important to understand what each of these option do, as they’re very different.

Match your image to the sequence frame size.
Scale to Frame Size will actually resample your image, removing pixels and setting the scale to 100 percent. That means if you scale this image back up at a later time, you’ll be losing quality. Set to Frame Size, on the other hand, will simply adjust the scale attribute so that the image fits perfectly in the sequence frame. To change how Premiere Pro handles your photos by default, go to the Edit > Preferences > Default Media Scaling drop-down menu.
Position the Anchor Point
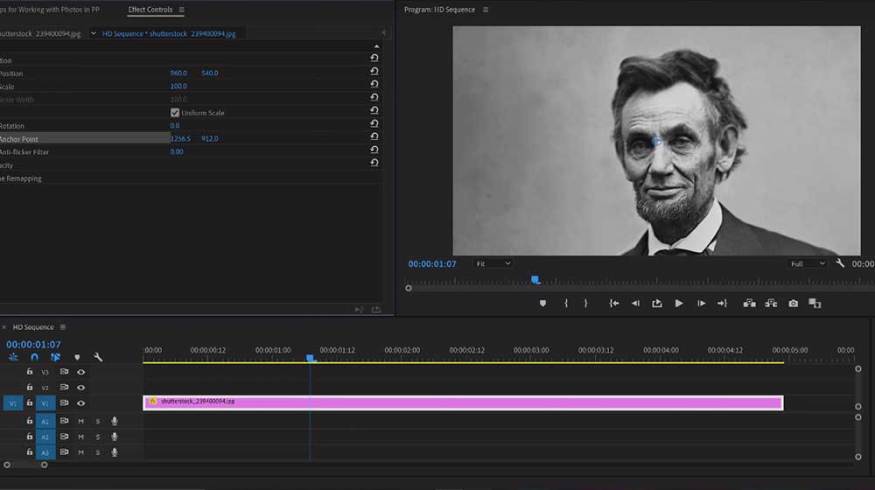
To inject some life into my image, I’ll want to add some basic animations via keyframing the Scale, Position, and Rotation attributes. Since all of these animations will center on my layer’s anchor point, I’ll want to make sure I positioned it properly. If I want to do a simple zoom out on the eyes of Lincoln, it’ll help to move the anchor point to this area.

To begin adding life to your photo, you’ll need to position your anchor point.
To reposition the anchor point, I’ll select the Anchor Point parameter in the Motion section of the Window > Effect Controls panel. This reveals the crosshairs of the anchor point within the Program panel. With the crosshairs visible, I can now easily move the anchor point to Lincoln’s eyes. Now, everything will animate around this spot as the center.
Animate the Photo
With my anchor point in place, I’m ready to animate. For this, simply open up the Window > Effect Controls panel. Select the photo, then place the timeline playhead where you want to start the movement. Adjust the Motion attributes in the Effect Controls panel to get the photo where you want it. Press the Toggle Animation buttons (the stopwatch symbol) for each parameter to add keyframes.

Begin animating your photo by opening up the Window>Effect Controls panel.
Next, move the playhead to the desired end position, and readjust the Motion attributes. A second keyframe will be automatically added as you change these parameters. To make the animations silky smooth, add some ease to the keyframes. This is known as the Ken Burns effect, named after the popular PBS documentary filmmaker.
Change the Default Duration
If I plan on working with a lot of photographs, I might want to create a sequence where all of the images are the same duration. For this, I can actually specify the default duration for still images in the Preferences panel. Under Edit > Preferences > Timeline > Still Image Default Duration, I can manually enter a duration in either seconds or frames. Once I make the adjustment, I’ll restart my project. Now, every time I bring a photo into the timeline, it’ll be at the new default duration. This is definitely an important preference to know.

Sequence your images by specifying the default duration in the Preferences panel.
Edit in Adobe Photoshop
Often, when working with historical images, you’ll need to bring them into Adobe Photoshop for some clean-up work. Most of the time, for me, it’s simply removing scratches or other imperfections in the image. Luckily, Premiere Pro works well with Photoshop, as they are Adobe siblings.

Remove minor imperfections by utilizing Adobe Photoshop.
To launch PS from within PP, simply select your image in the Timeline or Project panel, then select Edit > Edit in Photoshop. Once in PS, I’ll primarily use the Patch tool to quickly remove any unwanted objects on the photograph. Saving in PS will automatically update changes to the photo in Premiere Pro.
Add Overlays
Yet another way to add more life to your still images is by adding various overlays. Since this is a proper historical image, I’ll first add some film grain, which will add some nice, subtle visual movement to the frame. Shutterstock happens to have a pack of five free film grain overlays here. To apply one, I’ll simply drag over the 8mm grain clip above my photo and switch the blend mode to Overlay.

An alternative way to incorporate life into your images is by adding overlays.
Adjustment Layers
As a final touch, I’ll open the Lumetri color panel and tweak the look a bit further. The best way to do this is to apply the Lumetri effect to an Adjustment layer, which I’ll add via File > New > Adjustment Layer. Once the layer is in the timeline and selected, I’ll add a quick vignette and make any other creative tweaks, such as slightly boosting the Faded Film slider bar.

Tweak the look a bit more by applying the Lumetri effect to an Adjustment layer.
Lincoln has never looked better.
Check out the tracks used while creating this tutorial:
- “Yankee Doodle Dandy” by Richard Heacock
- “Liberate” by Immersive Music
- “Innovations” by Trending Music
- “After Stasis” by Taizo Audio
Looking for more on Premiere Pro? Check out these articles.


