Color-Matching Footage from Different Cameras in Premiere

In this video tutorial, we go over how you can color-match the profiles of a GoPro, an a7III, a cellphone, and a Mavic 2 Pro.
When I shoot, I’ll capture just about anything on whatever I have at that moment. My motto is The best camera is the one that’s always with you. And while this rings true in many scenarios, there’s one thing to be careful of: camera synchronization. What I mean is making sure your diverse camera selection looks the same in sequence. The look of a GoPro is drastically different than that of an a7III, and an a7 III is nothing like a cellphone.
Let’s take a look in this video.
Step 1: Get a LUT
Step one is finding a LUT with the look you want. Check out “29 Free LUTs for Video” for free LUTs (and a video tutorial on how to use them). If you’re new to LUTs, we’ve got a breakdown on how they work for you here:
LUTs shift the color information when you apply them to footage or photos — to yield superior color accuracy. LUTs are cross-compatible with different video applications, cameras, and even external monitors.

Image via “Get Better Results Using LUTs with Lumetri Color in Premiere Pro.”
Step 2: Balance
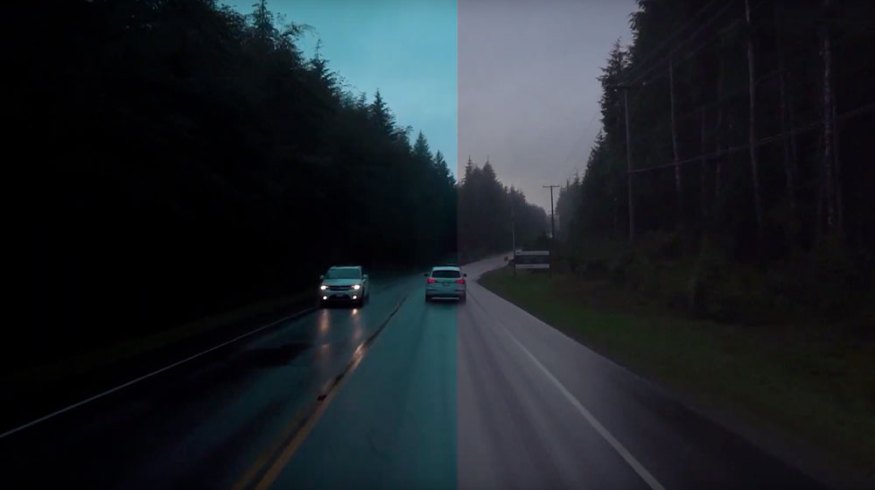
Before doing any significant stylizing to your shot, you want to balance its colors and contrast. For example, I’d suggest you level your white balance and find a contrasted “look” you prefer. This is essentially making a base layer.

Image from “How Understanding White Balance Makes You a Better Filmmaker” (via Sompoch Tangthai).
Step 3: Blending Your LUT
I find LUTs can come off a little strong, so if you’re using one, make sure you blend it with your shot so that it doesn’t pop out too much. You can do this by lowering the intensity or adjusting dials (like your white balance), so that it blends better.
Step 4: Copy and Paste
Once you’ve created the look you want for your footage, copy the Lumetri settings of the shot from your effects panel and paste them into the following shot. If your timeline looks like mine, this won’t look very good. The colors are either too contrasty or way too flat. This is where we begin to balance again.
I find that the two primary coloring tools I use consistently are Curves and White Balance. To match the “look” of any camera, you’re going to bounce between these two options a lot.

Step 5: Finding a Pattern
You’ll find that this method of copy-and-pasting your color profiles will consist of a pattern — comparing and balancing. From this point forward, don’t change the look of the shots; take what you have and make it look similar to the shot that played before. You can do this by toggling the comparison view icon in the bottom section of your viewer. This allows you to compare key elements like color balance and contrast between your reference shot and your current one.
Repeat steps four and five over and over again until you’ve colored the entire timeline. Now play it back.
Step 6: Playback
Sit back and watch (with a fine-toothed comb) your freshly colored timeline. This will allow you to see how everything flows. If a shot pops out, it’s time to go back to step five and adjust. This takes time but trust me, it pays off!
For another look at color matching two cameras, check out Shutterstock Tutorials video:
Looking for more Premiere tips and tricks? Check these out.