

Prevent Hard Audio Cuts with Natural Reverb

Learn how to add natural reverb to the end of a music cut using Premiere Pro, DaVinci Resolve, and Final Cut Pro X.
In this tutorial, we’re going to learn how to add natural reverb fall-off to the end of a cut on a music track. We will start in Adobe Premiere Pro with our music track, then make a cut and a few adjustments before sending the clip to Audition.
Once that’s complete, we’ll talk about how to approach the same effect inside DaVinci Resolve and Final Cut Pro X. We use these reverb tricks a lot when we need to shorten a music track for time, or if we need it to cut it off suddenly. I find the reverb fall-off to be less jarring than a hard-cut or just decreasing the volume. This audio effect also works great for intros and outros.
Ready? Let’s dive into how to pull this off in Premiere Pro.
Steps in Premiere Pro

First, in Premiere Pro, you’ll need to create a cut on your music track. I recommend doing this about half a second after a strong beat or hit in the music.
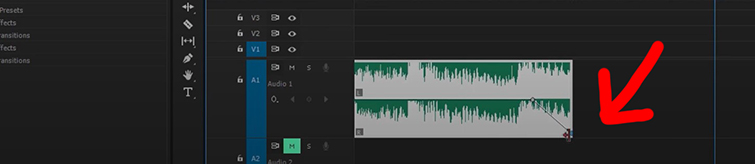
Now, before sending the clip to Audition, we need to lower the volume level at the end of the audio clip. Hold CTRL and click on the keyframe line in the middle of the music track, just after the strong beat you’d like to end on. (Hold CMD and click on a Mac.) This will create a keyframe.
Next, create another keyframe at the end of your music track and lower the keyframe to the bottom so that the audio level is set to negative infinity.
Finally, go ahead and right-click on your music clip and select Edit Clip in Adobe Audition.
Steps in Adobe Audition
Once Adobe Audition has launched, you’ll see the waveform for your music track. Move the play-head to the end of the music clip by clicking at the end. Now, go to Edit > Insert > Silence.

After you’ve inserted the Silence section at the end of your music clip, set the in-and-out points. Place the in-point in the middle of the final beat of the song. Place the out-point all the way at the end of the Silence section.
You can now apply the Reverb effect located under Effects > Reverb > Reverb. My settings for the effect are listed below. After you set the Reverb values, click Apply.
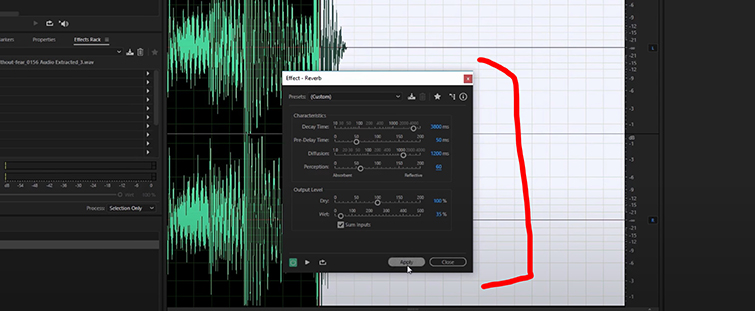
This will result in a more natural reverb fall-off at the end of the music beat. You can see this reflected below as the waveform gradually decreases over time. Now, all you need to do is save your file by going to File > Save.
Back in Premiere Pro, you’ll see that your music clip has updated. All you need to do now is extend the end time of your music clip to see where the new reverb ending was added.
So, to wrap this all up, the following points can help when you create your Reverb ending cut on your music:
- Make your ending music cut about half a second after a strong music beat.
- Lower the volume level of the ending of the music in Premiere Pro.
- Insert about four seconds of silence (or more) to the end of your music clip in Audition.
- Apply the Reverb effect halfway on the final music beat. Set the Decay Time to 3800 or more.
Steps in DaVinci Resolve
To end a clip with reverb in DaVinci Resolve is actually rather simple, and you don’t need to move to another program like in Premiere.
First, you duplicate the audio clip that needs the effect. Make that clip a Compound Clip, and then duplicate that clip again. Extend the duplicated track out by a lot, then mute that track. Finally, go back to your master timeline and extend the clip you want “reverb-ed,” and apply the reverb effect to that clip. Voilà!
It’s super simple. If you find that you’re not getting the sound or results you were hoping for, just play around with the song until you find the right note to end on.
Steps in Final Cut Pro X
Similar to how we do this in Resolve, while editing in Final Cut Pro X, you’re going to want to find the part of the song you want for the effect, cut the clip, duplicate it, then hit Shift-Hold to drag out the duplicated clip. This is the clip you’ll be applying the effect to. (I’m sorry for using the word “clip” so much. Also I’m about to use it a lot more.)
So, choose the Cathedral effect and apply it to your clip. Then, right-click and make the clip a Compound Clip. Once you’ve done this, trim the clip to only have the reverb left, then add necessary volume gain or loss so that it transitions from the previous clip smoothly. It’s just that simple.
Now, here’s a bonus CLIP that demonstrates an interesting way to use audio for scene transitions.
For more freebies, audio tips, and other filmmaking resources, check out these articles:
- Datamoshing 101: How to Make Your Footage Look Trippy
- The 5 Best Free Audio Editing Programs Available
- Download 28 FREE Firework Sound Effects for Your Next Project
- 14 Effects Tutorials Inspired by Marvel’s Loki, WandaVision, and More
- Over 280 Free Sound Effects for Videos, Apps, Films, and Games
Cover image via Patrick Daxenbichler.


