
10 Minute Crash Course: Newton 3 After Effects Plugin

Newton is a 2D physics simulator plugin for After Effects. The plugin makes text, shapes, and masks behave like real-world objects. Let’s take a look.
Newton — a 2D physics simulator plugin for After Effects — makes text, shapes, and masks behave like real-world objects that have been dropped. You know, like an apple falling from a tree. Ok, I’ll stop there with the Newton-related puns.
Instead, I’ll present a ten-minute tutorial that covers the core principles of the plugin. This is going to be a truly basic tutorial geared toward teaching you to crawl rather than helping you hit the ground running. Because, while the plugin has a simple, elegant design, it can become complex in its use. Plus, an all-in tutorial would likely be 2+ hours in length. Therefore, I invite you to watch the ten-minute tutorial below, which should be sufficient enough to get you started with Newton 3.
I understand it’s not always practical to watch a tutorial, therefore, you can find the written transcript below, with GIF examples. However, there are likely to be moments that specifically call to the instructions of the video tutorial.
Geography
When installed, you won’t find Newton 3 under Effects or Scripts, but instead under the Composition menu within the menu toolbar.

Once installed, you’ll find Newton 3 under the Composition menu.
Upon selecting the plugin, an independent window will open containing the user interface of Newton 3. While it mirrors the design of After Effects, it operates entirely different.
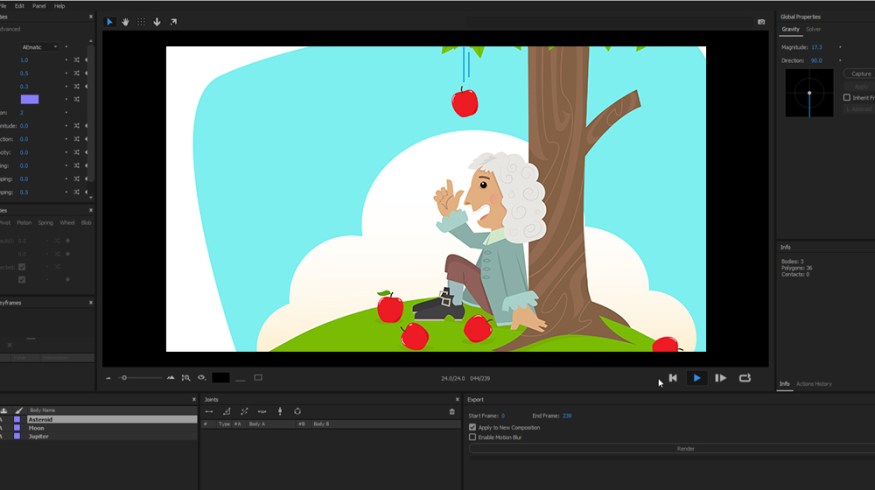
Let’s quickly run through our interface geography — it’s divided into several smaller panels. We have our main Preview window at the center, which is where we’ll watch back the physics simulation. The Body and Joint Property panel to the left, which will dictate how our bodies and joints react upon being met with the gravitational pull. To the right, we have our Gravity settings. At the bottom, we have our Bodies panel, where the shapes are added along with a Joints panel where any joints will sit. Finally, a Render panel. Other than the Advanced Settings tab, there are no other pop-up menus or panels to work from. This is it.

The interface geography is divided into several smaller panels, at the center is the main Preview window.
In the Preview window, upon pressing Play, the Gravity settings are set in motion, and the PremiumBeat logo and ball fall into infinity. The reason these objects react to gravity (and fall to infinity) is that they’re a dynamic body and because we don’t have a Shape Layer to act as a floor.

When the gravity settings are set in motion, the logo and ball will fall to infinity.
However, instead of returning to After Effects to create a shape to act as a floor, we can alternatively select the Infinite Ground button. Now, when we press play, the PremiumBeat blocks fall to the ground, and the shapes react accordingly.

Select Infinite Ground and hit play for the PremiumBeat blocks to fall to the ground.
Density
The four parameters that primarily set how the individual shapes react within Newton are Body Type, Density, Friction, and Bounciness. What do these settings refer to? Well, density refers to the mass of a body. Quite like real life, if you take two objects — one heavier and one lighter — they’ll fall to the ground at the same speed upon releasing them. However, the object with more mass will create a more intensive impact.
To show an example of this, I’ve created a composition with two tennis balls and a weak table structure. Therefore, let’s go back into Newton to see how the density of an object will affect its surroundings, but first, we have this issue.

You’ll want to increase the mesh precision to regain the balls’ original round shape.
Our circles have become angular, and this is because Newton prefers simple shapes. The less processing, the better. But the problem with angular shapes is that they bounce and roll differently.
For example, if I place this circle on top of the other, then click play, we can see that when the circles roll off each other, there’s a slight bump in its reaction (see video). Perhaps, if this were a high-intensity scene with lots of things going on with complex shapes, the angular nature would be alright. Still, for something simple like this, it’s noticeable, and we need to increase the mesh precision to regain the roundness of the original shape.
With that covered, let’s adjust the left ball to have a density of 0.1 and the right ball to have a density of 20. The ball with a density of 0.1 barely shakes the structure, and given that the center isn’t supported, it’d only take a slight bit of force to break through, yet the ball with the density of 20 smashes through the structure.

By applying different densities to each ball, their individual reactions to the structures are distinct.
Friction
Next, we have friction. And, to demonstrate the properties of friction, I’m going to open another composition where I have two squares and two slopes for the squares to fall onto. However, look at what happens when I click play within Newton 3. The slopes interact with gravity.

The slopes interacting with gravity.
Therefore, we need to change the body type in the Body Type dropdown menu. While a dormant body may seem like an appropriate choice (and at first looks like such), it’s not. A dormant body refers to the type of body which remains static until another object touches it. So instead, we need to select Static. A static body will remain stable in Newton, overriding all outside animations.
After adjusting the left square to a friction setting of 0.1, and the right square to a setting of 3, when we click play, the slopes remain in place, and we can see the difference between the two squares. One acts like light plastic, the other like a coarse stone.

By adjusting the Friction settings, the two squares fall at different rates.
Bounciness
Finally, I’m going to reset the Friction, which can be done on all the properties by hitting this circle button — this represents Reset.

Reset the friction by hitting the circle button.
Then, I’m going to decrease the bounciness of the left square to 0.1 and increase the bounciness of the right square to 3, and upon play, one square acts like it’s made from stone, the other rubber.

Varying the levels of bounciness for each square allows them to react in different manners.
These three properties are the core basics of how you dictate your physics simulations. And, of course, they all work in conjunction with one another. For example, a shape with a friction setting of 2 and a bounciness of 1.5, may bounce sporadically but come to a stop when rolling. Whereas, a shape with a friction setting of 10 and a bounciness of 0.5 will fall like a piece of lead.
Body Properties
The final two properties we haven’t discussed are Kinematic and AEmatic. These body properties both represent two ways in which a pre-animated shape is affected. Let’s look at this example where I have an asteroid hitting this moon. The asteroid flies in from the right, hits the moon, and the moon will react accordingly, as it’s a dormant layer. However, since this is space, I’ve changed the gravity to zero.
Under Kinematic, the asteroid will continue to fly because it was in a state of motion upon entering the gravity sim. If you refer to the video, you can see how the asteroid differs under a gravitational pull of 5.

The asteroid continues to fly after hitting the moon because it’s in a state of motion.
With Kinematic, a body animated in AE with keyframes is not altered by the physics until the end of the animation. Whereas, with AEmatic, the animation is instantly recognized, but we can see it’s also fighting with the gravity settings upon entering the frame, and upon the final animated keyframe, it will stop the motion.

With AEmatic, the asteroid ceases movement once it hits the moon.
Render
With the majority of circumstances, the Newton animation will likely be shorter than your composition. Therefore, to export the simulation, we need to press Play, let the animation come to a completion, note the frame number from the movement, and then add that to the export End Frame type box. Finally, hit render and let Newton do its thing.

When rendering, make sure to note the frame number from the movement.
Upon completion, you’ll be taken back into the After Effects default window to find the completed simulation in a new composition. As each animation is set as a keyframe, we can adjust the timing of specific moments by moving the layers. However, remember they’ll fall out of sync of any collisions.
Now, how do we get our picture elements to act with the physics engine? All we need to do is make sure our graphic element is positioned on top of the simulated shape directly, and then parent the image to the shape. Using the sequence from the Kinematic example, this is the final result.
By using the sequence from the Kinematic example, here’s your final result.
These elements cover the core basics of Newton. There are, of course, many advanced elements to the plugin that we completely skipped in this ten-minute rundown. For example, we didn’t even touch on joints, which can add a number of varying elements to your gravitational simulation.
We should acknowledge that this is a $250 plugin, and therefore not accessible to everyone. However, I think this is acceptable to get you started with using the plugin. And, hey, there’s a free trial version. It’s limited to 25 fps but adequate to play around with in After Effects.
Interested in using plugins to advance your After Effects skills? Explore the content below!
- Exploring the New Lens Distortion After Effects Plugin
- Top 10 Paid and Free Scripts and Plugins for After Effects
- 10 After Effects Plugins Every Motion Designer Should Have
- Take a Look at gridRig, a Plugin from Ordinary Folk
- Free Final Cut Pro X Plugins to Improve Your Video Edits
Cover image via bilha golan.


