Video Tutorial: How to Create Annihilation-Inspired VFX

In this video tutorial, learn how to use some free RocketStock assets and Adobe After Effects to create Annihilation-inspired VFX.
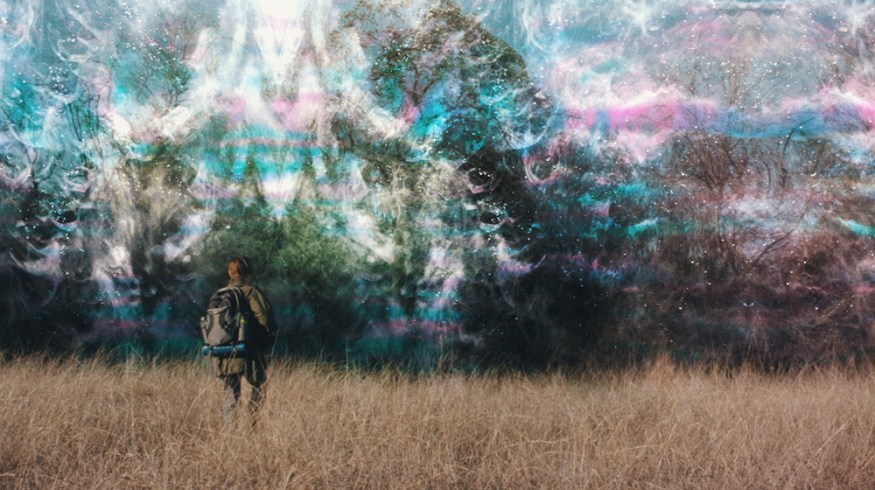
If you’ve seen the trailer for the upcoming Alex Garland film Annihilation, then you’ve seen some of the stunning VFX from the film. In the trailer, we see strange animals, beautiful overgrown forests, and (perhaps most notably) a strange fractal-covered bubble-like wall with interesting colors and textures.

Image via Paramount Pictures.
In this video tutorial, I’ll show you how to pull off a similar effect using Adobe After Effects and a freebie pack from RocketStock called Nebula. The pack contains 19 4K space background elements created organically and captured in-studio. Although we call these assets space background elements, you can use them for many other purposes and effects. In this tutorial, we’ll use the elements from the Nebula pack to bring interesting textures and colors to the effect, and we’ll use some relatively advanced rotoscoping techniques to help us get there.
Tracking The Shot
![]()
The first step in almost all VFX compositing shots is to track the shot. In this case, we will need to be able to composite in 3D space.
To do this, we’ll use the built-in Camera Tracker in After Effects. Once you have your shot tracked, you’ll select the tracking points in the area where you want to add your textures. In this case, the tree line is where we want to add our effects. Luckily enough, that was the area in the image with the most contrast and tracking data for the tracker to pick up.
Select the tracking points you want to use, right-click, and select Create Camera And Solid. This will add a solid in 3D space as well as create a camera for it. For the duration of this project, you can use the position data from the tracked solid to place your textures and effects correctly in 3D space.
Rotoscoping the Shot

The next step is to rotoscope the shot.
Every shot will be different, as far as this goes. However, in this case, we needed to separate the ground and the character in the foreground from the tree line in the background. That way, we can add all of our textures and effects below that layer, and everything will be separate.
This is by far the most time-consuming part of the effect. There are also many different methods for achieving a good rotoscope. Some people choose to use the rotobrush tool in After Effects, and some people choose to do frame-by-frame animation of a mask on the layer.
However you choose to do it, be sure that you are very thorough and that you take the time to do the rotoscope right. A very easy way to ruin a compositing effect is to do a bad job rotoscoping.
Creating The Textures

To create this effect, you’ll need to create a texture that looks somewhat like the natural randomness and colors that you’d see on a soap bubble.
To do this, create two different layers with the Fractal Noise effect. Alter the contrast and scaling until you get something that you like. Then, on the topmost of those two layers, you’ll add a Colorama effect. Here, you can delete a few of the unneeded colors and change them to the colors that you want. We went with a light pink, baby blue, and faint yellow.
Set the topmost layer to hard mode.
Then, you’ll use the Turbulent Displace effect to give it the warped bubble look. Add time expressions to the evolution of both layers to allow both layers to animate on their own.
Use the Nebula Elements

Now, you can bring in one of the elements from the Nebula pack to create a luma matte for your bubble texture layer.
Layer your bubble texture into the shot below your character and ground layers, and make it 3D. Then, you can use the Motion Tile effect to spread the texture across the entire shot. Now, add a fractal ambience element from Nebula above the bubble texture layer, and add the same effects to it until it has filled the shot to your liking.
Then set the track mode on the bubble layer to Luma Matte. This will use the luminance values from the Nebula element to reveal the bubble texture where the brighter areas are.
From here, you can customize however you like — duplicate layers, add glow, correct colors, etc.
If you haven’t yet, be sure to check out the Nebula freebie from RocketStock.
Looking for more video tutorials inspired by your favorite VFX? Check out these articles:
- Video Tutorial: How To Get The Stranger Things Look
- Create Transparent Titles Inspired by Dunkirk in Premiere Pro and FCPX
- Create a Glow Warp Title Transition Inspired by Marvel’s Thor: Ragnarok
- How to Create a Star Wars-Inspired Hologram in After Effects
- How To Create a Stranger Things-Inspired “Upside Down” Look