DaVinci Resolve 15 Video Crash Course — The Edit Page
In part two of our six-part video series The DaVinci Resolve 15 Crash Course, we cover the edit page — and how to get your timeline the way you want it.
In episode two of PremiumBeat’s Resolve editing crash course, we’re going to look at the edit page, creating a new timeline, editing media from the source viewer, and how to change the timeline view options.
As always, it’s crucial to watch the video tutorial for the guided instructions and to see the visual examples, but for a recap or to find a specific tip, you can find an abridged transcript of the tutorial below.
Edit Page Overview
As a reminder, this is a crash course, so we will be omitting some advanced features, such as placing a media clip on the timeline via the timeline viewer’s edit functions. (Although to be quite honest, I’ve never found a use for this.)
This is the edit page. Let’s take a quick tour and get ourselves acquainted with the layout. (If you change the layout and want to return it to the default, you select Workspace > Reset UI Layout.)
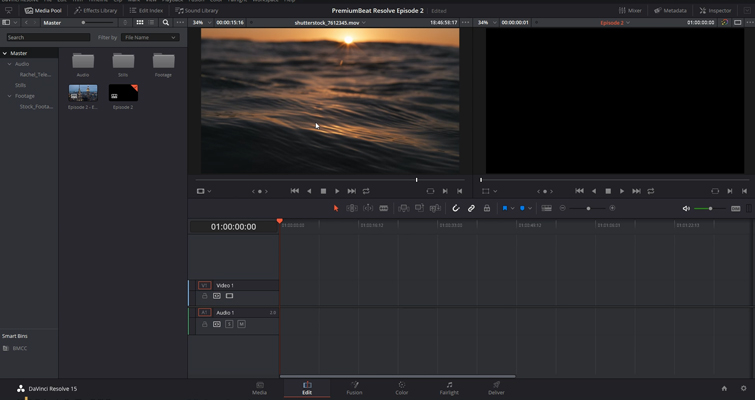
In the top left, we have the media pool. The media pool is where all of your imported media will reside. If you have set up bins, smart bins, and so on in the media page, then all of those elements will also appear here. If you decide to create a new bin, or delete footage, then know that you don’t have to return to the media page; you can do it all in the media pool. And, as I mentioned previously, you can also import footage from your desktop directly into your media pool.
But if you do want to browse your drives and connected media, you need to return to the media pool. To the right, we have the effects panel; here we can access the effects library, where you can apply video transitions, effects, and text to your video.
To the right, we have a source viewer. This is where you’ll preview the clip before bringing it onto the timeline — because you never really want to drag a media clip from the pool to the timeline (that creates problems and will eat up your time).
To the right of the source viewer is the preview viewer or timeline viewer, where, of course, you will play back your edit.
Above the preview viewer, is the inspector, which is essentially the Swiss Army knife of the edit page. If you want to change the properties (such as the size or position of the clip), lower the volume of an audio clip, adjust the properties of an effect, and so on, this is the panel to use. You can make these adjustments other ways, too. For example, you can adjust an audio clip’s volume in the timeline, but for precise adjustment, the inspector is a better tool
Underneath, and not visible until you click the mixer button, is a mini audio mixer, where you can monitor the track’s (not the clip’s) audio levels and adjust those properties.
Then, of course, we have the timeline. This is where we’ll be editing and creating the next masterpiece.
Creating a Timeline
Now, you could create a timeline by taking a media clip and placing it in an empty timeline area. This will create a default timeline. However, I recommend that you right-click in the media pool (or press Ctrl+N) and select “create a new timeline.” This is, really, the correct way to create a new timeline because you can choose timeline properties such as the start timecode and how many tracks you want.
However, you may notice when opening the project settings, which you can do so by hitting the cog in the lower-right corner, that unlike Premiere, when creating a new sequence, you can’t change the overall properties such as the frame rate. If you’re editing a video game stream captured at 60fps, you would need to change the timeline FPS before importing your first video clip. For the new timeline, I’m going to change the name to “Episode 2,” and I’m going to insert two video tracks and two audio tracks and keep the audio in stereo.
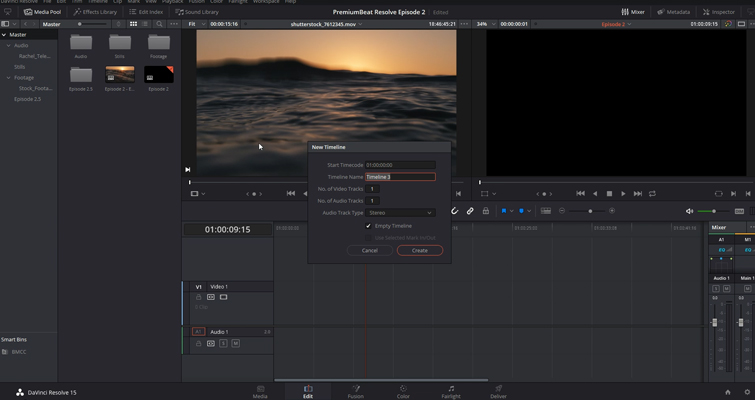
We’ve added tracks to the timeline; we need to add the video and audio. So let’s reopen the media pool and head to our video bin.
Editing From The Source Viewer
I covered how the media pool and source viewer work in episode one: you can change the view options, you can turn live preview on, and you can show the audio waveform — and so on. To bring a clip into the source viewer, you double-click on the selected clip. This is where you will prepare the clip for editing. It doesn’t have to be perfect, but you want it to be close to what we want in the timeline.
I’m going to find the first mark, and I’m going to select “mark in.” You can do that with the mark in button, or use the keyboard shortcut (which is “I”). The keyboard shortcut is my preferred method because it’s the same shortcut as marking a specific section of the timeline. Next, I will now “mark out” by either using the mark out button or pressing “O” on the keyboard. And then you either click the insert button or press F9 — or you can right-click and drag the video onto the desired track. There are plenty of methods. Essentially, by creating in and out points and inserting to another point on the timeline, we’re doing three-point editing.
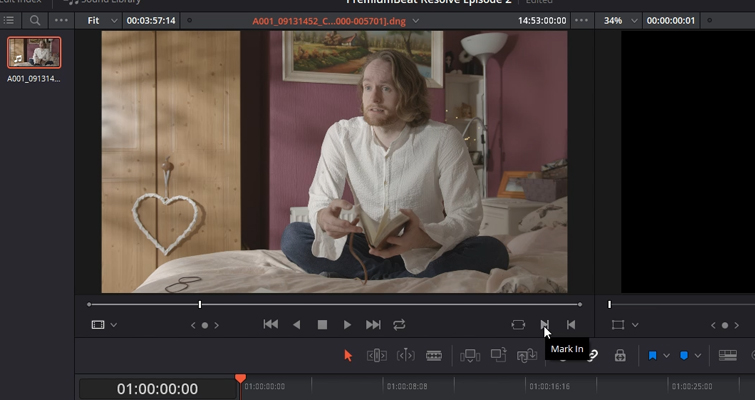
Before we move on, if I undo that process and attempt to drag the clip again, you may notice that when I hover over the source viewer, two icons appear: a celluloid film frame and an audio waveform. Now, if you were to click and drag one of these icons onto the timeline, we get the corresponding medium: video or audio. This great if you’re editing a music video and have on-set sound from the onboard camera that you don’t need.
Let’s say, for example, that we have a new timeline, we’ve created in and out points, and we’ve positioned the play head where we want new media to appear. When we insert a clip on a timeline populated with other clips, they all move aside. Now, even if we remove “Auto Select,” which is a function we will talk about in the next lesson, the clip we inserted will still push aside all media to the right. So, it’s not a destructive insertion, but it will dislodge your track, or the timeline completely, if autoselect is activated.
Next to insert we have “overwrite.” As you might have guessed from the name, this will overwrite whatever is currently on the track to the duration of the clip from the source viewer.
Therefore, if I have a 15-second clip in the source viewer, and the playhead is positioned where the clip’s total duration of 20 seconds on the track is 20 seconds. The clip will overwrite the first 15 seconds, leaving the final 5 seconds of the original clip on the track.
The final edit is a replace edit. This is kind of similar to the overwrite, but the edit depends on the position of the playhead in the viewer and the position of the playhead on the timeline. So, if, for example, I want to replace this clip. I would position the playhead where I need it in the viewer, and then position the playhead at the start of the clip and hit replace. This is useful when you have a short clip in and need to replace the entire clip.
Finally, to round out this episode, we’re going to look at timeline view options.
Timeline View Options
First, we have the zoom in and out functions. I love to use alt and the scroll wheel to zoom in and out, as I find that’s the fastest way. You will only be able to zoom in and out of the playhead’s position, not where your mouse is located. Shift+Z will jump out of whatever position you’re in and fit the entire timeline into view. If you are a keyboard shortcut person, you can also zoom in and out using Ctrl + or Ctrl – (Cmnd on a Mac).
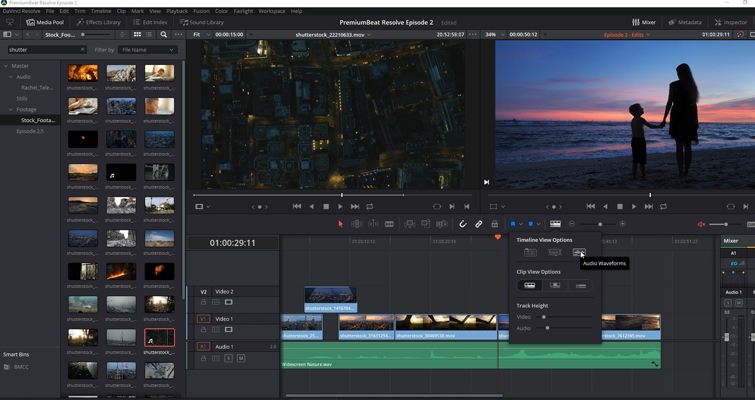
To the left, we have a timeline view option box, and here we can change the media display. For the time being, we’re going to skip the stacked timelines and subtitles box and focus on the audio waveforms button. This will turn the waveform on and off. A common forum comment I often see involves new users worrying that they have messed up the audio because they cannot see the levels, but it’s usually just because they have clicked this button without knowing. Underneath, we can choose how to display our clips.
We can display all the frames in a clip. If you were to zoom right in, you would see every individual frame for that one clip. You can also choose to display just the first and last frame, or we can display minimized tracks. Underneath, we can change the height of the tracks, but if you ever need one track higher than the other for a precise task, you can increase the individual height by extending the track itself.
This was just a condensed overview of the edit page. It would take a good few hours to run you through every aspect, but with what you’ve learned today, you should now know the layout of the page, how to use the source viewer, how to create a timeline, and how you can place your clips on the timeline. In episode 3, we will look at trimming your clips using the various trim tools, and more edit page properties.
See you next lesson.
Lewis McGregor is a certified DaVinci Resolve trainer.
Looking for more info on using DaVinci Resolve? Check out these articles.
- DaVinci Resolve 15 Video Crash Course — The Media Page
- Revive Your Footage With Resolve 15’s Automatic Dirt Repair and Dust Buster Tools
- How to Use the Shared Node Feature in DaVinci Resolve
- Quick Tip: How To Use Optimized Media In DaVinci Resolve
- Remove Unwanted Shot Features With Resolve 15’s Patch Replacer


