

Extension Release for Autodesk Smoke 2013: New Features

The long awaited Extension Release for Autodesk Smoke is here. Check out my breakdown of some of the new features and what they mean for you.

The Extension Release is the biggest update that Smoke 2013 has debuted to date. Not only are there numerous bug and stability fixes, but there are new features and workflow improvements as well.
Autodesk defines this release as an Extension for Smoke 2013. This gets kind of confusing since we have already had 2 service packs released. Smoke 2013 SP1 & SP2 were just bug & stability fixes. The reason that this release isn’t Service Pack 3 is that it also contains new features, which I will detail in a bit. The Extension Release is also only available to brand new or Subscription users. This release isn’t available with the Student Licensing nor the Free 30 Day Trial. UPDATE: As of June 19th, 2013 you can download the Extension 1 Release as a 30 Day trial even if you have downloaded a previous trial or pre-release. This is a big move for Autodesk and I think they made the right decision to open up these new features so that everyone can see the full potential that Smoke has to offer. It is also available for the 36 month Student License.

Smoke 2013 Versions:
- Smoke 2013 – v2013.2
- Smoke 2013 SP1 – 2013.2.1
- Smoke 2013 SP2 – 2013.2.2
- Smoke 2013 Extension – 2013.2.53
New: Support for Blackmagic I/O cards:
New support for Blackmagic DeckLink (PCIe), UltraStudio (Thunderbolt) and Intensity series video IO devices. Depending on the features of your device you should expect SDI Capture, SDI Playout, and SDI / HDMI Preview. Now Smoke can work with most of the major hardware I/O and monitoring. For Resolve fans, you can now have your cake and eat it too.
New: Codec Support
- New support for files generated by Sony F5 and F55 Cameras. Smoke already supported the F65. This support includes new Debayering options for resolutions and quality.
- Updated ARRI Support. ARRIRAW 4.4 is now supported and MXF (DNxHD 145 and 220x as OP1a) files generated by the Alexa camera are now supported. New Debayering options like Proxy, ADA-3(HW) & ADA-3(SW) are now available.
- Updated REDCODE SDK 4.4 Support. You can now import RED EPIC-M MONOCHROME R3D files. With this updated SDK support there are changes to DRX processing. You can use DRX processing with a Red Rocket Card. Some of the DRX (Dynamic Range Extension) can cause legacy .r3d clips to process the image differently. You can check if your clips are affects via the clips Pre-Processing settings
- Updated support for Avid Intermediate (transcoded) MXF media files. You can now import Avid intermediate clips encoded with XD CAM HD and XD Cam EX codecs. You can import AVC-Intra 50, AVC-Intra 100, & DNxHD encoded intermediates as well.
New: Trim View
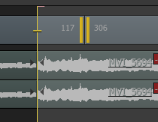 One of the features asked for by users was a Smoke Trim View for better editorial. This was something that was always in the works, and is now rolled out in this release. In previous versions of Smoke 2013 your trimming selections were segment based. Now the Extension Release, has changed this to transition based selections. So now you are selecting the left side, right side or both sides of a transition/cut points for trimming.
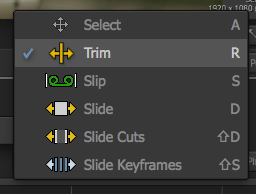 There is a specific Trim Mode that you can now select. This is now different from the old Select Mode, which still exists, but now will just select and not activate trim behaviors. As a general rule, I tend to always remain in Trim Mode while editing. This will mimic the original Smoke 2013 behavior.
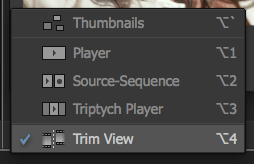
To access the Trim-View there is a new viewer pop-up. You can also access this view anytime you select a transition. If you are slipping/sliding and double-click, the Trim-View will automatically open.
 When you are done trimming and click on anything else in your timeline or a new source, the Trim-View closes. If you don’t double-click your trim selection you can continue to trim without the Trim-View, just like before the extension.
When you are in the Trim-View, there are many options for trimming. See the image for details (click for larger image).

You can even use J, K and L shortcuts in Trim-View to adjust your clips dynamically.
There are also improved keyboard trimming functions and the number of hotkeys have been reduced since the trimming operations are selection based. For example, you had multiple hotkeys to “nudge 1 frame forward/backwards” depending on if you were slipping/sliding or trimming. Now you have 1 hotkey to nudge forward 1 frame (.) and nudge backwards 1 frame (,) and they work for all modes.
New: Feedback Mechanisms
One of the biggest issues for editors and new users in adopting Smoke 2013 was that the information feedback that the software gave you was horrendous. Most of the time you don’t know what was happening under the hood. So in the case of clip caching, you didn’t know there was a problem unless you dug deep into a sub tab in MediaHub. Not very helpful.

But now, The Smoke Extension Release brings this much needed feedback to the editor in a simple display that you can hide or expand as needed. Even when it’s hidden there is always one line of feedback being displayed when things are happening in the background.
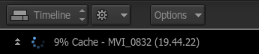 Now you can keep track of caching, proxy creation, and export quickly and easily. You also can now see a percentage progress counter so you know how much time any given process has left. It’s a very simple addition and one you will come to rely on in every session.
Many users wanted the render bar to be more obvious, which it now is.

Improved: MediaHub Browsing
The MediaHub browsing has been greatly improved. It is now easier to navigate large file systems, as the indexing clip and building of thumbnails is remarkably quicker. The functionality remains the same, but the performance received a substantial upgrade.

In some cases where it took minutes to display files, now takes seconds. Clips are displayed progressively so you can interact before the entire list is complete. This enables you to preview and import right away. You can also resize the thumbnails between 7 different sizes. As mundane as file importing is… the new MediaHub speed makes it far less of a chore.
Other Notable Improvements:
Timeline:
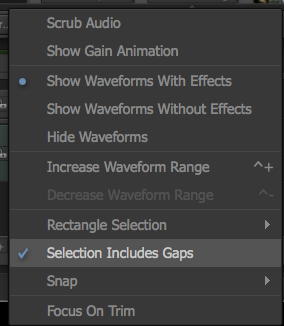
- In the Timeline Options menu, the new Selection Includes Gaps setting allows you to select whether empty gaps are included, when performing a selection on the timeline. This solves the issues people were having in box selecting clips (as empty Gaps are no longer selected).

- It is now possible to open multiple sequences simultaneously, in a folder for example, from the Media Library. You can also close multiple sequences directly from the Timeline. SHIFT+C will close all sequences or you can access the contextual menus for these functions.
- The LINK option for clip Video/Audio tracks has been moved to the center tool area with Ripple and Trim. The Link button can easily link or unlink a clip’s audio/video tracks so that you can choose how they are selected for trimming. You can also toggle invert the function much like Ripple and Snap by holding the ATL key when the segment selection is made.
 .
.
- You can now drag and drop to copy Format Options (format specific settings such as debayering settings or timecode selection) and PreProcessing Options (resize on import and LUT) between timeline segments.


ConnectFX:
- You can now drag & drop replace the original clip the CFX was added to with a new clip from the library.
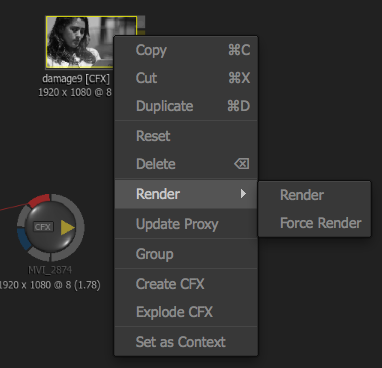
- Render options are now available as a contextual option when right-clicking a clip node. When you create a CFX clip you can render it right away.
 .
.

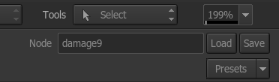
- The Node Load and Save buttons are now always available when a node is selected in the schematic. So you don’t have to select Node Pref anymore to save/load a setup. Preset menus have also been moved to the right side of the UI as well.

- The MUX node includes the Freeze Current Frame button. This is a quick way to output the image of the currently selected frame for the duration of the clip.
- You can set the ConnectFX default viewport as 1-Up or 2-Up in the main Preferences.
- It is now possible to disable or enable the automatic insertion of a node when it is dragged between two connected nodes in ConnectFX. You can find this option in the CFX Prefs and when disabled, you can hold SHIFT to auto insert a node.
- There are performance and rendering improvements in Action and the ConnectFX pipelines.
- In both Action and the Modular Keyer if the Action Back clip is a different resolution than the front clip a Resize node is automatically added.
There are even more additional improvements to the Color Management features in Smoke, as well as 100’s of bug fixes…and even a few more little things not mentioned here. I think you will be quite happy with the workflow improvements and stability of the Extension Release.
It will be available for download on May 29th, 2013. It is a separate install so you can have v2013 SP2 and Extension install at the same time. Projects are not compatible, per se, but there is an option to convert old projects to the Extension Release right on the splash screen. You will also have to create new users as many hotkeys and functions have changed.


