

3 Ways to Use the Fractal Noise Effect in Adobe After Effects

In this tutorial, you’ll learn how to harness the power of grayscale noise in Adobe After Effects. Let’s get started!
No matter the type of project you’re working on in After Effects, Fractal Noise can probably help make it better. This extremely versatile tool is useful for a myriad of purposes. To illustrate this versatility, I’m going to bring a spaceship cockpit to life using Fractal Noise in three different ways.
First, I’ll create a background star field, then add the speed lines of a star tunnel. Then, I’ll glitch out my HUD elements by creating simple displacement maps. To finish things off, I’ll dirty up the windshield of my spaceship with some textures. Let’s do this!
Use Fractal Noise to Simulate Elements
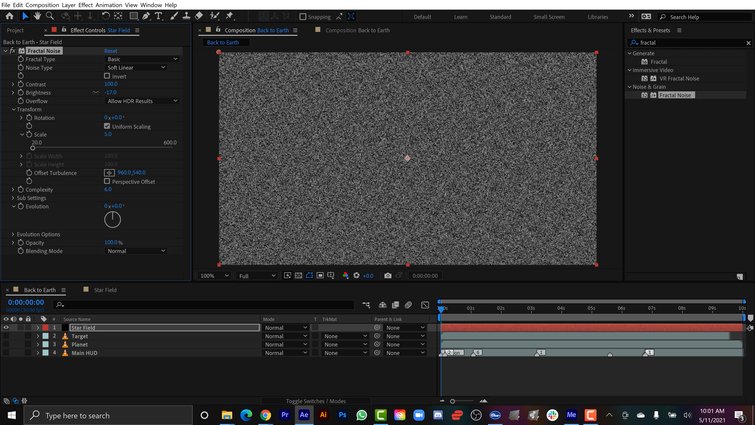
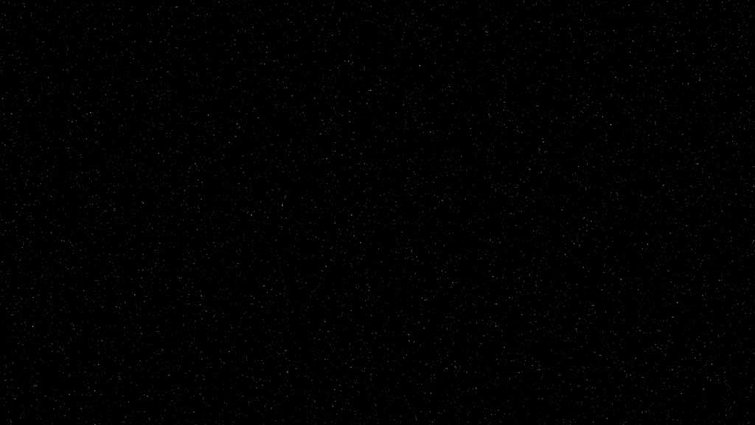
For the first step, I’ll create a basic star field. I’ll select Layer > New > Solid and name it Star Field. Now, I can add Fractal Noise via Effects > Noise & Grain. To create the stars, I’ll bring the Contrast to -75, then open up the Transform properties. Here I can bring the Scale parameter all the way down to 5.
It’s not bright enough, so I’ll duplicate the Fractal Noise effect and set the Blend Mode of the duplicate to Add. I can keep duplicating the duplicate until I’m happy with the brightness level of the stars.
In this animation, I’m flying a spaceship back to Earth at an insanely fast speed, so I want to show stars streaking by the ship. For this, I’ll create a new Composition with a resolution of 2000×2000, add a new Solid with the Fractal Noise effect, and name it Star Tunnel. Next, I’ll set the Contrast to 800, Brightness to -100, and open up the Transform properties. I’ll deselect Uniform Scaling, and then set the Scale Width to 1 and the Scale Height to 1400.

To create the tunnel effect, I’ll add Effect > Distort > Polar Coordinates to the layer. I’ll turn Interpolation up to 100% and switch the Type of Conversion to Rect to Polar. To bring it to life, I’ll go back to the Fractal Noise and add this expression to the Evolution property: time*2000. This expression is simply using time to drive the animation.
Now, I’ll drag the Star Tunnel comp into my main comp, placing it over the Star Field. I’ll set the Blend Mode to Screen, then add a small Ellipse mask to the center, feathering it out. Now, that’s a super-sweet star tunnel.

Use Fractal Noise to Drive Glitch Animations
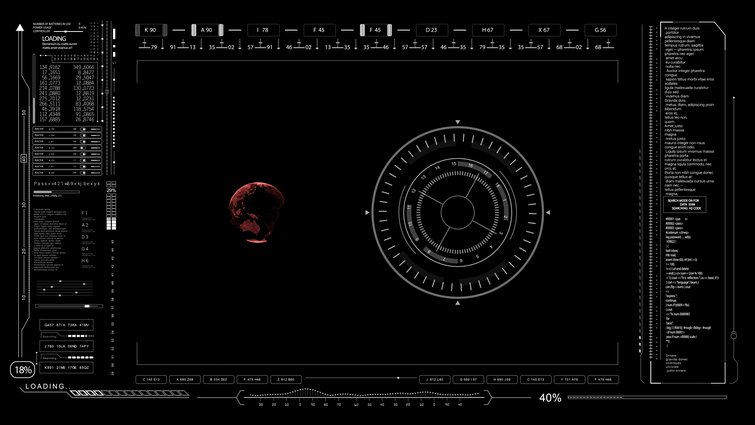
One of the most popular uses of Fractal Noise is to give elements a glitch effect. This is done by using the Fractal as a Displacement Map. Since I’m in a spaceship moving at light speed, I’ll make things more realistic by adding some glitches to my HUD elements. All three of these HUD elements are available on Shutterstock.
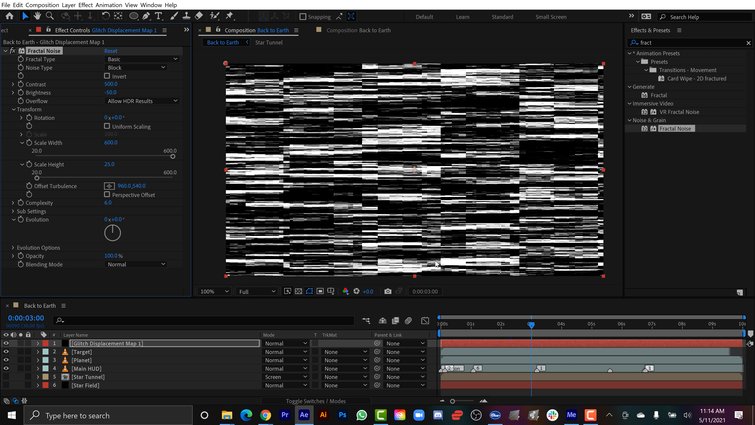
I’ll grab my main HUD overlay and isolate it in the comp. I’ll create a new Solid with a Fractal Noise effect and name it Glitch Displacement Map 1. I want a digital look for this glitch, so I’ll switch the Noise Type to Block and set the Contrast to 500 with a Brightness of -50. Now, I can go back down to Transform, turn off Uniform Scaling and set the Scale Width to 600 and Scale Height to 25.
Next, I’ll add a Displacement Map effect to my HUD clip, and set the source to my Glitch Displacement with Effects and Presets selected in the second dropdown menu. To get the size right, I’ll set Displacement Map Behavior to Stretch Map to Fit.
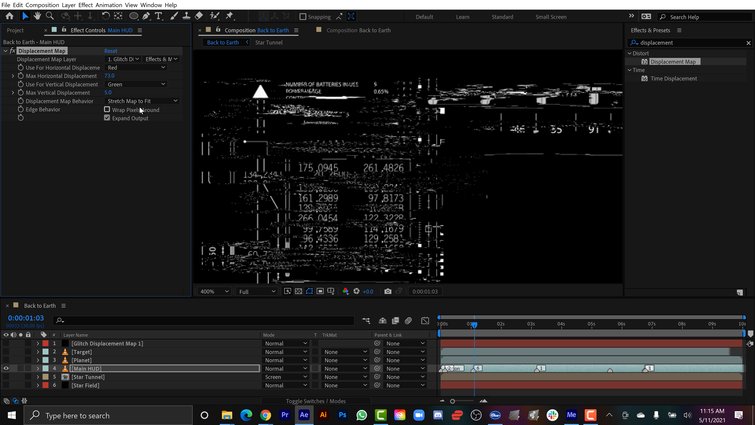
Finally, to bring the glitch to life, I’ll Alt + Click and add a Random expression to both the Max Horizontal and Max Vertical Displacements. Here’s what this expression looks like: random(8).
The higher the number, the stronger the glitch. I chose the Random expression because I want this to glitch continuously over time. If I want more control over the glitch, I can add a Slider Control and keyframe to my heart’s content. Now, I’ll simply repeat these steps for the other HUD layers, changing the random number to give me a different amount of glitch for each layer.
Use Fractal Noise to Add Texture
As a final touch, I’ll add some texture to make it look like the spaceship has some smudges and scratches on the windshield.
For this, I’ll create a new Solid with Fractal Noise and name it Windshield. First, I’ll create some scratches. The default Fractal Type is just fine for this look. I’ll set Contrast to 145 and Brightness to -78, then uncheck Uniform Scaling. Now, I can bring Width to 1200 and Height to 40 to get some good-looking scratch lines.

Next, I’ll create some smudges by simply duplicating the Fractal effect and resetting the parameters. I can switch the Fractal Type to Rocky and the Noise Type to Spline. I want this texture to be subtle, so I’ll set the Brightness to -75. To blend everything together, I’ll set the smudge fractal’s Blend Mode to Screen, and the layer’s Blend Mode to Lighten.
Now my windshield is nice and dirty.
Bringing Everything Together
It’s time for some final touches. I’ll grab my Target HUD element and Shift + Pick Whip it to the Planet layer. Then, I’ll resize and animate the planet across the screen, giving the feeling that we’re slowly approaching the Earth as we zip through the universe.
To shake everything up, I’ll add Wiggle expressions to the position of each element. I’ll parent the Windshield layer to the Main HUD, since these two objects need to move together to add to the realism of the scene. For a truly unique look, I’ll add a Camera and a Wiggle expression to the Point of Interest. I’ll activate 3D for just the starfield and the star tunnel layers. Now, everything is animating nicely.
Finally, I’ll add some lens distortion via an Adjustment Layer and the Optics Compensation effect. I’ll set the Field of View to 39 and turn on Reverse Lens Distortion.

Never fear, kids. Fractal Noise will get you back home safe and sound.
For more cool Adobe After Effects tips and advice, check out these articles:
- Starting with Adobe After Effects in 2020 — 5 Must-Know Features
- How to Animate Individual Letters in Adobe After Effects
- How to Create the Split Diopter Look in Adobe After Effects
- Basic Screen Replacements (with Reflections) in Adobe After Effects
- Create a Retrowave Background Loop with Adobe After Effects


