

Fix Out-of-Focus Footage With This Simple Tip

Work around slightly out-of-focus footage with this simple DaVinci Resolve quick tip.
Top image via Shutterstock.
Several years ago, in true guerrilla-filmmaking style, a friend and I were shooting in an unsafe location with potentially weak structures and asbestos—something as an older adult I would not recommend. However, as a guy in my mid-20s, all I saw was the perfect location for the project I was working on, and I took the risk. Yet while shooting, we still felt somewhat uneasy, and we wanted to wrap up quickly. As a result, I under-compensated the distance of the subject, and my focus for two shots isn’t perfect. This shot is onscreen for no longer than five seconds, and after we cut to see what the character is looking at, we return to a close-up in focus. In short, it’s an easy mistake. For cinephiles and perfectionists, however, it will not suffice.

You can see from the image above that it’s only a touch out of focus. Everything is perfectly viewable, but when you zoom in 100 percent, you can see the lack of sharpness in the details.
The Method
Technically, you can’t fix an out-of-focus image. Many, however, would jump straight into a standard sharpen effect and apply it to the overall image. However, that isn’t effective when it comes to soft-focus since it essentially sharpens every edge of the image, making it look like you shot on DV tape. We need more control over the elements of the sharpening.
For this technique, we’re going to leave the majority image in its soft-focus state and, instead, concentrate on bringing some life to the character’s eyes and head. The eyes are always the first thing we look at when speaking to or acknowledging a person; therefore, if we can sharpen the eyes and facial region, the rest of the image will look naturally out of focus, and it will be less noticeable.
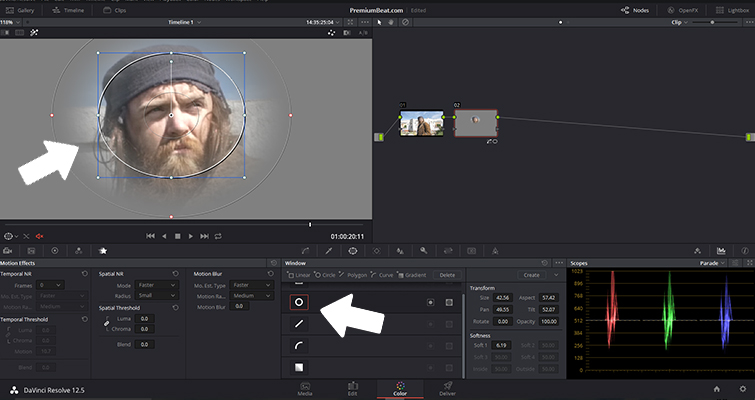
In DaVinci Resolve, bring your footage into the color grading page and create a new node. Select a circular power window on the new node and place it on the character’s face—eyes at the center point. Adjust the softness of the window, so sharpness will gradually fade away from the center of the window.
Open the sharpening panel. There are three settings you can adjust: Radius, H/V Ratio, and Scaling. The radius only needs a slight tweak. As you can see here, dropping it just -15 has already over-sharpened the image.

The radius setting controls how much to sharpen or blur. The H/V Ratio controls the direction of the applied effects; in our case, we can ignore this. The scaling control multiplies the scaling that the radius is implementing. Again, these settings need only the lightest of touches.

For my shot, I added just 0.03 sharpening and 0.44 scaling.
This is the before and after. The image on the right has more perceived sharpness to the face. Since the rest of the image retains the soft focus, it will appear more like a choice of shallow depth of field (even though we can see the background clearly) rather than a focus blunder. Considering this is a shot that will appear onscreen for five seconds, it’s a good fix.

For those who are not adept with Resolve, you could recreate this process in After Effects by duplicating the footage and using the Unsharpen Effect and a mask on the top layer (remember to feather the mask).
For more on DaVinci Resolve, check out the articles below:


