

Using Compound Clips in DaVinci Resolve

Work smarter, not harder! Grouping multiple clips together as a compound clip makes it easier to add effects. Here’s to do it.
Similar to grouped clips and compound nodes used during the grading process, compound clips allow users to cluster clips together in the Edit and Color pages.
DaVinci Resolve’s compound clip functionality is essentially a grouping feature that works much like those in other nonlinear editing programs. For instance, if you’re coming from Premiere Pro, this is pretty much nesting your clip. You’re taking multiple clips and collapsing them down into one.
Now that we’ve got that out of the way, Let’s dive in and learn how to make the most of compound clips in DaVinci Resolve.
New Compound Clip
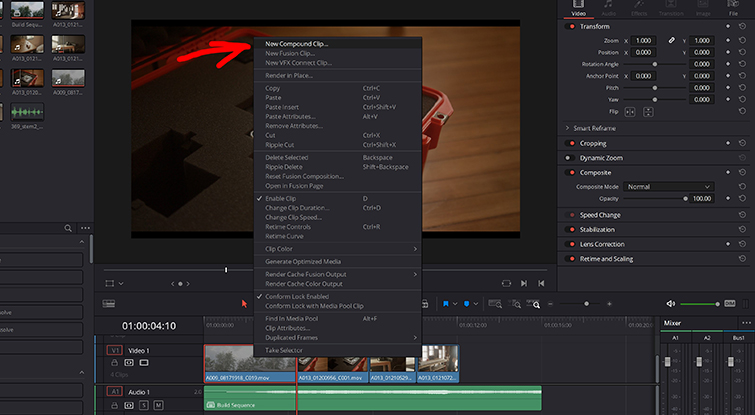
Lasso or control/command-click the shots to be grouped together and right-click on them. At the top of the menu, choose New Compound Clip. Compound clips don’t necessarily need to be in sequence with one another.
You’ll get a dialogue box that enables you to give a specific name to the compound clip. After clicking Create, the compound clip will show up in your Bin as its own clip. This will allow you to place this compound clip anywhere on your timeline.
For instance, say you have a sequence that you’ll need to place multiple times throughout your timeline. Simply make it a compound clip, and keep it handy in your bin. When you need it, get it and place it wherever you want. This will save you hours.
So, once you hit New Compound Clip, you’ll see this box pop up.
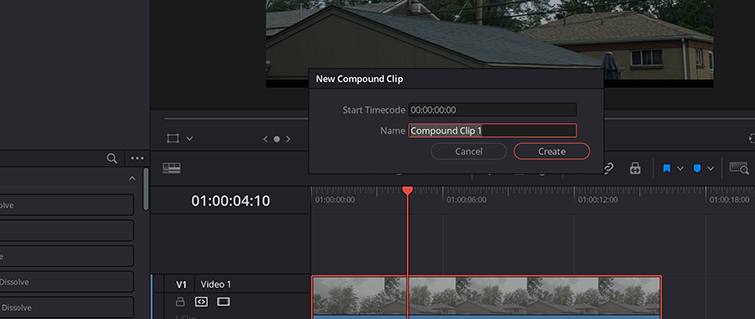
This just allows you to name the clip whatever you want. I highly suggest naming it if you’re planning on making multiple compound clips. This will save you from the process of scrubbing through them in your Bin to find the right one.
For a basic overview of compound clips, check out the tutorial below:
One of the biggest benefits of using compound clips is the time they save you when adding and applying certain transitions and effects to individual clips in a sequence.
For example, if you have a shot with a title and lower third (and maybe even an overlay) all stacked on top of each other on your timeline, and you need to dissolve or transition into the next clip in a certain way. Instead of going through and applying the effect to each individual clip, make them into a compound clip. When you apply the effect to the compound clip, every clip will have that effect applied to it automatically.
Adjusting the Compound Clip
Now, let’s say you decided to create a compound clip out of five different ungraded shots. As you might expect, if you grade the clip on the color page, the same grade will be applied to all five clips. So, be sure to go into your compound clip to grade each shot separately.
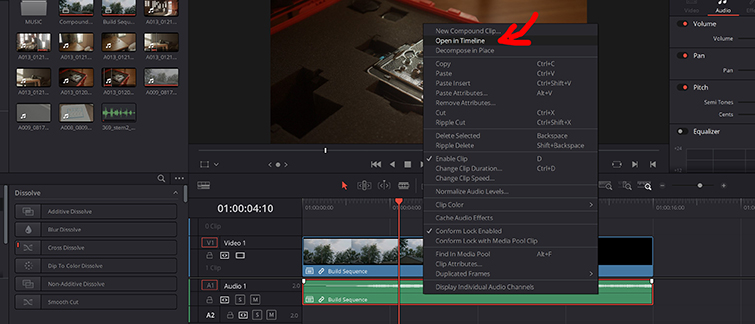
To open up the compound clip, as you can see above, right-click on the compound clip and hit Open in Timeline.
To color each clip separately, step into the compound clip using Open in Timeline, switch to the Color page, and grade as normal. To step back out of the compound, click on the name of your master sequence.
Decomposing Compound Clips
So, let’s say you want to remove the compound clip. Or, better yet, you want to change something about it, maybe swap out one clip for another, or you simply just don’t need the sequence made into a compound clip anymore.
You can get rid of a compound clip just as easily as making one. Select the compound, right-click on it, and choose Decompose in Place.
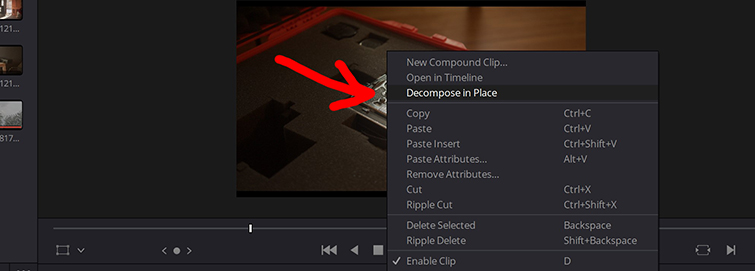
So, this just pulls all the clips back apart, allowing you to lengthen, remove, and do whatever else you need to the original clips on your timeline.
Other Uses for Compound Clips
Recently, I was working on a project in Resolve and needed a quick reverb effect applied to an audio clip. I needed the beat to end with an echo out instead of an abrupt stop. This isn’t anything new or anything you haven’t heard of with editing, but if you’re new to Resolve, creating a compound clip is the way to go.
The idea is simple: Just find the note you want drawn out with the reverb, then isolate it from the rest of the clip, duplicate that new clip, make that clip a Compound Clip, duplicate THAT inside the Compound Clip, then drag the bottom track out and mute it.
This will tell Resolve that your audio clip is longer than it actually is, thus letting you extend the clip further without any sound being present. Once the effect has been applied, it adds that reverb sound as the track fades away.
And, if you’re relatively new to DaVinci Resolve, might I suggest this video by our own Lewis McGregor. It’s an informative look at what to expect when approaching simple edits and how to get comfortable with the interface.
For more tips on DaVinci Resolve, check out these articles:
- CineMatch – Color Matching at the Click of a Mouse
- How to Move a DaVinci Resolve Database to Another Computer
- Fusion vs. After Effects: Which One Is Right for You?
- A Focus on Resolve 17’s New Masking Tool: Magic Mask
- 5 Hidden DaVinci Resolve Editing Tips and Techniques
Cover image via George Khelashvili.


