

Keyframing in Smoke – The Channel Editor

Animations are only as good as your keyframes. Find out how to get the most out of the Channel Editor in Autodesk Smoke.
Autodesk Smoke gives you great power in adding effects to your edits. But great effects are only as good as the keyframes that control them.
Smoke’s Animation Channel Editor is often overlooked, but I find it to be one of the video editing application’s strongest features. Working with Smoke’s animation curves allows you to easily tweak an animation so that it flows naturally and has just the right feel. Smoke’s Animation Channel Editor is similar to the Graph Editor in Adobe After Effects or the F-Curve editor in many 3D software.
There is a lot to the Smoke Channel Editor, so in this post we will take an in-depth look at the Channel Editor and the Keyframe Tab. The User, Filter, and Audio Tabs will be covered in a future post. Whether you work with AutoKey On or manually setting keyframes, eventually you need to adjust your animation. Within the nodes in ConnectFX, almost every parameter is keyframeable. This means that the Channel Editor often has lots of information to look at… sometimes too much. When you have lots of nodes in a ConnectFX setup, each node and every property of that node is accessible in the channel editor. Figuring out what’s what can be a challenge (click image for larger view).

You can access the Channel Editor with the aptly named ANIMATION button found in the main CFX Menu (and is also accessible within every node). This will bring up the Channel Editor in the lower part of the UI. This allows you to easily see your curves, along with your schematic and result views (2-up view).


If you hold SHIFT and double-click in a numeric field that has a keyframe set, then the Channel Editor will open up full screen at the top of the UI and switch to 1 up view. The numeric field you clicked on will be highlighted and framed.

If you hold SHIFT and single-click in a numeric field, and then open up the Channel Editor, that numeric field with it’s keyframe curve will be selected and framed for you.
You can expand and collapse the keyframe channels by clicking on the triangles. The nodes are broken down by name and contain channels organized by feature properties.

You can also choose to place the Channel Editor (F5 Hotkey) in one of the multi-view views which gives you access to the Curve editor, your Result View, and the numeric controls.

 By activating the REGEN button in the Animation menu, any adjustments made to the curves will be instantly seen in the Result View. So tweaking a curve will show you instant feedback on screen.
- You can manually select and move an individual keyframe by selecting it [Shift+S], and then moving it [Shift+M].
- You can also CTL+Drag and box select multiple keyframes to move them together.
- Holding [ALT] will move the keyframes in whole numbers.
- You can also adjust the in and out tangents on the keyframe to really finesse the movement of your animation.
![]() By default the tangents auto adjust, but you can break them [Shift+B] and then move them individually to get just the right look to your animation.
By default the tangents auto adjust, but you can break them [Shift+B] and then move them individually to get just the right look to your animation.

You can Add [Shift+A] and Delete [Shift+D] keyframes directly in the channel editor. Adding keyframes on the curve is really nice as it gives you some very detailed control in the middle of your animation.
But sometimes you need to do more with your keyframes and the curves, and that’s where the Keyframe Tab and it’s menu controls become important.


By selecting a single channel or group of channels, you can perform multiple functions depending on the menu selection.
You can change the color of the selected keyframes for easy identification, and adjust them using the numeric field to give you more precise control.
You can select a channel, highlighting the curve, then switch to Translate X, and then type a number or drag in the the numeric slider a give number of keyframes, positive or negative, and the keyframes or curve will slide along the X axis than many frames. This will affect when the keyframes happen in time.
The same thing can be done in the Y axis, by choosing Translate Y. This will move the curve up and down, affecting the magnitude of the animation.
Tangent R and Tangent L will allow you to adjust the tangents of multiple selected keyframes the same amount. When the tangents are broken, then the specific L or R (Left or Right Tangent) choice becomes relevant.
With a Keyframe or Channel selected, when the menu button is then set to Negate, the curve will invert the values for the keyframes, and thereby inverting the movement in the animation.

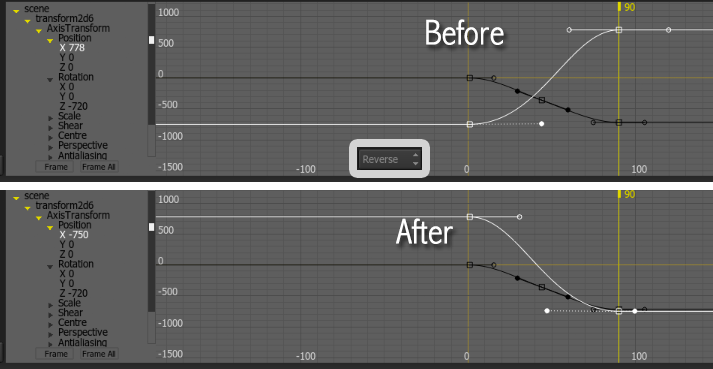
The Reverse function works when 2 or more keyframes are selected. If you have a simple animation where an image moves left to right, by selecting the Position X Channel, and selecting Reverse, it will now move right to left.
The Insert Key and numeric field next to it will allow you manually set a keyframe and then advance the time-bar the number of frames selected in the the field.

With this, you can easily set a keyframe every 10 frames for 90 frames. With the keyframes set you can then adjust the values for the keyframes as desired.
So for example, if you did this with Scale, you can easily create a bounce animation.


When you have a lot of keyframes generated by using any of the trackers, there are a few settings that can help you finesse your tracking keyframes.
The Average menu option will allow you to smooth out a curve by performing Average on the keyframes based on the slider value.

The Jitter menu option works much like the Average option, but is used when you want to smooth out jitter but keep the overall tracking motion when stabilizing a clip. While in the Stabilizer, and after tracking, you can select the SHIFT data and smooth out the tracking data by remvoing the jitter.
Removing jitter in Smoke is a process of trial and error. Try different values until you find one that gives you good results. As a general rule, start with a large value over n frames to remove slow jitter, and start with a small value to remove fast jitter.

Simplify is great for when you have been creating a complex animation with lots of keyframes. By selecting the channel, you can select Simplify, and by increasing the numeric slider, you can decrease the number of keyframes needed to generate the animation curves. This helps to clean up the curves and make it easier to adjust individual keyframes.

The Tangents, Interpolation, and Extrapolation options tell you what the current settings are, and gives you options to select different interpolation styles for individual keyframes if selected or for entire channels.

With extrapolation set to Cycle or Rev+Cycle(Reverse Cycle), with only a few keyframes you can create a nice looping animation or ping-pong effect.
On the far right of the UI you will find more keyframe tools (see image below). These are the basic, cut, copy, paste of selected keyframes or channels. You can copy whole channels like Postion X,Y, Z and paste them into another channel as long as it too has the same number of channels.
 For example you could paste it into Rotation X,Y,Z or Scale X,Y,Z. You can also Copy and Link, creating a simple link expression of one channel to another. The Keep button will clear all keyframes for the selected channels and keep the current value for the channel regardless if there is a keyframe there. Its a quick way to clear out rogue keyframes on a channel. There is also a Reset Channel or Reset All Channels button.
The Auto Select button will automatically select the animation channel in the channel editor whenever you adjust a numeric value while working with the tool. This is best seen when the Animation Channels are open in 2 up view.
In a future post I’ll show you some tips in displaying only animated channels and creating selection sets for channels that you are working on, as well as slipping keyframes by using the tracks view.
Until then… feel free to share any Smoke keyframing tips you may have!


