The New Raspberry Pi Camera Is a Worthwhile Upgrade
With a much larger image sensor and interchangeable lenses, the new Raspberry Pi High-Quality Camera Module is a complete upgrade from the previous model.
It’s not often that the Raspberry Pi Foundation creates first-party accessories for their credit card-sized computer, the Raspberry Pi (or RasPi for short). Their latest release, however, has folks in both the tech and camera worlds excited.
Perfect for tinkerers, content creators, and videographers looking to experiment with a surprisingly good budget camera, the versatile new High-Quality Camera Module is a total upgrade from the previous offering.
It’s now possible to use different lenses, adjust focus and aperture manually, and attach to a tripod for stable video. It’s a far cry from the previous fixed-focus camera modules, which were practical and affordable but not great.

The bundle comes with the HQ Camera Module and two lenses. All images via the author unless noted.
The camera module went on sale immediately after a surprise announcement on the Raspberry Pi Foundation website. Word spread quickly, and it didn’t take long for the HQ Camera Module to sell out at most online retailers. Fortunately, the camera module and lenses are expected to be back in stock by mid-June.
Luckily, I was able to grab one during the first few hours, and I’ve spent some time fiddling with the lenses and settings. While it can’t compete with mirrorless or DSLR cameras that are much more expensive, the HQ Camera Module captures video and images clearly, for a fraction of the price.
With the addition of a small screen, a case, and a portable battery, the RasPi could be a hacked-together portable camera. In fact, someone has actually done it already, and it won’t be long until manufacturers capitalize on a portable camera case.
If you want to know how to set up the HQ Camera Module and what you can do with it, keep on reading.
Camera Module and Lenses

Everything that comes with the bundle. The camera module includes a short ribbon cable and a C-CS lens adapter (farthest to the right) to fit the 16mm telephoto lens.
With a 12.3 megapixel Sony IMX477 sensor, the High-Quality Camera Module is the best camera currently available for the Raspberry Pi. It’s relatively affordable, versatile, and has plenty of potential for future projects.
The HQ Camera Module costs $50, which is only $20 more than the older 8-megapixel models. Online retailers are bundling the new camera with two lenses, both of which are available as separate purchases. The CS-mount 6mm wide-angle lens costs $25, while the C-mount 16mm telephoto lens costs $50.
In a move that’s in line with the Raspberry Pi Foundation’s business practices, the new camera module works with all current and previous RasPi models that have a camera connector. Older models, such as the RasPi Zero, may need an adapter. The camera works with CS-mount lenses, but it also works with C-mount lenses via the C-CS adapter included with the camera.
How to Set It Up

The ribbon cable connects to the camera connector, which is next to the audio port. Image via Alejandro Medellin.
Setting up the new camera module is pretty straightforward, and even more so if you already have some experience with setting up a RasPi. (FYI, we recently covered the RasPi, and the article has tons of great information, project ideas, and a buyer’s guide.)
Before you start, insert a microSD card — installed with the latest version of Raspbian OS — into the RasPi. If the RasPi is inside a case, take off the top and look for the camera connector located near the audio port. There’s a similar connector for screens, so make sure you don’t plug the camera into that one.
For this next step, you’ll need the thin ribbon cable that comes with the camera module. Carefully lift the little piece of black plastic atop the camera connector, and gently insert the cable until it comes to a stop. Don’t force it. Push the black plastic holder down onto the connector, and you’re done. The camera is now connected to the RasPi.
Connect all the relevant cables, then boot up the RasPi. Open up the Settings menu — accessible via the top-left corner drop-down menu — and enable the camera. For the change to take effect, reboot the system by heading to the command terminal and typing sudo reboot.
Now you’re ready to take images and shoot video via the RasPi command terminal or by running Python code. It’s not as hard as it sounds; even though the RasPi lacks a graphical interface for the camera, shooting video or images is easy enough once you learn some basic commands.
How to Shoot Images and Video
The command terminal is the simplest way to shoot images or video, but it does require you to learn a variety of terms and what they do. The camera module and Raspberry Pi cannot autofocus or adjust aperture — this is done via the lens. Still, it’s possible to tweak settings such as exposure value, brightness, contrast, saturation, and others. There are dozens of commands to learn, but you’ll only need to know a few to get started.
Shooting Images on the Raspberry Pi
To test out the camera, type raspistill -o test.jpg into the command terminal. The raspistill command tells the RasPi that you’re taking a picture, and the -o command gives the image a name based on what follows (e.g., test.jpg). You can name the file whatever you want, and the image is stored on the desktop.
Before the image is captured, you’ll see a preview screen pop up for a few seconds, but it’s possible to change that by using -t and then following it up with a time measured in milliseconds. For example, this command — raspistill -t 5000 -o test.jpg — takes an image after five seconds.
Shooting Video on the Raspberry Pi
Shooting video is not much different, except that the command changes to raspivid.
When shooting video, the -t command defines how long the video will be. To adjust the resolution, type -b followed by the bitrate — a bitrate of 15Mbps is 15,000,000, and the max bitrate for the RasPi is 25Mbps.
Changing the frame rate can be done by using -fps followed by the number of desired frames, such as -t 30. The RasPi can reach 90fps, but this will heavily impact the resolution.
If all this sounds too complicated, don’t worry — the Raspberry Pi Foundation published a detailed camera guide that covers everything. You can download it for free from their website.
The camera guide goes through the setup process, commands, projects, and it even provides Python code that you can copy and paste. It tells you everything you need to know to shoot images, video, slow-motion clips, time-lapse footage, and more.
Initial Impressions
I got the RasPi 4 – 4GB a few months ago, and I’ve had a blast using it as a secondary desktop computer and retro gaming console. I also occasionally use the RasPi as a security camera that I can access from any device within my network. This high-quality camera, however, blows the previous camera out of the water. The lenses are the real game-changers, adding versatility to an already great camera.
Lenses

Both lenses are small enough to fit in the palm of your hand. The 16mm telephoto lens ($50) is on the left, while the 6mm wide-angle lens ($25) is next to it.
The 6mm lens is perfect for wide-angle shots, and it’s the best choice if you’re planning to use the RasPi as a security camera. The 6mm lens also works well as a webcam, which I’ve tried on Google Hangouts.
The F1.2 aperture adds depth to your shots because of the shallow depth of field, and I immediately noticed that I popped from the background. I don’t think other cameras at this price point — $50 for the camera module and $25 for the 6mm lens — look as good.
At $50, the 16mm telephoto lens is a bit pricer, but it’s worth the money. Content creators can use it for excellent close-up shots or to create much tighter framing when speaking to the camera. This lens has an aperture of F1.4-16 and does a great job of providing shallow depth of field to your shots. The 16mm telephoto lens works well for bird watching, too.
Other Features
The 12.3-megapixel sensor is larger than the 8-megapixel sensor on older models, and the upgrade is noticeable. Images and videos appear sharper and capture more color, with increased detail in the shadows and highlights.
I also noticed that the camera performs much better in low-light conditions, such as a dimly lit bedroom. Shooting video at a high frame rate is possible with this camera module because of the bigger sensor, though the resolution does take a considerable hit.
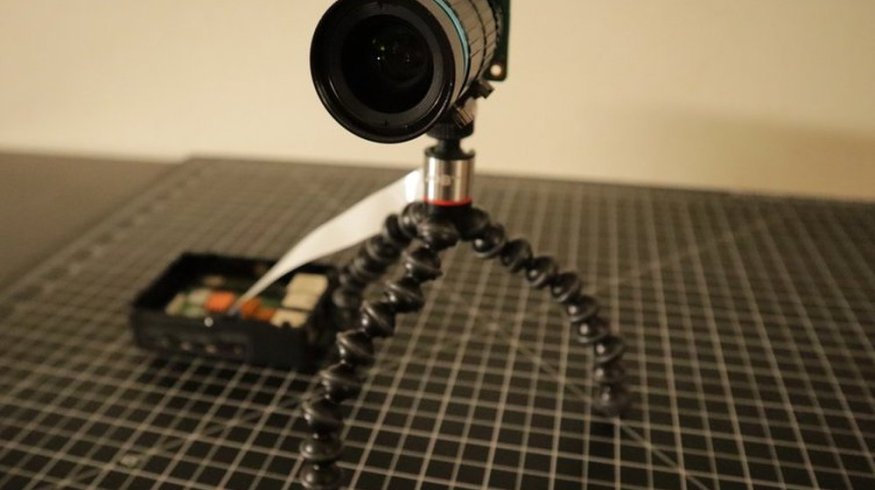
The tripod mount, which was lacking in the previous camera modules, might seem like a minor addition, but I can’t imagine not having it. I recommend using a small tripod because the included ribbon cable is not very long.
Complaints

The ribbon cable is just long enough to reach the camera module on the tripod. Moving the camera requires moving the whole unit, which is cumbersome, especially when it’s hooked up to the monitor, keyboard, mouse, and power source.
There’s not much I dislike about the new camera module, but I will say that the ribbon cable is much too short. I find myself constantly battling the ribbon cable when trying to move the camera, which is attached to a short tripod. Those who use even smaller tripods may not have to deal with the same problem, but I do wish they had included a second larger ribbon cable. Ultimately, it’s not a significant issue since I can purchase a longer ribbon cable.
The ribbon cable also interferes with the case. If you have a case with a slit for the ribbon cable, then you’re in the clear. I don’t, however, so I’ve had to remove the top part of my case that houses the small CPU fan. It’s my only option at the moment, and the only way to remedy the issue is to buy a new case or roughly mod my old one with a box cutter.
Another gripe I have is about the lenses. The complaint isn’t about the quality or performance, it’s more about the manual adjustments. Maybe I’m too used to digital cameras doing all the work, but it can take several minutes of continuous manual aperture and focus adjustments to achieve clear, well-lit shots.
When framing oneself in a shot using the telephoto, the camera is a few feet away. So, every time it needs focusing, you have to get up, adjust the focus, and sit back down to see if it worked. The situation is not ideal — but it’s also $125 for the whole camera kit, so certain limitations are expected. Again, it’s not that significant of a problem.
A Legit Camera Module for a Tiny Computer
In the end, the HQ Camera Module is the Raspberry Pi Foundation’s finest camera to date, and the price appeals to all. I admire that the company continues to iterate on its products, not wanting to rest on its laurels. New products from the Raspberry Pi Foundation aren’t released that often, but when they are, they’re always well-received by the community.
The camera module is a clever, affordable product with more uses than one, and I’ve had a lot of fun experimenting with mine. Like most people, I prefer my Pi a la mode, and this is exactly the dollop of ice cream I’ve been waiting for.
Interested in interesting video gear? Considering creating some unconventional content? These articles are for you.