Organizing Your Premiere Pro Project
Organizing your video editing project is key to an efficient edit. Let’s take a look at a few ways to organize footage and assets in Premiere Pro for editing success.
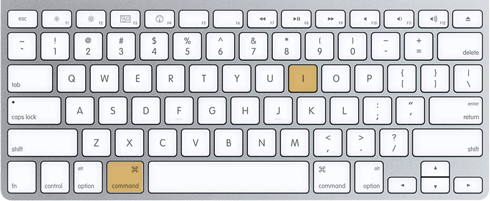
Importing assets (video, audio, pictures, PSDs, image sequences, titles, etc.) into Adobe Premiere Pro projects is a simple task that can be done with the keyboard shortcut Control + I (on a PC) and Command + I (on a Mac).
Premiere Pro Keyboard Shortcut: Importing on a Mac
You can also get media into your project with a quick double-click in the grey area of the project panel. So, yes… importing is easy. The hard part is keeping your video editing assets organized once they’re in the project!
The first thing that needs to be said is – slow down! Don’t rush to grab everything in a hurry and dump it in your Premiere Pro project panel and start flinging things into your timeline. This reckless speed at the front end will cost you precious time on the back end. Instead, take a moment to think about what you’re going to be adding to your project and where you want to keep those assets so that you can easily find them later.
Organizing Your Premiere Pro Project: Harness the Power of Bins
This calls for bins (video editing language for folders), which are easily be created in Premiere Pro by either choosing File > New > Bin or by clicking the below icon at the bottom of the project panel.
Note: Make sure you have the project panel selected or else the bin option will be greyed out.
Once a bin has been created, you should always rename it so that it’s completely clear what you will keep inside it, as seen below.

Now to the important issue of opening and navigating bins in Premiere Pro.
Organizing Your Premiere Pro Project: The Ins and Outs of Bins
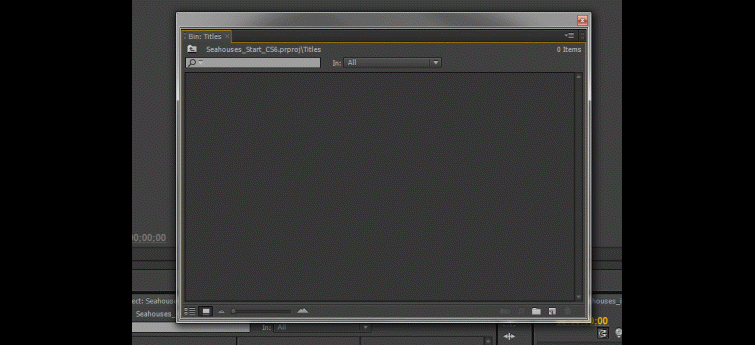
Probably your first impulse is simply to double-click on the bin, hoping that it will open in place. However, what you find instead is that the bin has a default behavior of opening up in a floating window, as seen below.
However, we can change the default setting in the Premiere Pro preferences. So, on a Mac go to Premiere Pro > Preferences > General. On a PC go to Edit > Preferences > General and look at the following section towards the bottom of the page.
As you can see, I have already changed the behavior of the double-click from “open in new window” to “open in place.” I’ve also modified the +Ctrl shortcut (+Cmd on a Mac) to “open in new window.”
What this means is that when I double-click on any bin, it will open in place — but if I really want a floating window, I can then choose to hold Ctrl/Cmd while double-clicking to get that. Also note that Alt + double-click will open the bin up in another tab in the project panel.
You can also change the order of these tabs simply by clicking on any tab and dragging it to another place, as shown below.
Okay, so now you’ve changed your Premiere Pro preferences so that bins open in the Project Panel and you’ve added assets to the open bin. Now you want to get back to the main Project Panel with all your bins in it — but you can’t see how! To navigate back you need to use the icon shown below.![]()
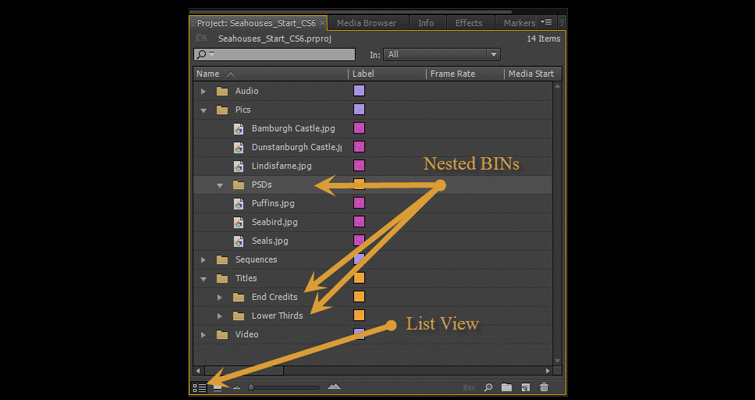
Some of the typical bins you will need for a basic project are shown below. However, you may find it useful to create bins inside existing bins. To do so, select a bin and hit that new bin icon again. You’ll see that a bin will be nested inside the bin you’ve selected.
For example, you may have a “Pics” bin for your pictures, but also want another bin inside it for your PSDs. You can see this more clearly if you look at your bin structure using the List View as shown below.
If you accidentally create a bin in the wrong place, don’t worry — you can click on any bin and drag it in and out of any other bin. The bin will move with all its contents to wherever you decide it should be.
In Premiere Pro, you can import items directly into a bin. To do so, simply open a bin and choose the standard import methods (as referenced above). The items will automatically be imported into the open bin. This can save a lot of time when organizing your Premiere Pro project. Create bins specifically for your sequences to keep them organized and all in one place.
A Word About Video Editing Organization
Always give your media assets names that mean something to you. With lots of tapeless formats available today, you may receive files with very technical and non-descriptive titles. In Premiere Pro you can rename any asset with a name that means something to you without losing or changing the original item.
Premiere Pro creates a link to the original asset on your hard drive and allows you to change the name of the file in the app without changing the asset. So, if you change a name from “Clip 001” to “Tide coming in – early morning,” Premiere Pro will still always play “Clip 001” on your hard drive every time you see “Tide coming in – early morning” in your timeline/project panel/source monitor, etc.
Names matter and a good naming convention will save you a lot of headaches further down the line! If you’re looking for more tips on naming, see our previous post on “File Naming for Video Editors, Designers & Photographers.“
Start off by thinking about your organizational game plan from the start, and do your best to maintain it throughout your post-production workflow. One way to simplify your folder organization is to create a project template — an empty Premiere Pro project with all the bins you typically need.
Next time you need to start a new project, simply open your template, do a File > Save As, and give it the name of your new project. This will save you time — and every second counts in video editing.
If you’re looking for a few more video editing tips, checkout our extensive library of Premiere Pro articles!
Got any time-saving or organizational tips you’d like to share? Do so in the comments below!


