
How to Quickly Retouch Skin in Adobe After Effects

Need to remove blemishes or smooth skin textures in your footage? Check out this tutorial to see how it’s done in After Effects.
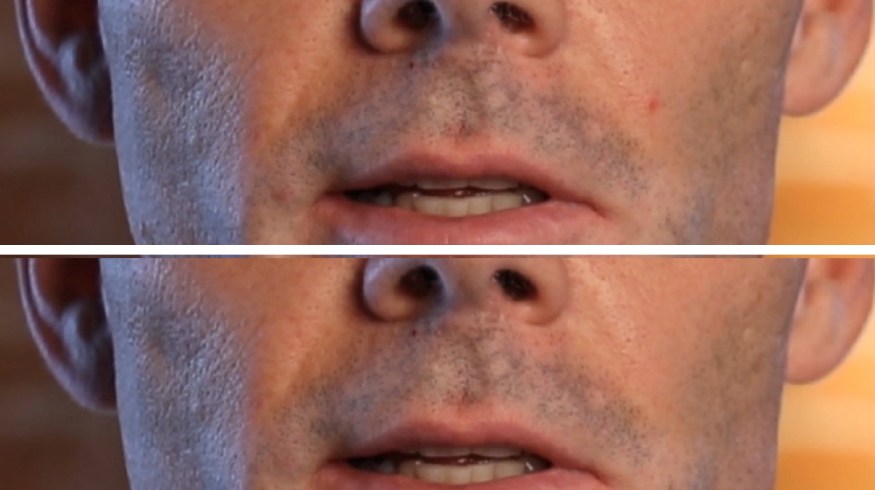
Knowing how to retouch skin in a photograph is truly an art form. Retouching skin in a video, however, is a completely different ball game. You’re not just retouching one photograph — you need to retouch hundreds if not thousands of the individual still images that make up your video clip. Also, you need each photograph to seamlessly blend with the next. This requires a unique approach that includes masks, tracking, and a little patience. Let’s take a closer look at one method to get you started. In this example, I’ll be removing a small blemish on my interview subject’s cheek.
Step 1 — Duplicate your video

For the first step, I need to duplicate my layer. I’ll rename the duplicate layer cheek. Labeling the layers will help me stay organized once I do a lot of retouching. If I avoid this step, I can get lost in my project and quickly throw something out of sync. The duplicate layer I create will serve as a patch over the original layer. The original layer will remain untouched.
Step 2 — Apply a Mask
 Next, I need to apply a mask to the cheek layer. Think of this method as similar to using the clone tool in Adobe Photoshop. To get a patch for our blemish, I’ll use the Ellipse tool to mask an area directly adjacent to the blemish. This area needs to match the color and general movement of the blemish area. I’ll also make the mask slightly larger than the blemish. I need to be careful to not move the layer forward or backward on the timeline, as both of my layers need to be in sync for the effect to work.
Step 3 — Track the Mask

Once I have my mask applied to the cheek layer, I’ll track it. To do this I’ll simply control-click the mask and select Track Mask. This will bring up the Tracker panel, where I can select the method and direction of the tracker. I can track by playing back the current time indicator. For more complex tracks, I can go frame by frame. Once the mask track is complete, I’m ready to patch the blemish.
Step 4 — Move Layer Over Blemish

To patch up the blemish, I need to move the cheek layer over the blemish within the composition panel. To make sure the patch blends, I’ll play back the clip and check the movement. It helps to watch the clip a few times, once in full screen and once zoomed in tight on your patch. I can also check out the patch by isolating the layer as I watch it.
Step 5 — Fine-Tune the Mask
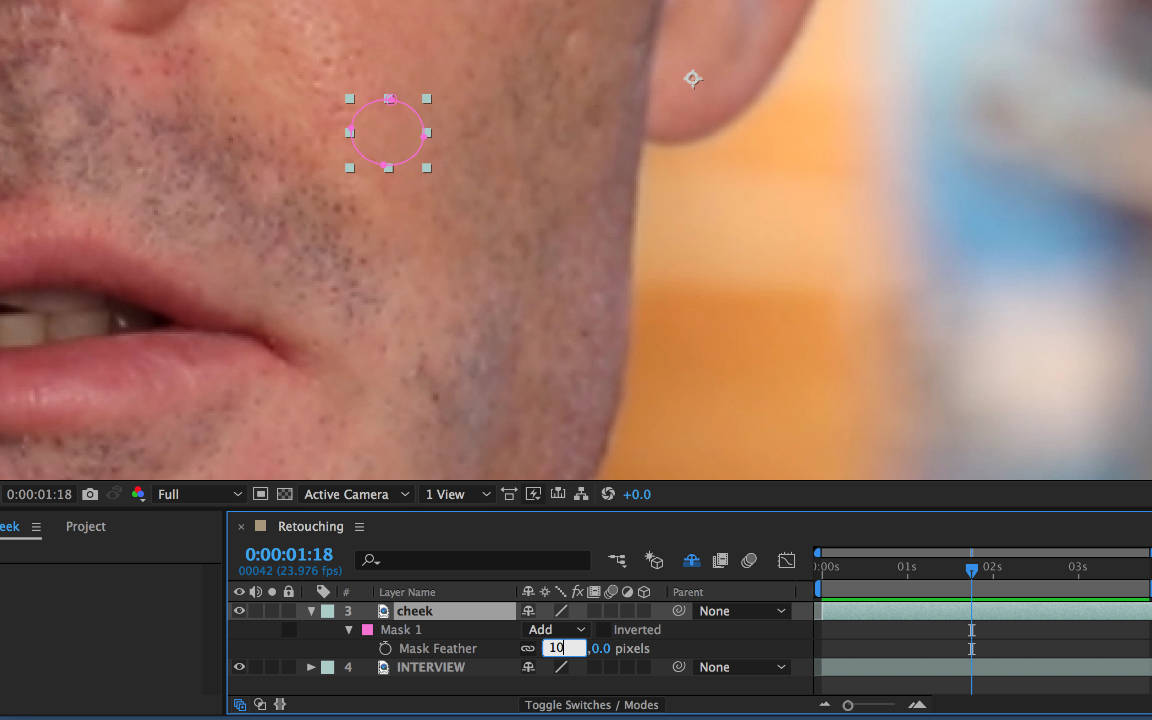

For the last step, I’ll do some fine-tuning to the patch so it blends perfectly. There are a few ways I can accomplish this. The main thing I’ll do is add a feather to the mask. Since it’s a relatively small mask, a 10-pixel feather will do. If I need to further match colors or brightness, I can add an RGB curves effect and adjust accordingly.
Final Notes
Mask tracking is a powerful feature in After Effects that you can use for a variety of different purposes. Use it to put a mosaic over a face, blur out logos and signs, create a moving vignette, or color correct specific areas of your image. You can also remove wall outlets and other distracting objects.
Looking for more on skin retouching? Check out the following.


