
How To Make Someone Look Ill Without Makeup in DaVinci Resolve

Need to make an actor look sick, without a makeup artist? Use this DaVinci Resolve technique to pull it off.
All images courtesy of the author.
Ok, first, you should not be relying on post-production for this effect — practical makeup is always superior. However, if you’re late into production, and there’s been a story tweak that requires one of the characters to look ill, or perhaps you’re working on a passion project with no budget, here’s how you can make one of your characters look like they have fallen ill.
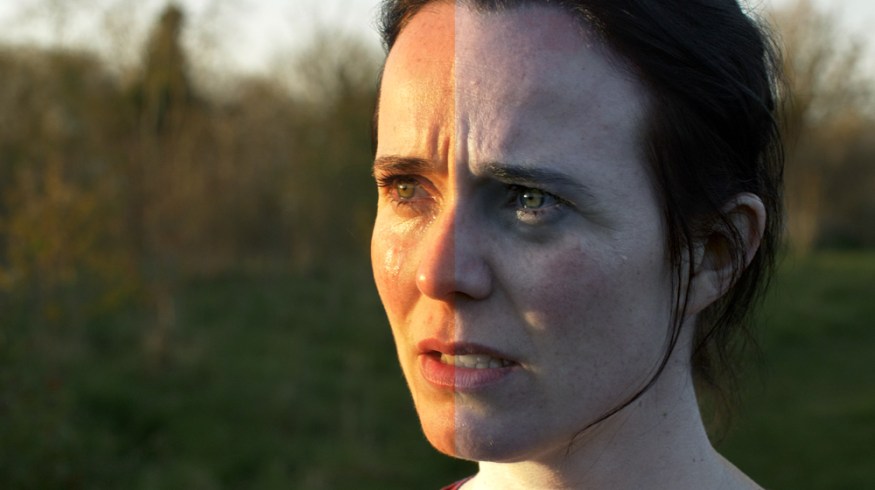
Open Resolve, Import your clip, and head to the color page. I’ve inadvertently chosen to work with quite a complex clip as the actress is moving, and the evening sun is illuminating her, which makes one side of her face brighter than the other, but both of these issues are workable.
With the HSL qualifier, select your actor’s face, and use the individual hue, saturation, and luminance sliders to rein in the qualification to make sure only the actor’s face and skin are selected. Ideally, you want to avoid bringing any hair into the selection. I would recommend using the high contrast B&W highlighting (OPTION/ALT+SHIFT+H) to see what areas you’re not selecting.

I’m quite happy with this selection, but we have a problem with the foliage in the background. This image was shot during golden hour, and those trees have a similar hue as the actress’s skin. To fix this, we’re going to apply a square power window. In this particular instance, I’m using a square window because the circular window misses part of the actress’s neck.

This is our pulled selection; it looks good, but out of personal preference, I’m going to give the mask a blur of 5. The saturation in Resolve defaults to 50; we’re going lower this down to 40. (When we’re sick, our bodies divert blood away from our faces and skin toward vital organs and areas of infection. We’re duplicating that look.) Although we’ve lowered the saturation, we get the paleness by introducing cyan to the midtones. In the image below, you can see that the amount is relatively small, but it’s enough to neutralize the natural complexion of the actress’s skin and give her a cold look.

We’re going to lower the lift by a small amount to darken the shadows and give the actress a slightly gaunt look. We’ll also increase the gamma and gain, so it looks like the pale skin is reflecting more light.

To finish, we’re going to create two circular power windows around the actress’s eyes.

Here you want to lower the overall offset and introduce a slight amount of blue into the gamma. This will give the actress dark bags under her eyes, as if she hasn’t slept well for days. Of course, if your character is moving at all, you’ll need to track her. Resolve has a fantastic tracker, so just switch to the tracker window and hit play. Your power windows should now track with the movement.

This is the before:

This is the after:

Without a makeup artist, it looks pretty good. Although I can understand how some may look at this image and think it looks like I’ve just neutralized the evening sun. So I’ve gone back to an older clip and performed the same technique on a different actor.

Now it looks like he’s about to fall victim to a fever. It’s a great technique to have your Resolve arsenal.
Looking for more articles on DaVinci Resolve? Check out these articles.
- Speed Up Your Editing In Resolve with These Quick Tips
- How To Use The Dynamic Trim Tool in Resolve
- Reduce Unwanted Skin Shine In Post-Production with DaVinci Resolve


