
Reduce Unwanted Skin Shine In Post-Production with DaVinci Resolve

No makeup artist on set? Your actors could end up with shiny skin. Here’s how you can minimize the problem in post-production.
All images courtesy of the author.
Unwanted shine is every narrative filmmaker’s headache from time to time. It can distract from the story, and it lends an amateur air feel to the production. For example, here is a still from a project I’m currently working on.

While there isn’t anything inherently wrong with the picture at the surface level, upon closer inspection we can see a problem.

In the shot, the left side of the actor’s cheek is showing unwanted shine. These are specular highlights that are somewhat brighter than normal facial highlights. This sort of shine can be the result of sweat or makeup, and the reflection becomes slightly stronger than the skin tone. It’s important to note that these highlights are different from seeing the side of an actor’s face completely clipped due to improper exposure.
For some, this may not be a dilemma. However, when someone brought up the skin shine here, it was all I could see when the actor moved his head.
Let’s look at how you can fix this problem. We’re not going to be able to eradicate the shine, but we will be able to dull the glossy texture.
In the shot, the actor is wearing a dirt makeup mixture of Aloe Gator SPF Gel and Mehron Star Blend Cake Makeup: ebony color. This was the mixture makeup artists on Terminator: Salvation used to give the characters a “lived-in” dirt effect. The Gator Gel is a substance similar to petroleum jelly, and it’s giving the actor an oily complexion. At the time, we didn’t have any HD translucent powder, which would neutralize the shine, and as a result, we now have to fix this problem in post.
For this specific task, we’re going to be working in DaVinci Resolve. So head on over to the color window and find your clip.
Using the HSL qualifier, select the specular highlights, and minimize the selected area using the luminance and saturation controls. You want to avoid bringing neutral skin into your selection, but if it’s unavoidable, don’t worry: we can fix that a little later.

Next, you want to blur the selection from around 75-150. The amount of shine will dictate how much blur you use.

You now want to lower the gain/highlights to minimize the shine, but we don’t want to kill the natural vibrancy of the area, so we’re also going to slightly increase the gamma/midtones. This will reduce the shine, but maintain the overall luminance. If you find that part of the area has become discolored, gently introduce a similar color in the gain color balance controls.

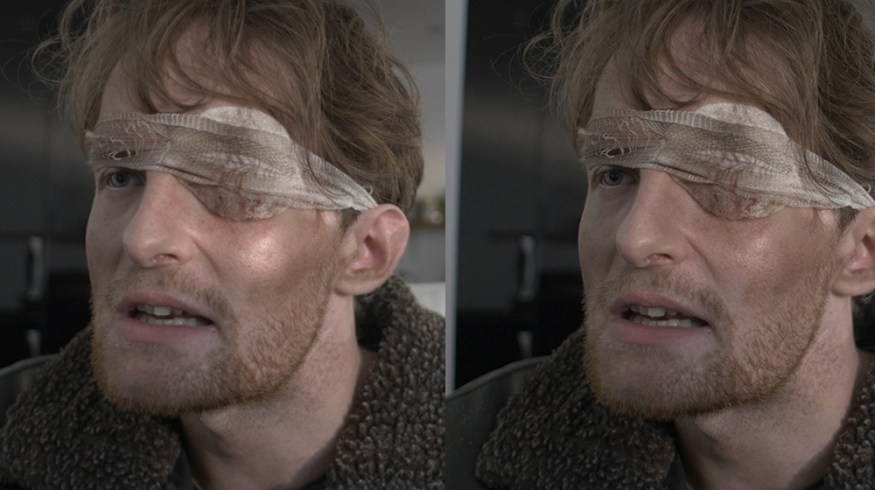
Our final image will look like the following. You can now see that the shine is significantly less noticeable, and it looks a lot more natural. There is a slight discrepancy in exposure between the two images. But as the scene has yet to be graded, that is very easy to fix later.

Depending on the intensity of the shine, this fix may not always work. Highlights are the enemy when working with digital, and you’re going to want to minimize any post-production work that involves healing them. In this case, we should have had a makeup artist at the ready with the HD powder to avoid this issue, but that’s low-budget filmmaking for you.
Looking for more DaVinci Resolve tips? Check out these articles.
- Reduce Unwanted Skin Shine In Post-Production with DaVinci Resolve
- Employ the Usage Tab to Simplify a DaVinci Resolve Project
- DaVinci Resolve Tip: Use Color Keys to Fix White Balance
- DaVinci Resolve: Enhance Your Sky in Under Five Minutes
- Speed Change Techniques In DaVinci Resolve
Interested in our entire collection of Resolve articles? Check them out here.


