
How to Set Up a Tethered Shoot with the Panasonic GH5

Need to tether your GH5 to your Mac or PC so you can view photos and videos in real time? Here’s how you do it using Lumix Tether.
Last Fall, Panasonic released a much-awaited firmware update for the GH5. It introduced an abundance of new features, along with fixes for many issues that users were experiencing. One of the exciting additions to the camera was the ability to tether with a PC or Mac. If you’ve never heard of tethering, it’s just a way to directly connect the camera to the computer, so you can view your photos or videos in real-time. (It also allows you to make adjustments to your camera using the software.)
You’ve more than likely seen this in use in a behind-the-scenes fashion shoot. Whether you use the GH5 for video only, or for both video and photography, I’m confident you’ll find a use for this feature. While there are countless tethering programs available on the market, we are only going to focus here on using the Lumix program.
Getting The GH5 Ready
The Lumix Tether software is free for both PCs and Macs, but before you install it, let’s get your camera ready.
If you download the tether software and find that your GH5 isn’t connecting, it’s likely that you have the older firmware installed. But before you can install the update, you need a freshly formatted memory card and a full battery.
Next, head to the Panasonic website to get the new firmware. With the firmware .exe downloaded, extract the GH5__V22.bin file to your desktop, so it’s ready to place onto your memory card.
If both the memory card and the battery boxes are ticked, copy the GH5__V22. file into the main directory of the memory card, insert the memory card into your powered-down GH5, turn it on, and press the play button to initiate the update.
I cannot count the number of times that I’ve failed at successfully following firmware update instructions, so if you too find these instructions cumbersome, you can watch the steps I listed above in action in the following video from Max Putnam.
The Software
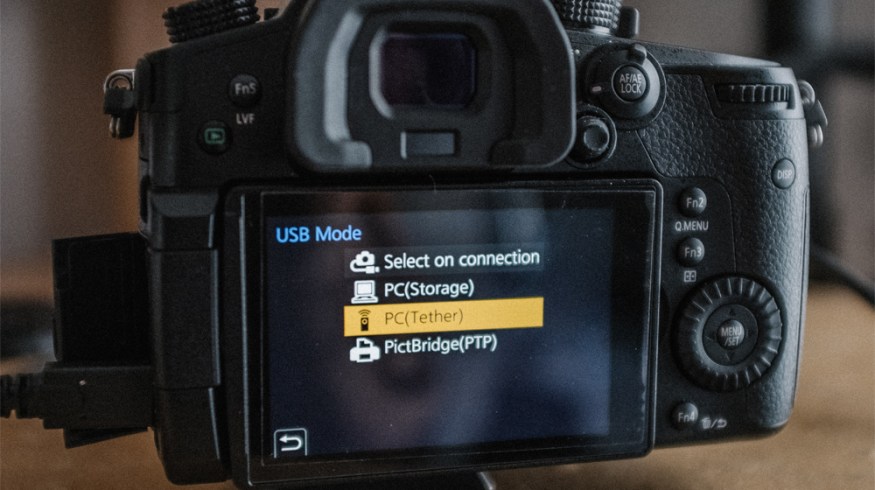
Before you connect the GH5 to the PC, you need to change a setting on the camera, otherwise, your camera and PC will communicate as if you are only transferring media.
First, head to the setup menu (fourth menu down), and on the second page, select USB Mode. There are four options:
- Select on connection
- PC (Storage)
- PC (Tether)
- PictBridge(PTP)
You’ll need to select PC (Tether). Alternatively, if you don’t have a card reader and usually transfer media via USB, you can choose Select on Connection, which brings up this menu whenever you connect to a PC.
With the GH5 set up, it’s time to get to it.
The GH5 comes with a USB-C to USB-3.0 cable that you can use for the software. However, it’s only one meter long, so it might be impractical for real-world tethering. I highly recommend TetherPro USB 3.0 cable.
With the camera connected to your PC, and turned on, you can finally open the tether software. At first, you’ll see the tether remote control panel. Here, you can change most creative parameters on the camera. From the shutter speed to the metering mode — anything that you can adjust using the external function buttons on the GH5 will accept modifications from the control settings. There are also a few internal settings in the setup menus that you can adjust, such as resolution and file quality (when using the camera for stills).

I use old manual Nikkors with my GH5. Therefore, the lens properties on the control panel will be greyed out in the screenshots. But if you want to check out how the Lumix Tether works with electronic lenses, there are a few demonstrations in the following video from 9to5Toys. You can click any area of the image to tell the camera to focus on that specific point.
Before you start to use the tethered setup, you want to open the settings panel and adjust anything you need to for your project. The Storage Location setting is useful if you plan to capture the media directly to your PC. Of course, in case of data errors, it’s always best to save for both. It’s also worth noting that if you plan on capturing media directly to your PC, you still need a memory card in the GH5.

With the settings completed, hit LV (Live View) to open the preview monitor. You may notice that if you use focus peaking or zebra patterning, those features also carry over into live view. However, other LCD camera properties, such as the grid and level gauge, do not carry over, and you have to turn them on manually using the buttons on the right-hand side.

The software also lets you customize the parameters of the grid and guide lines — such as the thickness or number of the lines. Now, I’ve used the tether software once on a job, and I’ve gone over this software with a fine-toothed comb in preparation for this write-up, and for the life of me, I cannot find a reset button.

Therefore, if you play around with the grid and find that you can’t get it back to the original setting, to avoid uninstalling and then re-installing the software (like I did) here are the default settings:
Grid
- Horizontal Number: 2
- Vertical Number: 2
- Thickness: 2
- Color: #808080
- Display Diagonal Lines: Unchecked.
Guidelines
- Vertical Direction 1: checked – 25%
- Vertical Direction 2: checked – 75%
- Horizontal Direction 1: checked – 25%
- Horizontal Direction 2: checked – 75%
- Thickness 2
- Color: #0080ff
It’s important to note that the live view display doesn’t the feed at the same fps setting as the camera — at least not in this version. The feed probably peaks at around 15-18fps. Therefore, you’re not going to be able to use the PC as a secondary live monitor. However, having the software available and knowing how to use it is still an extra tool in your kit.
Do you also use the GH5 for photography? You can check out how to tether-shoot for photography in the following video from Panasonic and James Schmelzer.
Looking for more tips and tricks? Check these out.


