

Smoke ConnectFX: Deal, Deinterlace, Difference Matte

We continue our breakdown of the ConnectFX Nodes in Autodesk Smoke with a look at Deal, Deinterlace and Difference Matte.
Not all of the nodes inside Smoke’s ConnectFX workflow are sexy. Many of them are simple utility nodes for various clip processing. However, tools like Deal, Deinterlace and Difference Matte are just as powerful as any flash and glitz effect node when you need to manipulate your clip.
Smoke’s Deal Node:
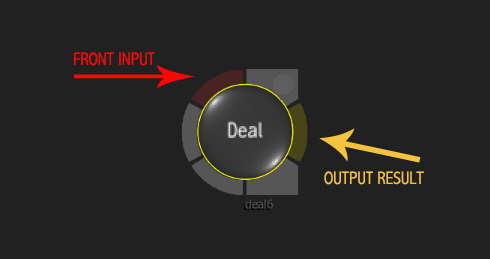
The Deal Node is a bit of an ‘old-timers’ node. Back in the day, when video was transferred around on video tape, there was no such thing as an embedded alpha. For clips that had an associated matte or alpha, that Matte would get laid down on tape after the Fill version. For example, at 1:00:00 your animated logo fill is output to tape and at 1:01:00 the corresponding matte would be output as a black & white hi-con clip. But organizing these clips when you had various pieces and parts was difficult as you had to keep the Fill and Matte clips together while you were working.
If you had all of the fills in one bin and the mattes in another, you would often have to search around to get the matching clip. So in order to make this easier on the editor or effect artist, the animated logo and its matte would get laid down to tape in alternating frames. So, frame 1 would contain frame 1 of the Fill video and frame 2 would be the matching Matte frame. When you watched the clip play on video tape, you would see a flashing of Fill Video and Matte, back and forth, every frame. When you digitized this clip from tape, the Fill Video and the Matte for your animating logo would always be together. This type of recording is know as an Interleave Frame Clip.
Interleaving clips was popular when images were transferred from machine to machine via video tape like D1, D5, or DigiBeta. When you digitized the clip, you would use the Deal Node to split the clip apart and create 2 separate clips. One clip would be the fill video and the other would be the matte. You could then use these clips as needed in creating your composition.
Today we’re are almost 100% file based for this type of workflow. We are working with video files that can contain embedded alphas that we can use to maintain the relationship to the fill video. As this is the case, you may never need to use the Deal Node inside of Smoke. But, there are some benefits of using it as a creative tool.
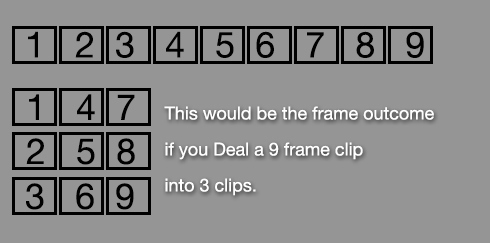
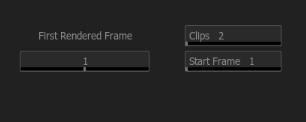
The Deal Node in Smoke will split a clip into a user defined number of clips, frame by frame, until all frames are distributed. Essentially, the frames of a clip are dealt out like playing cards in a deck to players at a poker game. The controls for the Deal Node are pretty simple. The First Rendered Frame is the frame that is output from the node. Setting the start frame to 30 will not display any frames until frame 30. The Clips setting is the amount of clips that the original clip is split. The Start Frame setting will output which “clip” is output.
In the example of fill video and matte, you would create 2 clips. Then to output the matte you would set the Start Frame to 2:
You can use the Deal Node as a creative tool to create a clip that is 200 or 300% faster, if you set the clip setting to 2 or 3. The resulting output would be every 2nd or 3rd frame. You can also deal a clip out and then treat each segment differently. You could color or blur each dealt clip differently. You would then need to recombine the clips back into a frames clip, with your own interleave effect. You can also create an interesting effect by interleaving the frames in a different order than the original, thereby creating a very studdery-strobe effect. There is no interleave node in CFX, but there is one in the Tools Tab of Smoke 2013. There is also the same deal tool, so you can split your clips on the desktop if you desire.
Smoke’s Deinterlace Node:
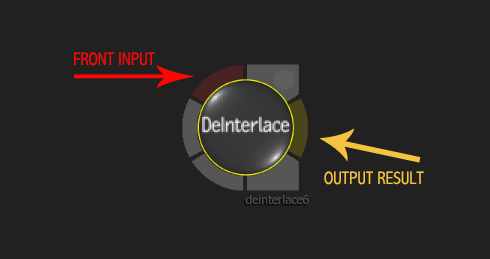
Deinterlacing inside of ConnectFX is different from the deinterlacing you might be familiar with during exporting – where you are taking an interlaced source and making it progressive for web delivery. The Deinterlace Node will split the fields of a frame, interpolate them, and then place them one ofter the other. So, Frame 1 would be Field 1 and Frame 2 would be Field 2 (this assumes a field 1 dominate source). The resulting clip is then doubled in time. A 90 frame interlaced clip becomes a 180 progressive frame result clip. In theory, you could then use the Deal Node to separate the clip into 2 clips, being 1 clip for field 1 and 1 clip for field 2. But this would also give you half of the resolution of the original.
Why would you want to deinterlace a clip? One main reason would be for keying. Although the keyers in Smoke are excellent, you can still get some edge issues with interlaced clips, especially clips with lots of motion and natural motion blur. By deinterlacing the clip prior to keying it, you can achieve a cleaner result for your key. If you were comping this key over a background, you would also deinterlace the background. Once the deinterlaced clip is keyed, you would then use the Interlace Node to reassemble the clip back into it’s original field order.
[Click for larger image]
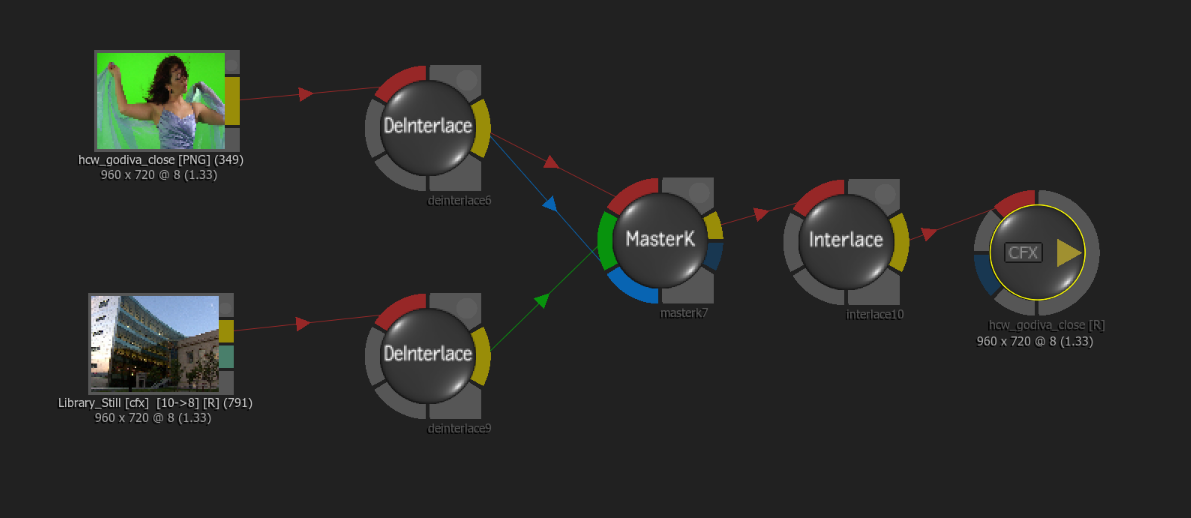
A second reason you may want to deinterlace a clip is for tracking. Tracking can sometimes not be as accurate on moving interlaced images as the fields change. Although Smoke’s trackers do have a setting for interlaced video and it performs quite well, if you do have a problem track you can try deinterlacing.
The Deinterlace UI is very simple as well. The First Fame setting will process the deinterlace at the frame. No output will happen until that frame. The Field Dominance Box would be set to the clips field order. If you don’t know the clips field order, you can set it to Auto. By activating the INTERP button, you can eliminate interlace artifacts, as Smoke will interpolate the differences in the fields. This will create a cleaner full frame.

Smoke’s Difference Matte Node:
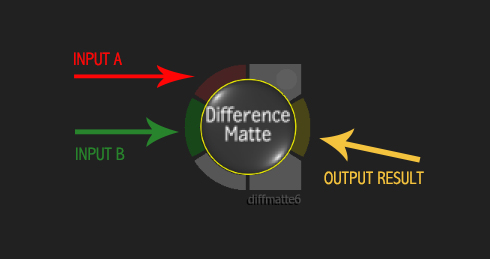
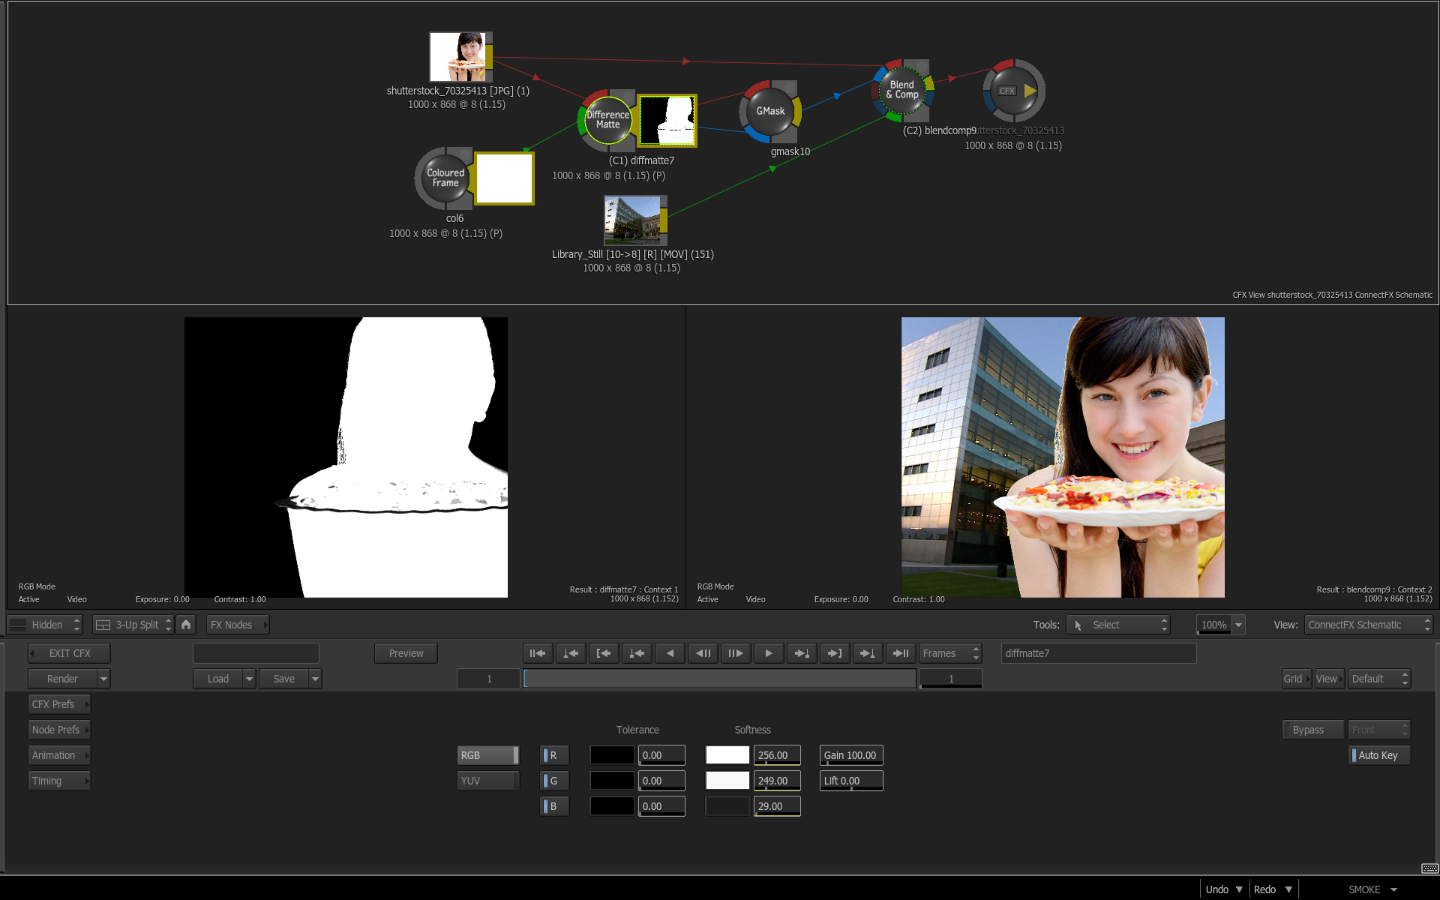
In Smoke you can perform a comparison between two clips on different video tracks on the timeline with the Difference Tools in the viewer overlays. Inside ConnectFX you can use the Difference Matte Node to perform a comparison between 2 clips and produce a Hi-Con Matte of that difference. A difference comparison will perform a pixel by pixel comparison between the 2 clips. Exact pixels will return a black pixel result and non-exact matches will result in a white or grey pixel.
[Click for larger image]

Often times in compositing, you can create a matte for an object by taking a clean background and the same background clip with an object over it by inputting them into the Difference Matte Node. you can often achieve a cleaner matte from difference keying than from luminance keying.
The adjustments in the Difference Matte Node are simple. You can adjust in RGB or YUV color space. and you can adjust the Tolerance and the Softness of the individual RGB or YUV Channels. There is also a master Gain and Lift adjustment for the result, if you need to enhance the white levels or crush the blacks.
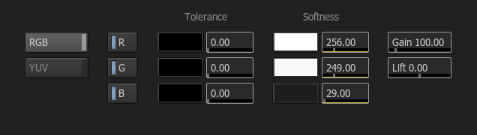
I personally get a lot of print logos or images which are composited over white. By performing a difference matte between a white frame and the logo/image over white, I can pull a matte for the logo/image that I can use further in my CFX schematic. Sometimes you also need to clean up the matte with a Gmask or Paint.
[Click for larger image]
There are some nodes that are flashy and sexy and are used for creative effects. And then there are nodes like these, that are Smoke’s workhorse nodes and utility nodes. That’s one of the great things about Smoke. All of the video utility tools you need to technically work with your video clips are provided for you, as are many of the flashy effects tools.
As you can see over this series of blog posts highlighting the Nodes in ConnectFX, Smoke is an all-in-one solution, where you don’t need to export your clips out to another application. If you have any questions or comments on this blog series please feel free to respond in the comment area below.


