

Smoke Hotkeys You Should Customize to Work Faster

Master the Smoke workflow by creating your own hotkeys to be more effective in your editing.

![]()
Autodesk Smoke is a very hotkey (or shortcut) driven software. The key to mastering the workflow is to know the hotkeys. Yes, it is true that the 2013 release has changed a lot of hotkeys for legacy users but they have also incorporated the FCP 7 shortcuts to help ease in those users to Smoke.
There are many hotkeys that aren’t assigned in the hotkey editor, but in my opinion should be. Here is my collection of hotkeys that have helped me speed up my editing and effects workflow.

Smoke Classic vs FCP Hotkeys:
I still use the Smoke Classic hotkeys because I am a long-time Smoke editor and these are the hotkeys I am most comfortable with. I honestly do believe that they work best for working in Smoke, both as an editor and for effects. Here’s why:
The Smoke Classic hotkeys are primarily focused on the left side of the keyboard.
Timeline navigation for the start and end of the timeline, and jumping between clips and edit points, are all centered around the A,S,X and Z keys. Using these keys in combination with the Alt, Shift, Control keys allow you to quickly jump around the timeline with your left hand.
The right hand is for your tablet or mouse. Smoke was originally designed with a tablet, and much of the workflow still works best for that. For playback Smoke Classic uses the [V] key, again, near Z & X.
Copy clip operations use the [F] key, which is again, in line with A & S. Delete clip is [Shift+D], right in the same grouping as everything else we have discussed.
So, although the letters themselves don’t make much sense in matching the letters with the function, they make perfect sense with how your hand works. With effects operations, the F1-F4 hotkeys are also used, which work with this this left-sided keyboard layout.
Now many of the FCP shortcuts make a lot of sense. I & O for In & Out marks. And of course JKL for clip transport. However, FCP shortcuts seem to be more right sided keyboard centric. The FCP shortcuts do have the limitation of not being able to use the Spacebar as a hotkey modifier since it is tied to Play and Stop.
The Spacebar is used heavily in Smoke Classic for many operations when combined with other keys. Zoom for instance is just [Space + click] and Pan is [Alt+Space+Click].
The bottom line is: use whichever works well for you. Being comfortable with the shortcuts is the key to working fast in Smoke.
Assigning Hotkeys:
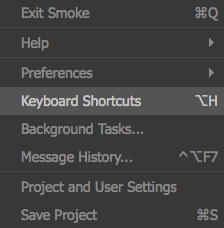
You can access the shortcut editor with a hotkey of it’s own or via the menus. With the FCP keys the shortcut is [ALT+H], while Classic is [Shift+Alt+F8].
On the left you will see the list of assigned hotkeys. You can sort them by name, number or hotkey. There is also a search option, to help you find the function you wish to map. Smoke has 2 sets of hotkeys, Global and Local.
Global hotkeys (Yellow) are hotkeys that work in all operations of the software: Timeline, ConnectFX, Action, etc.
Local hotkeys (White) are hotkeys that function in the area of the software you are in: Timeline or Action for example.
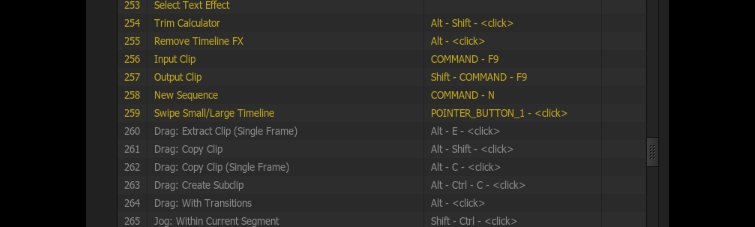
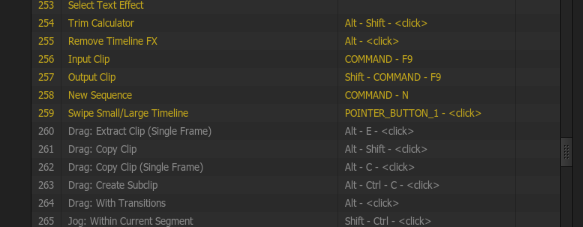 If you want to remap a function already assigned to a key [Render] you can select the line, and it will populate the fields to the right.


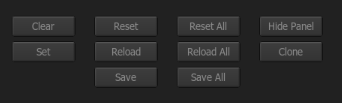
Press the Clear Button, and then assign a new keyboard key to it. You will see the key update in the editor. Press SET to commit the key, and you can then assign another key to another function if you wish. If you are done press SAVE or SAVE ALL, and confirm. Finally, CLOSE the editor.
![]()
 If the new key you have chosen is already being used elsewhere, you will get a message in the bottom left of the UI. You have no choice but to pick another.

![]()
My Must Use Hotkeys:
Some of these hotkeys exist in one shortcut set, but not the other. This seems like an oversight. So I’ll make note of it as we run through them.
1. New Library, New Folder, New Sequence:
![]()
 These don’t exist at all in the Classic hotkeys. This is crazy with the new Media Library workflow. They do however exist in the FCP set. I suggest [CMD+1, 2, & 3] as you can quickly add a New Library and Folder with just a few quick keystrokes.
2. Image Window: Fit Zoom Toggle:
![]()
 This is only mapped in the Classic hotkeys and not the FCP set. Why, who knows? This function will set the Viewers in the timeline and in ConnectFX and Action to “Fit Screen” mode.
Often times when you are working and zooming and panning a viewer with a large schematic or images, you just need a quick fit to screen. In the Classic set it’s already assigned to [CTL+Home]. I don’t like this key combination however, because I have to use two hands and take my pen away from the tablet (or off the mouse). I suggest the [TAB] key for the Classic view as it works well with the left handed keyboard setup. For FCP, find one that works for you.
3. Toggle Overlays:
![]()
The Overlay functions used to be easily accessible in previous versions of Smoke. Now they are buried in a submenu. This makes them kind of painful to deal with, as you are often turning on and off the overlays as you work. A simple [CTL+O] seems to work well. This will toggle the Overlays menu on and off, giving you instant access. (Note: must have the single viewer open when you access this hotkey in the menu).
4. Toggle Viewing Settings:
This works just like the Overlays setting in that it toggles the Viewing settings for quick access. [CTL+V] is a good choice. (Note: must have the single viewer open when you access this hotkey in the menu)
5. Toggle FX Pipeline (Button):
![]()
![]() Sometimes you just need a bit more screen space for your timeline when you are working. If you assign this function to a quick hotkey, you can toggle open and close the FX Pipeline display, so you can easily gain some UI real estate.
Sometimes you just need a bit more screen space for your timeline when you are working. If you assign this function to a quick hotkey, you can toggle open and close the FX Pipeline display, so you can easily gain some UI real estate.
6. Mark IN/OUT around selection:

This is a function I use all the time as I mainly work in Overwrite mode (since I am constrained to a fixed timeline length when dealing with commercials and promos). In the Classic hotkeys, this is a two handed operation [CTL+?]. In FCP it’s simply [X].
So for my workflow, I have set this to my forward Pen button. This way I can quickly select clip or clips and set the In/Out instantly with the tap of my pen button. Now a quick Overwrite hotkey and I can swap out shots pretty quickly.
7. Action Menu Buttons: If you enter ConnectFX, Add an Action Node and Select it… then enter the Shortcut editor, you will have access to the Action hotkeys.
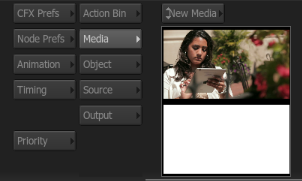
With the hotkey editor you can assign hotkeys to physical buttons of the UI even if they are not in the editor list.
To do this, open the hotkey editor and then press a button in the UI. Select the Action Bin button. You should see it pop up in the List and in the Description box. Assign a key to this button. [CMD+1]
Press SET to commit the selection. Now do this for the rest of the Action buttons (Media, Object, Source, Output). You can continue using the CMD and number keys to go down the list [CMD+2 through CMD+5].
![]()
 This allows you to quickly access the right submenu when you are working in your schematic or result view. So if you need to add a Gmask to an image, you can get to the Media menu easily with 1 keystroke.
8. Clip Cut at Current Frame:

These are unmapped in both Classic and FCP. They are limited in use, but they are very handy. This function will cut a clip into 2 separate clips at the positioner point. This works on clips in the source area.
9. Clip Cut at Each Splice: This is an interesting function that will slip a clip up at it’s cut points. So if you had a sequence, as a source, you can quickly slip the entire sequence into it’s separate clips. These clips will be “dumped” into the currently selected folder.
10. Clip Cut at (n) Frames: This is a quick way to cut a clip up into multiple clips with the same duration. With the clip selected, you hit they hotkey, and then a number in the calculator that pops up. The clip will then be split in to separate clips with the same frame duration.
Trim Hotkeys:

Once thing that has changed for Classic Users is that the trim hotkeys don’t need to be held down to function. If you want to SLIP a shot, just press [,] once and Smoke enters the SLIP mode.
The same goes for SLIDE. Then you can use the [B & N] hotkeys to slip and slide your clip. For FCP users, the process is the same with the FCP hotkeys. The fact that Smoke stays in a certain mode now, means that you can easily use the hotkeys and still work with one hand on the keyboard and one on your tablet or mouse. When you are done slipping and sliding, you can return to trim mode by hitting the Trim Hotkey [T] Classic or [R] FCP.
Explore the empty shortcuts in the hotkey editor and play around with assigning keys to them. Many can be useful functions not easily done in the traditional UI, and others can help make your workflow faster and easier. If you have any hotkey questions or have any special hotkeys you use, let everyone know with a comment below.


