
How to Soften Your Sharp 4K DSLR Video Footage
Super sharp footage is great when you need it, and not so great when you don’t. Here’s how to soften it — during production and in post.
Cover image via chuyuss.
There’s no denying the speed at which camera technology is progressing. A few years ago, the technology we have in our hands now (at the prices we paid for it) was the pipe dream of late-night forum posters. I can only imagine that within the next decade we will be seeing technology from the likes of RED in the latest release of Panasonic’s newest mirrorless camera. Perhaps. However, we can’t disregard the quality of what DSLRs and mirrorless cameras are producing now. So much so that, sometimes, the images might be too sharp when you’re going for a film look.
The sharpness and clarity of modern DSLRs and mirrorless cameras yields outstanding results. This is perfect for capturing travel videos at such high quality that they will transport the viewer to foreign destinations. However, ultra-sharp imagery isn’t necessarily a calling card of the “film look.” Of course, multiple elements and properties add to the look that new and aspiring filmmakers strive for — camera properties are just a part — but the sharpness of cameras, like Panasonic’s GH5, can often make the footage feel more like amateur HD video than something you would find in a cinema.
Thankfully, there are a number of things you can do to keep your footage from appearing overly sharp. Let’s take a look.
I’ll be using the GH5 for the in-camera example, and DaVinci Resolve 15 for the post-production methods, but the solutions are sound across all devices and editing programs.
In Camera
Way back when the 5D Mark II was the most innovate DSLR on the market, and before the Cinestyle picture profile debuted, customizing your picture profile was essential. The 5D Mark II’s standard profile was harsh with contrast and abundant with color — adjusting the picture profiles was only the real way of getting extra legroom so you could manipulate the image in post. Reducing the sharpness was almost as important as removing the lens cap.
Thankfully, over the years that followed, the “DSLR Revolution,” many brands incorporated video-friendly profiles — such as CineD and CineV found on Panasonic’s GH4/5/5s series, or even log profiles for a few models. However, as these profiles specifically cater to filmmakers, there’s a tendency to leave them as they are. Yes, you can use them exactly as they were installed, but by lowering the in-camera sharpness, you’ll be capturing a softer, more film-like image.
You may be initially inclined to think that your images will look like they’ve been shot with a filter that’s been smothered in Vaseline, but rest assured, that’s not the case. Below you can see an image shot with the sharpness at minus five on the left, and at default sharpness on the right (shot in the V-logL picture profile). From the standard default upload that we can provide, it may appear as if there has been little to no change.

Upon zooming in 150%, you’ll be able to see the difference.

A subtle difference at most, but this is what we want. You can see that the details are still there, just not as fine. By reducing the in-camera sharpness, you will slightly mitigate that HD sharpness.
Filters
If you’re working with an older DSLR or mirrorless camera that doesn’t have an adjustable sharpness feature when in movie mode, then you can look at using a diffusion filter to lessen the sharpness of your image. We’ve previously covered on the A-Z on diffusion filters in “The World of Diffusion Filters,” but to summarize that article in one sentence, a diffusion filter softens your image and generates a haze around bright objects. In the video below, filmmaker Chrystopher Rhodes gives visual examples of the difference a diffusion filter will make regarding the sharpness of your subject.
However, it is important to note that diffusion filters are going to give your image some haze (depending on the strength of the filter), and they may produce unwanted and irreversible effects.
In Post (Resolve 15)
Of course, if you want to retain the sharpness of the original footage (perhaps to pull 4K and 6K stills for marketing), the best approach is to soften the images in post-production. At first, it may seem obvious to just reach for the blur tools. However, there is a stern difference between blurring an image and softening the sharpness. In Resolve 15, you can find the perfect tool to help you soften your super-sharp 4k footage: the Soften and Sharpen effect.
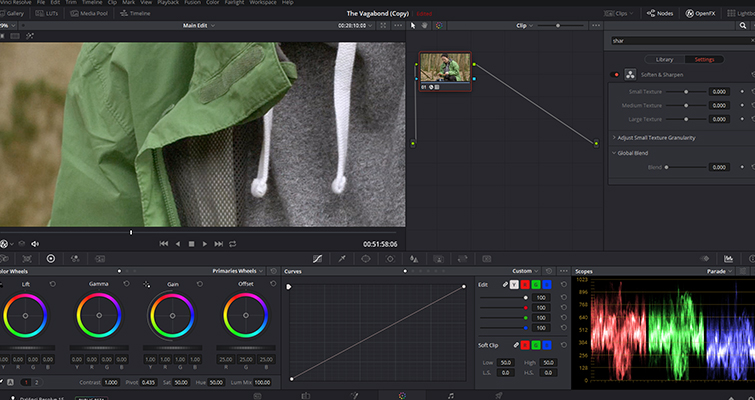
You can find this effect on the color page and in the OpenFX panel, and thankfully, it’s another Resolve tool that is incredibly straightforward. The effect is split into three panels, but the first panel is ideally where you need to direct your focus. There are three sliders: small texture, medium texture, and large texture, and each slider will affect your image properties differently.

For example, the large texture slider, when entirely decreased, will soften the image as a whole as Resolve is reading the input to focus on the large texture of the images. You will notice a difference when looking at the edges of objects. The smaller details will still be visible, but for the most part, it will feel like the focus is just a millimeter off. The small texture slider, however, refines its focus on the smaller textures, and this will directly affect the skin, brickwork, concrete, clothing textures, and so on — all the elements that, when sharp, we as editors notice.
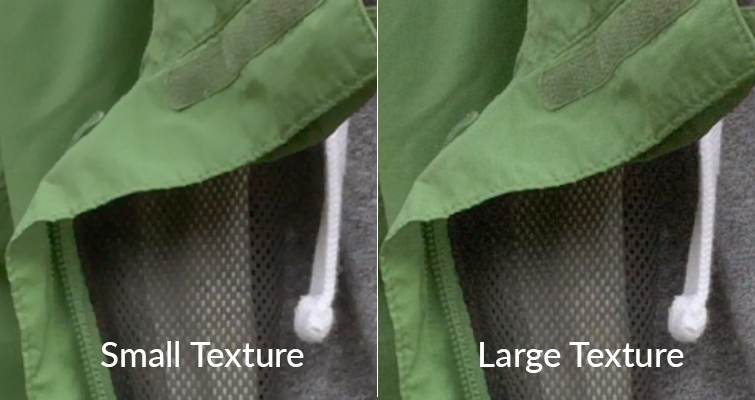
These sliders are incredibly powerful, and you only need to decrease them slightly or your image will look too processed. What’s the correct amount? Well, that’s going to depend on your image. Each camera model will need a different level of sharpness — there’s no one setting to use. But on the GH5, I have found that the small texture at -0.200, and medium texture at -0.250 helped remove that 4K sharpness while retaining the images’ details. In the still above, you can see that the features of the velcro hooks aren’t as apparent. Remember, we still want to see the small details, just not as much.
Film Grain
In 2017, we published an article titled “How Heavy Grain Overlays Are Affecting Your YouTube Upload.” In the report, I documented how YouTube’s compression would heavily reduce the sharpness of videos that had used heavy grain overlays. These grain overlays would consist of heavy noise, dust, hair, and flicker. On the desktop, this grain was very noticeable and added to the desired effect of aging my footage somewhat. Online, however, YouTube heavily compressed the grain, and while it was still apparent that there was grain on the clip, it was softened, and as a result, it also softened the upload.
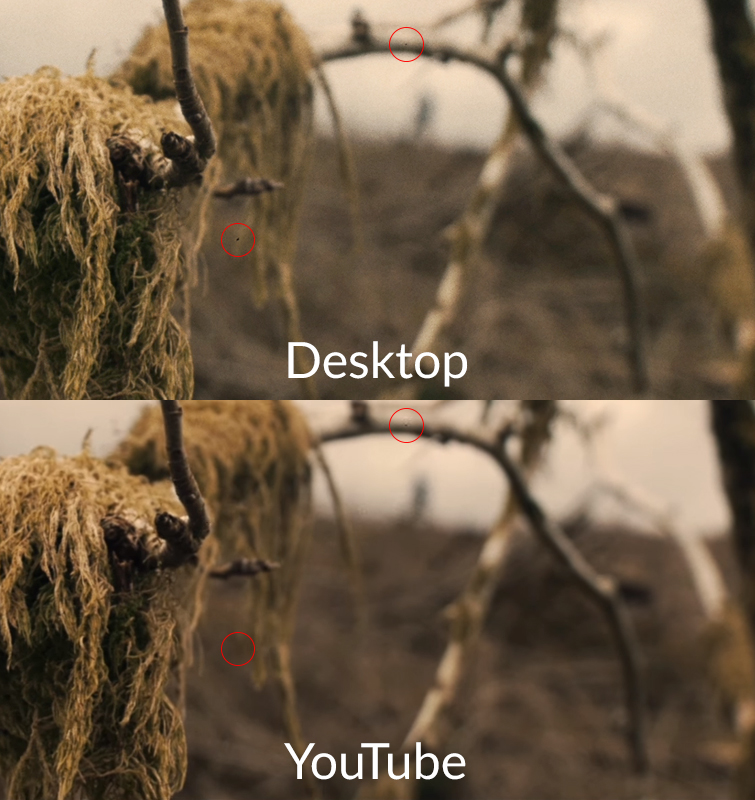
Of course, this is a bit of a last resort for online uploads. I don’t think it’s practical to think in pre-production “Let’s leave softening our footage until we need to upload to YouTube.” However, if after an initial test upload it appears that your footage is too sharp, and you don’t have the time to tweak each clip individually, a heavy grain overlay may be your answer.
Looking for more filmmaking tips and tricks? Check out these articles.


