Video Tutorial: Using Audio to Drive Your Motion Graphics
Why keyframe your animations manually when your audio can do it for you? In this tutorial, learn how to create motion graphics that react to your music.
Let’s say that I want to create motion graphics that will react to the beat of a song. There are a number of ways to do this. The first idea that comes to mind is opening up the waveform and animating using the peaks and valleys of the song as a visual reference. Another method would be to listen to the song and add markers on the fly, animating attributes at the marker points. Both of these techniques have something in common — I’m spending a lot of time manually adding keyframes.
This tutorial will show you a more automated method that still offers a lot of versatility. I’m going to use a music clip to drive the animation of a basic graphic. With this particular technique, you’ll find yourself focusing more on fine-tuning the animation than creating it from scratch.
Let’s get started.
Step 1 — Convert Audio to Keyframes

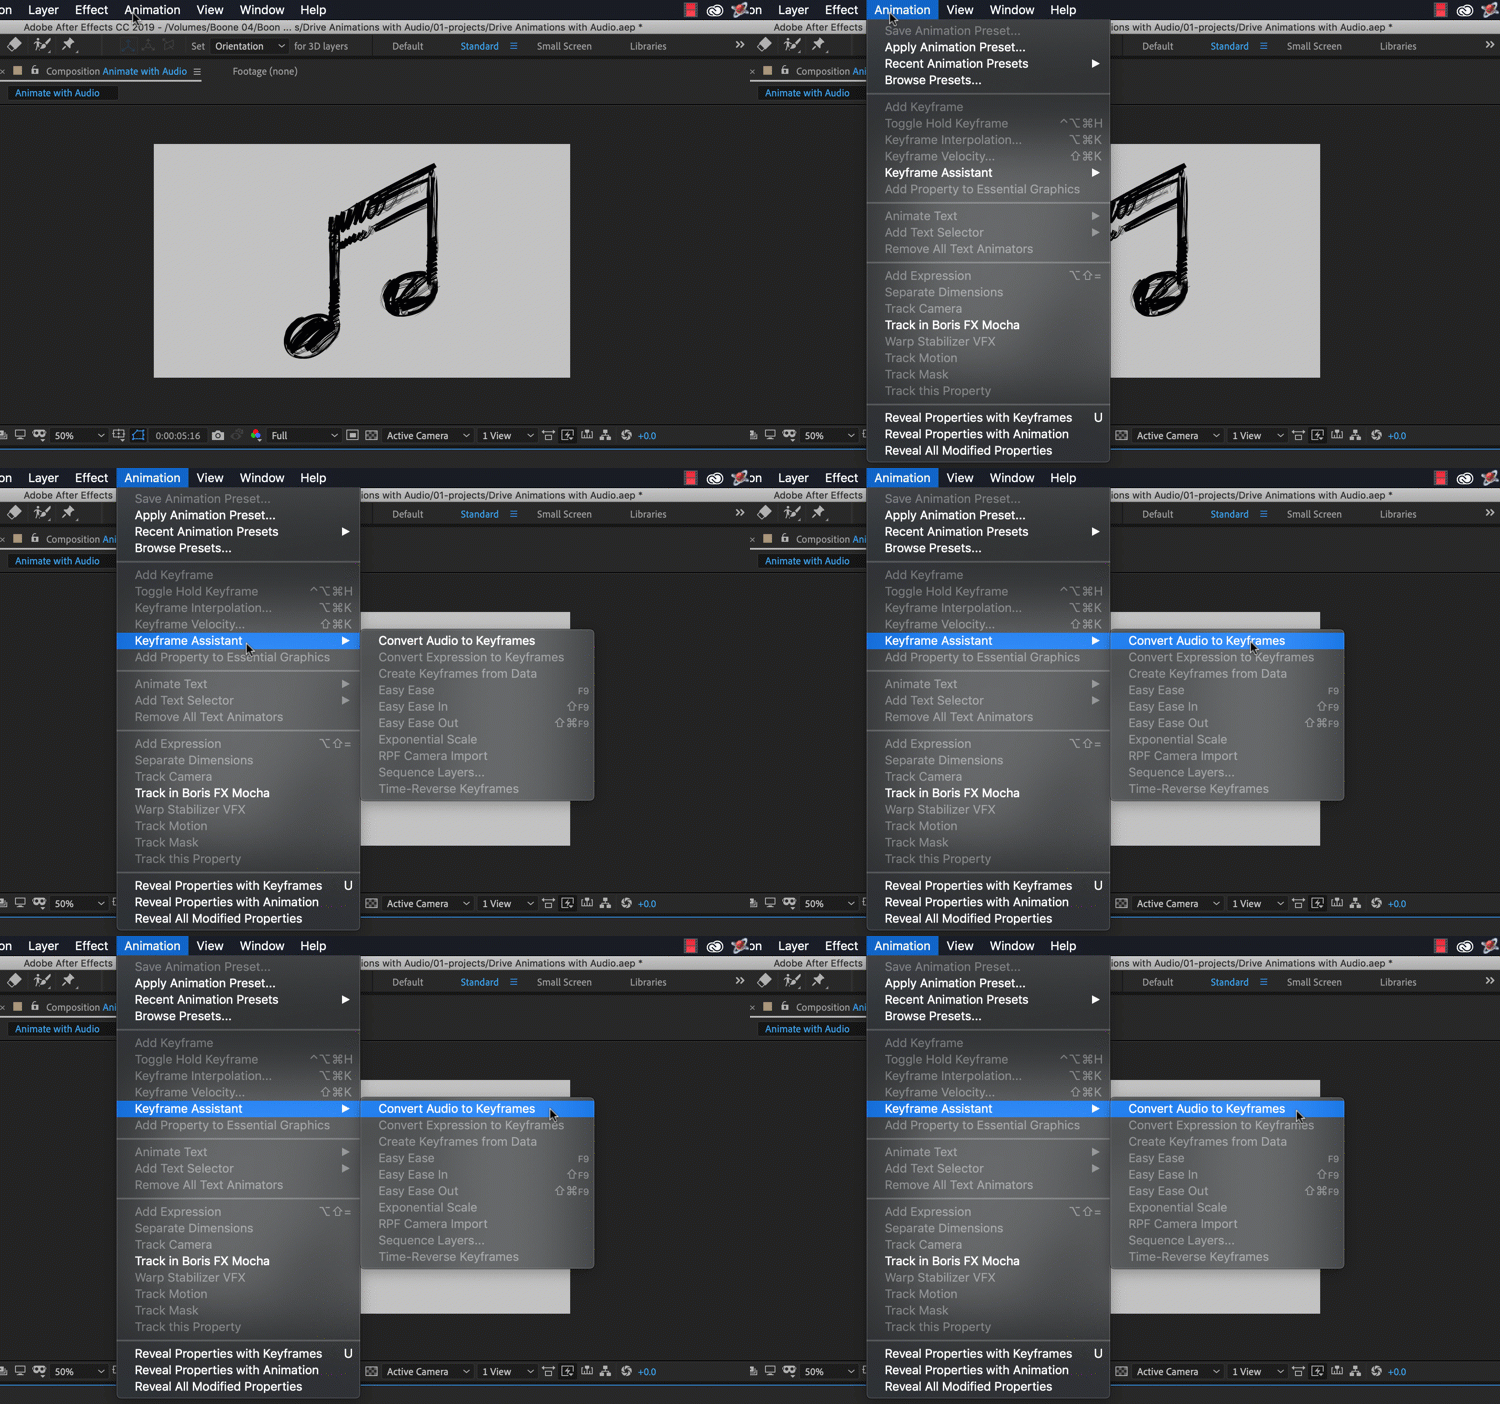
First, I’m going to select my music layer and go to Animation > Keyframe Assistant > Convert Audio to Keyframes. Once you’ve selected this, After Effects will create a new Audio Amplitude layer with all of the converted audio keyframes applied. It includes keyframes for right, left, and both channels. To keep this animation simple, I’ll delete the right and left channels and only use the Both Channels attribute.
Step 2 — Link to Attributes

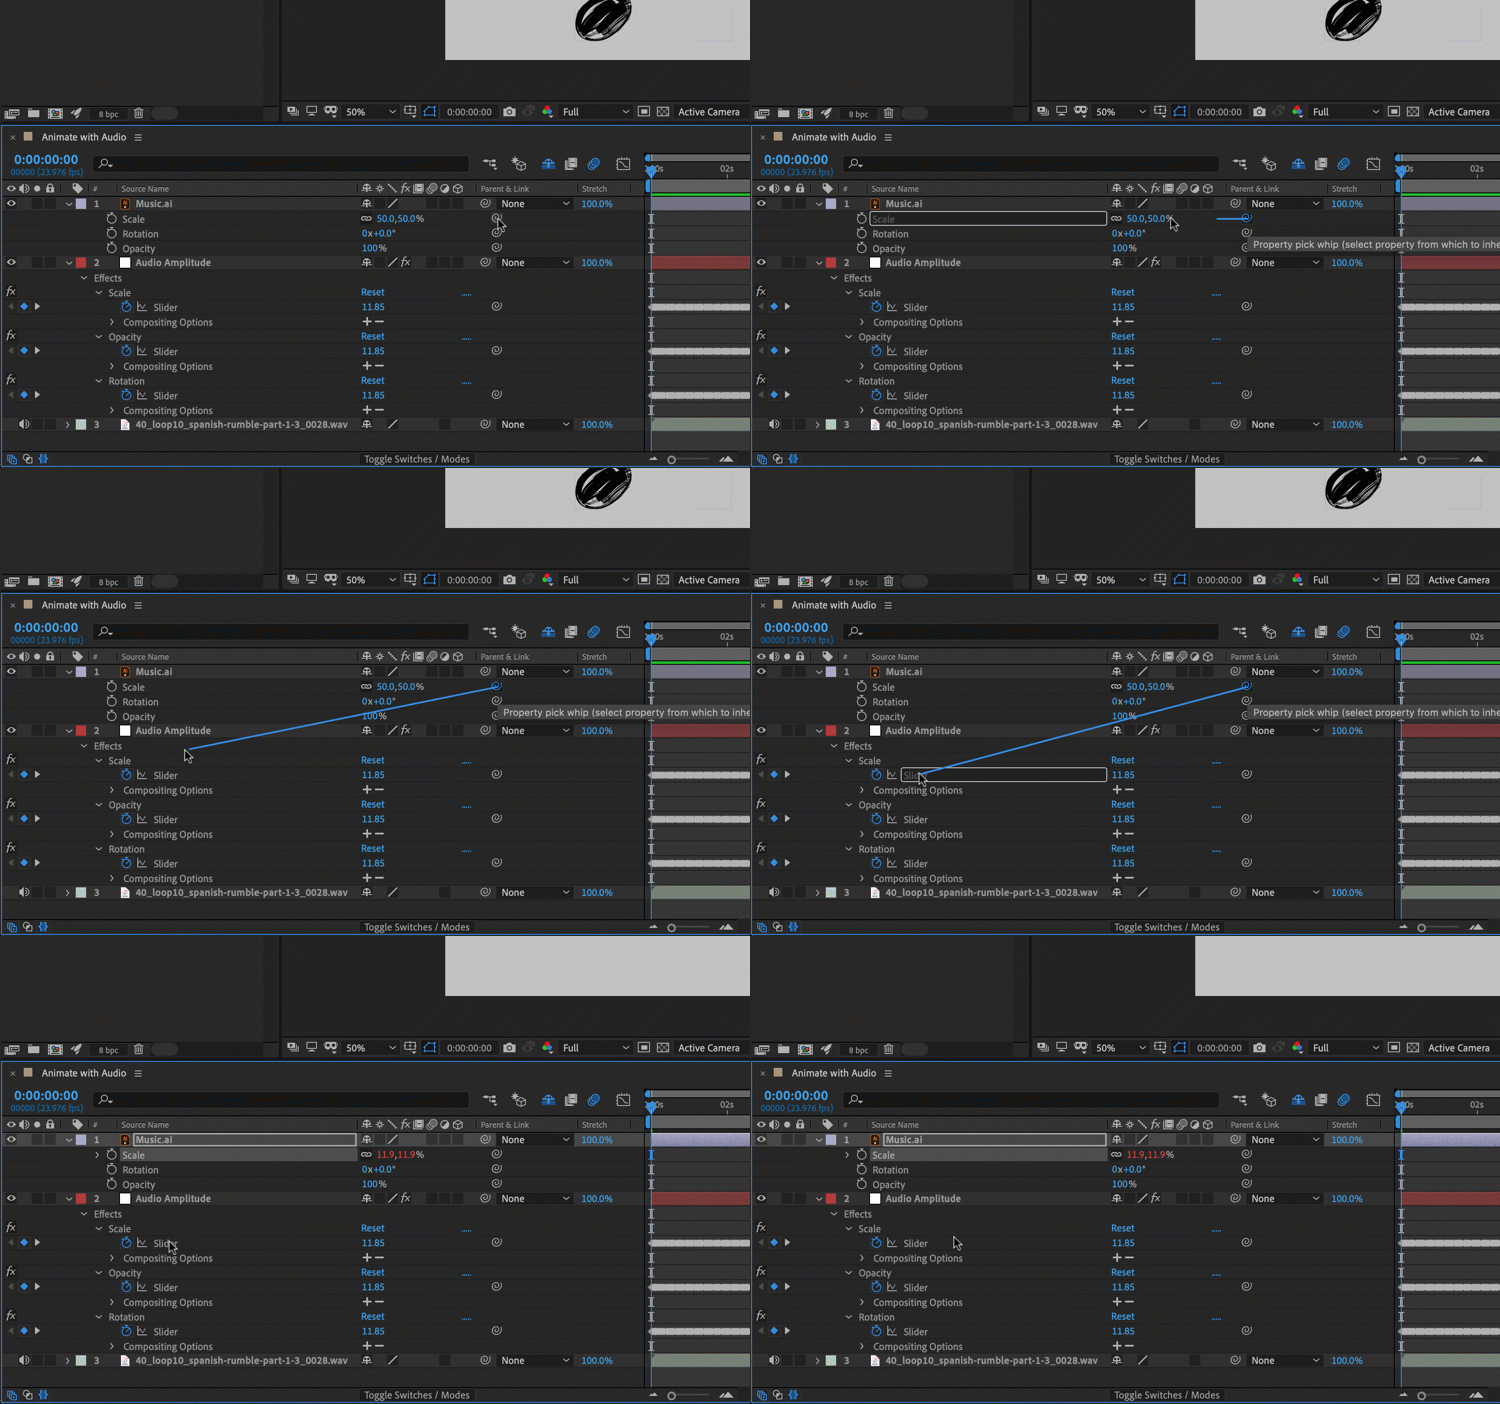
The key to making this method work is using expressions. But don’t let this scare you off — we’ll create the expressions via property pick whips. If you’re using the latest version of After Effects, then you’ll have the added benefit of property pick whips. For older versions of AE, you’ll need to Alt+Click the stopwatch of your property to access the pick whip.
For this animation, I have an eighth-note graphic that will scale, rotate, and change opacity to the beat of the music. To make this happen, I’ll open up the transform properties of the graphic in the timeline, as well as the converted audio keyframes of the Audio Amplitude layer. I’ll rename the Both Channels attribute to “Scale.” Next, I’ll duplicate Scale twice and rename the duplicates “Opacity” and “Rotation.” Now I can connect the attributes of the eighth-note graphic to the Audio Amplitude layer via the property pick whips.
Step 3 — Adjust the Values

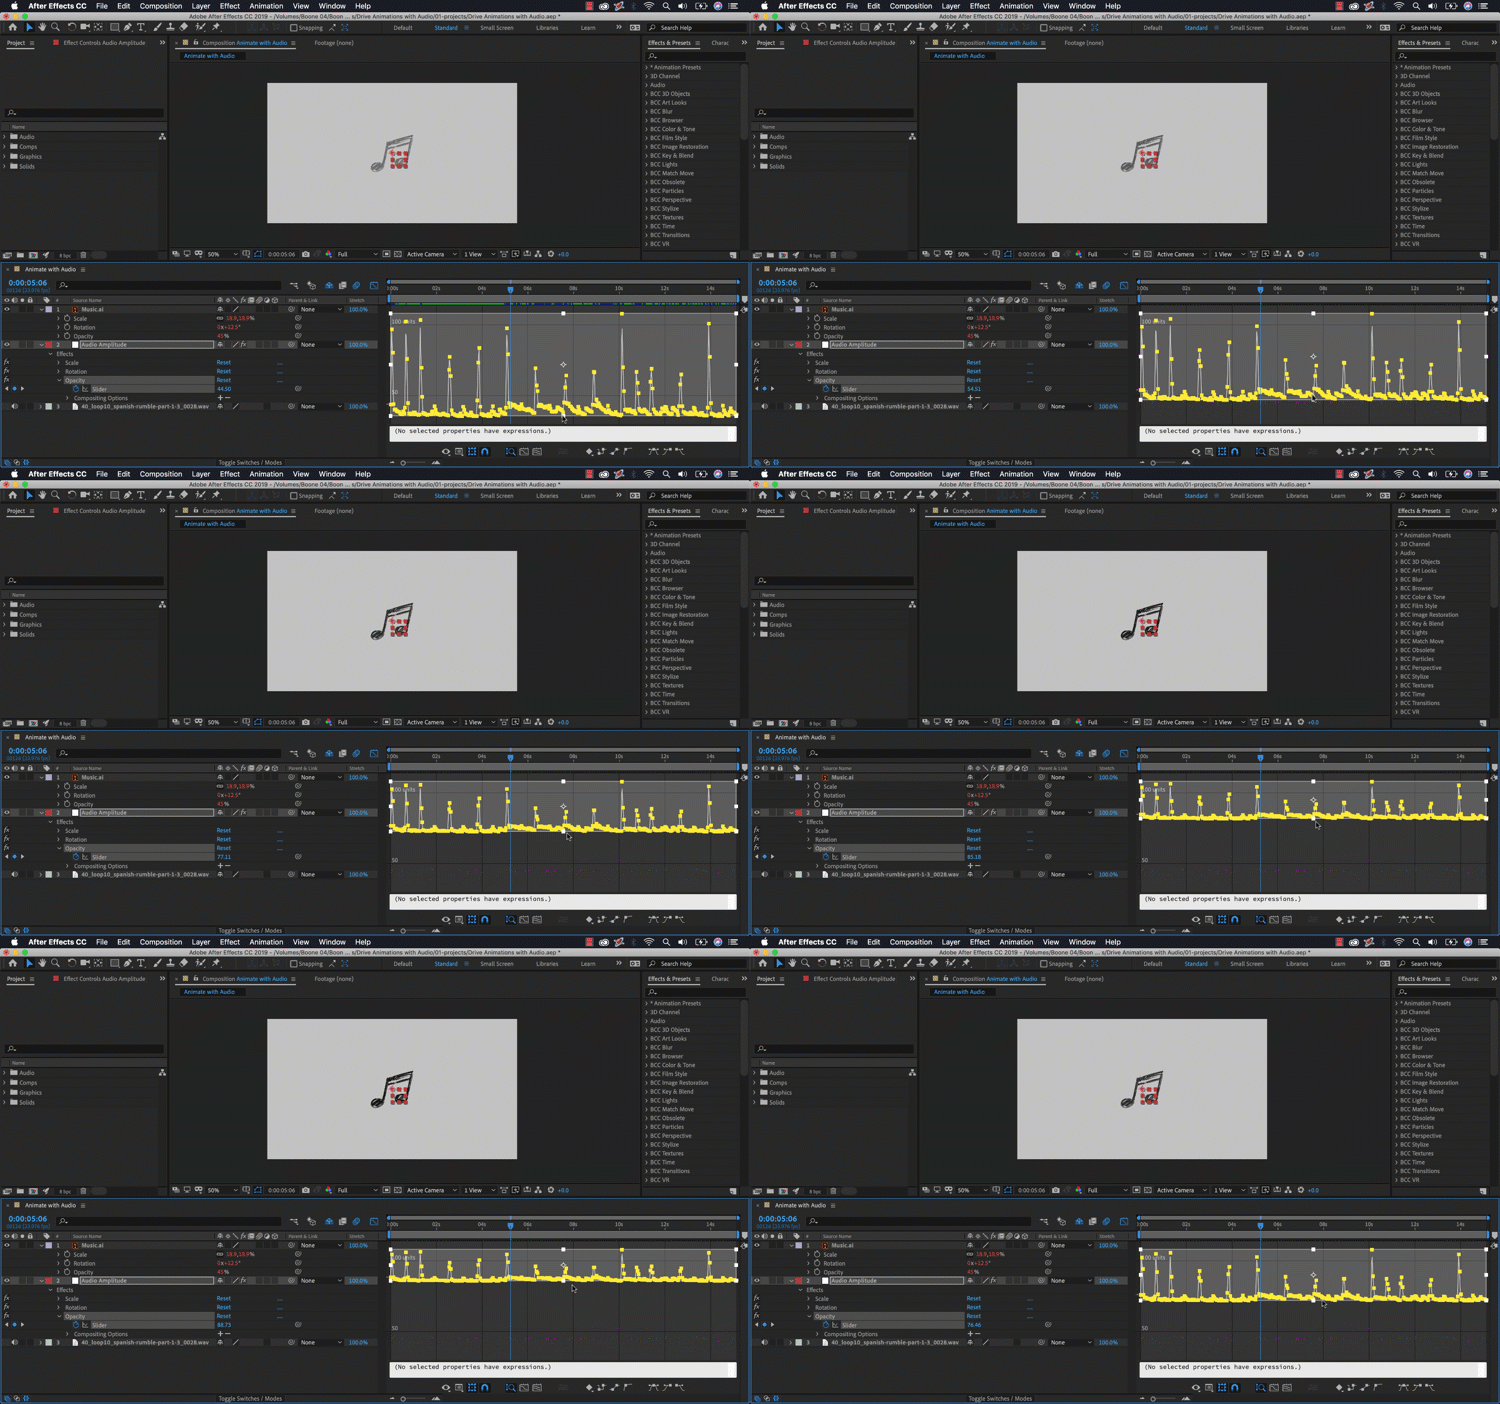
The properties are now linked, but the animation is not doing what I want. To further refine the keyframes, I’ll open up the Graph Editor. This gives me a visual reference to the values of my animations with time mapped horizontally and values (or speed) mapped vertically. Using the Graph Editor I can quickly adjust the scale, opacity, and rotation values.
First, I’ll click the Graph Editor button in the Timeline panel. I’ll set the view options to Show Selected Properties and the graph type to Edit Value Graph. Next, I’ll turn on the Show Transform Box when multiple keyframes are selected. The Transform Box provides me with a good method to quickly select multiple keyframes and change them together.
For example, I can click and drag to select just the peaks of my scale attribute of the Audio Amplitude layer and then drag them up to increase the value. I can also grab all of the keyframes around the bottom and quickly move them to a specific value. It’s very easy to work with a large number of keyframes via the Transform Box. Once I have my scale keyframes where I want them, I can repeat the process for opacity and rotation.
Endless Possibilities
Don’t limit your options to music when using this technique — it works great with narration and sound effects, too. When you use this technique in conjunction with expression controls, you can get some very interesting results. For example, you could use SFX elements to trigger a RGB glitch. Or you could have an effect ramp up during an audio swell transition. Another great use of this could be to visualize a voice in a documentary.
Using audio to drive animations helps you work smart, not hard.
Interested in the tracks we used to make this video?
- “Spanish Rumble Part 1” by Senbei
- “Street Signs” by Sound Force
- “Error Message” by Jack Chown
- “Creativity and Innovation” by Ulas Pakkan
Looking for more video tutorials? Check these out.


