
Video Tutorial: How to Loop an Animation in Adobe After Effects

Learn how to save yourself some time with animation loop cycles in Adobe After Effects with this easy-to-follow tutorial.
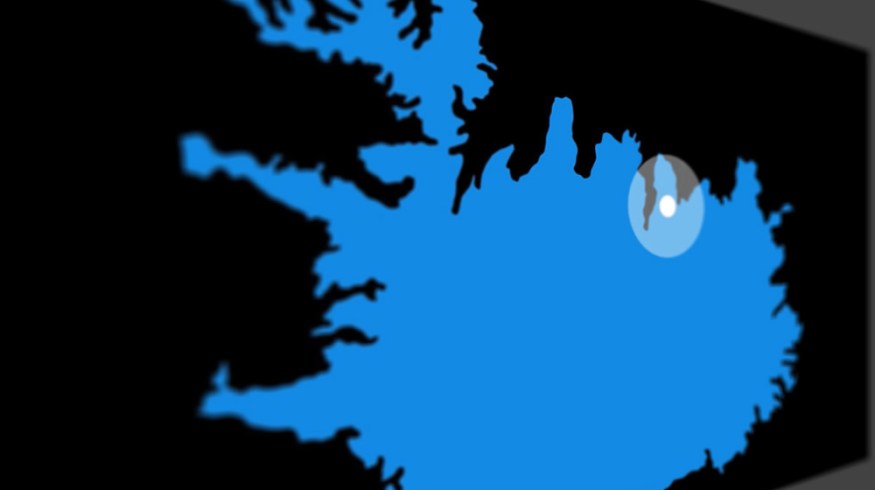
For this particular project, I am going to create an animated location marker that I can use over a map graphic. I want the location marker to have a subtle blinking effect, like a radar screen. It will look something like this:

So, let me show you how we can put this together very quickly using only a few keyframes and a simple expression.
Step 1 — Create Your Animation
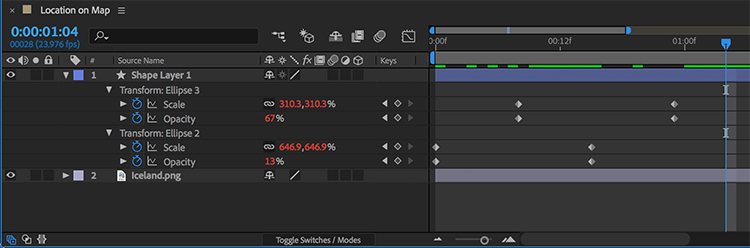
My location marker consists of two ellipse shapes. I’ll use one to create the animation effect, while the other will be stationary. Initially, I just need to animate the first cycle of the animation. To do this, I will animate the scale and opacity attributes of my second ellipse shape. I’ll keyframe the scale to go up while the opacity will go down. This first animation cycle only takes 4 keyframes to create and will give me my radar blip effect. I’ll time the animation to last for one second.

Step 2 — Loop the Animation
To loop this animation, I could simply copy the shape layer and then paste it as many times as I need — and maybe even precomp it to makes things more organized. However, this method has a few drawbacks. First of all, if I want to change the timing of the animation or the color or position of the marker, it might quickly become complicated with so many layers and keyframes. A much easier method is to use an expression.
If you’re unfamiliar with them, expressions can be quite intimidating. Even if you do know how to use them, they can still be confusing. How do you know what to use if you don’t understand the language involved?
Well, one way to apply expressions is with the Expression Language Menu. I’ll use this to easily apply a loop to my animation. To do this, I will simply alt+click on the scale attribute and then open the Expression Language Menu via the small arrow in the expression controls. Then, I’ll select the following:
Property > loopOut(type = “cycle”, numKeyframes = 0)
Once applied, I can now do the same thing with the opacity. Now both of these properties will loop for as long as the layer is on the timeline.

Step 3 — Customize the Loop
The brilliance of using this expression is the versatility it offers when I want to customize the animation or the graphic. For instance, if I want to speed up the effect, I can simply move the end keyframes either forward or backward. Now the animation will loop at the new speed. (This would be much more complicated with a large number of keyframes.) Also, if I want to change the position or any other attribute, it’s very easy.
Again, with the loop expression, I only need to add a few keyframes to bring this animation to life and make it loop. If I want to do this without the expression, it would require nearly 40 keyframes for just a 10-second clip. (And manipulating all of these keyframes would be quite tedious.)
As a final touch, I will duplicate the animated ellipse and then shift the duplicate in time slightly. This will give me a more dynamic location marker animation with two overlapping blips.
Looking for more After Effects tutorials? Check these out.


