Using the Roto Brush for Masking in After Effects

Use the roto brush in After Effects to break apart your video image. Once separated, it’s easy to move text, animation or talent behind and around elements in the video frame.

No doubt you’ve seen this effect in commercials or title sequences – text slides behind a tree or a car and is revealed on the other side, as if it was part of the original scene. It’s an impressive effect and can be created pretty easily in Adobe After Effects.
In this tutorial we’ll show you how to achieve this effect by creating a mask with the roto brush in AE. Here’s a peek of the final product, using a simple handdrawn cartoon:

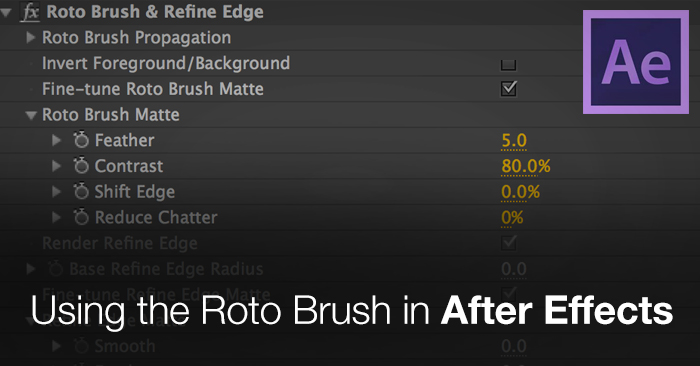
First, decide on the piece(s) you want to cut out. I’ve chosen this tree in the middle of the frame. Create a new composition with your piece of footage and double click the piece of footage within the composition. Now you are ready to select the Roto Brush (the ‘little man’ icon in the toolbar – or shortcut Option + W). It’s ready to be applied to your footage. Click any of the images below for closer view.


As you play around with the roto brush tool you’ll notice that it tries to automatically detect the element you want effected with each stroke. The tool is quicker with the less strokes you use, so have Command-Z ready to undo any missteps.
You can also hold Option while clicking to switch to a de-select tool.

Holding Command and moving the cursor up and down controls the size of the roto brush.

Start on the first frame you wish to separate and get as close as you can to masking your desired item out. Then move to the next frame and adjust the position if necessary.
Remember, with this technique it’s only important to mask out the parts that will have something traveling underneath it. In this case I know that the middle will get all the action so I’m not concerned with making the top and bottom of the tree extremely accurate. The smooth and feather setting are also very helpful in perfecting the mask.
As you mask, you can toggle between views with these three buttons.

Stretch this effect timeline out to it’s desired length. Hit space to load up a RAM preview to judge its effectiveness between each frame.

When you feel you are done leave the mask toggled in this position and then drag another copy of the original video underneath the copy with the mask, making sure the timing on both clips is the same. Ensure the bottom layer does not have the mask applied.

Next take your animated element, put it between your two layers and keyframe the movement, adjusting as you see fit. I added a shadow and color corrected mine to help sell the illusion a bit more.
This is a simple trick for giving your video image more depth. Experiment with it!