Exporting with Alpha Channels in After Effects
Get the most versatility out of your still image or footage with a transparent background. How to utilize the Alpha Channel in After Effects.
If you’ve never heard of the alpha channel, don’t worry. Everyone knows what it is—even the people who think they don’t.
What is Alpha Channel?

Before I ever touched Photoshop or Premiere Pro, I used PowerPoint for school projects. It amazed me that dragging a PNG file into the software made the white background disappear. However, as I advanced in my creative career, I came to learn that the white background wasn’t vanishing, it simply wasn’t there to begin with.
See, when you view a PNG on a website or your desktop, you’ll note that the image’s background isn’t always the same color, but the color of the website/photo viewer background. This could be light gray or sky blue. This is because the website/software is populating the background information as it’s being told that element of the image is transparent.
Adobe says,
Color information is contained in three channels: red, green, and blue. In addition, an image can include an invisible fourth channel, called an alpha channel, that contains transparency information.
An alpha channel provides a way to store images and their transparency information in a single file without disturbing the color channels.
When you view an alpha channel in the After Effects Composition panel or a Premiere Pro Monitor panel, white indicates complete opacity, black indicates complete transparency, and shades of gray indicate partial transparency.
– Adobe
That alpha channel, you’re going to want this if you need to lay graphics over other media files. Having a logo with transparency allows you to put it over anything you want.
I always use the alpha channel in After Effects. Without it, graphics that go over videos—lower thirds, accent graphics, etc.—would need to be rendered out in their exact composition dimensions. Just thinking about that is giving me a headache.
If you don’t render out the alpha channel, After Effects will fill in the empty space with black.
How Do You Render with Transparency?
First, see how much of your composition is transparent. Find the transparency grid under your main composition, and toggle it on and off.
See any gray and white checkered patterns? Those are your transparent spots. Turning this grid on or off won’t affect the final render, it just allows you to see a preview of the final product.
Step 1: Render Queue

To render a video with transparency, you need to add it to the render queue. So, under Composition, click Add to Render Queue.
Step 2: Lossless

Next, navigate over and click on Lossless. A window called Output Module Settings will pop up.
Step 3: Output Module Settings
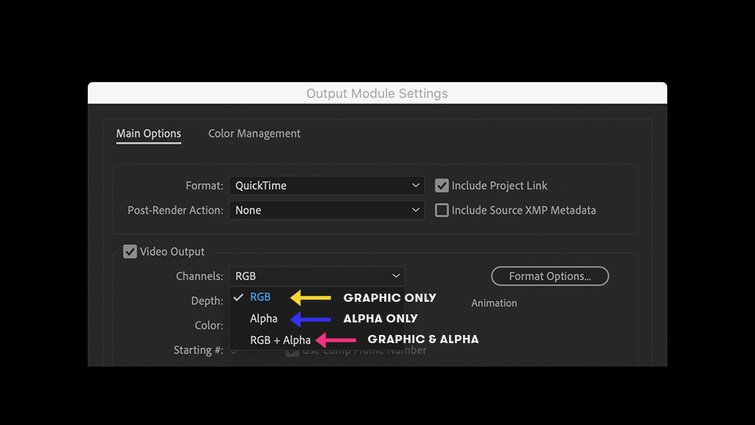
This is where you can change the codec, color depth, format, and channel. For transparency, you should be in the animation codec (or any other that allows the alpha channel to be exported).
Note that some codecs do not support transparency or RGB + Alpha. There’s a red, green, and blue channel, then the fourth invisible one called the alpha channel. Transparency is the alpha channel.
Once you pick the correct channel combination for your video, you should be good to render it out.
RGB + Alpha

I love to use transparency when I’m exporting out lower thirds. If I correctly position the lower third in a 4K comp, then I export the entire 4K video out with the RGB and alpha channels.
Doing this allows me to drag-and-drop the entire video into Premiere Pro without making any position changes. Of course, not all projects require you to render out the alpha channel, but it’s important to know what the alpha channel is and how to use it.
Further quick tips from Adobe:
- It’s often most efficient to import a source file already containing an alpha channel defining the areas that you want to be transparent. Because the transparency information is stored with the file, Premiere Pro preserves and displays the clip with its transparency in all sequences where you use the file as a clip.
- If a clip’s source file doesn’t contain an alpha channel, you must manually apply transparency to individual clip instances where you want transparency. You can apply transparency to a video clip in a sequence by adjusting clip opacity or by applying effects.
- Applications such as Adobe After Effects, Adobe Photoshop, and Adobe Illustrator can save clips with their original alpha channels, or add alpha channels, when the file is saved to a format that supports an alpha channel.
Need a little more After Effects action? Here you go: