
The Power of Adjustment Layers in Premiere Pro

Premiere Pro Adjustment Layers give you the ability to apply an effect to multiple clips with one layer.

Premiere Pro adjustment Layers are transparent layers you can apply effects to, just like you would to a standard video track. The advantage is that if want to change or remove the effect later, you are just changing one layer and not multiple layers. Adjustment layers also only effect the layers they are above, so you can move them below any layer you don’t want to effect.
In this Adobe Premiere Pro tutorial you will learn:
- What adjustment layers are & how to use them in Premiere Pro
- Creating a tinted, duotone look
- Creating a stylized film look

Creating Premiere Pro Adjustment Layers
To create a new Premiere Pro adjustment layer, click on “new item” in the Project and select Adjustment Layer. A dialogue box appears. Click “ok”. This matches the adjustment layer to your Sequence settings.

Drag the Adjustment layer onto a track into the Premiere Pro Timeline above any tracks you want to effect. Now when you apply any filters or effects to this layer, it will be reflected in all of the tracks beneath it.

Creating a Duotone Look in Premiere Pro
Using a Premiere Pro adjustment layer we’ll add the tint and luma curve effects to create a duotone look.
First, select the adjustment layer in a Premiere Pro Timeline, and in the Effects tab type “tint”.
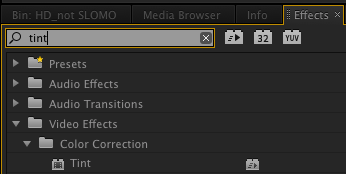
Double click on the tint effect to apply it to the adjustment layer.
Adjust the effect in the Effect Controls for the adjustment layer. The tint effect is now applied to any video layers below it.
In my example I mapped blue to black, and light orange to white and decreased the amount to tint to 50%.
I also wanted to increase contrast, so I added a Luma Curve and pulled down the shadows and pulled up the highlight (click on the line, add 2 points, adjust to taste).

BEFORE

AFTER

Creating a Film Look Using Blur & Blend Modes in Premiere Pro
Create a film look in Premiere Pro (increased contrast, softer details and highlights) by applying a fast blur effect to the adjustment layer. The magic happens when we change the blend mode.
- Select the adjustment layer in the Timeline, and in the Effects tab type “fast blur”.
- Double click to apply it to the adjustment layer.
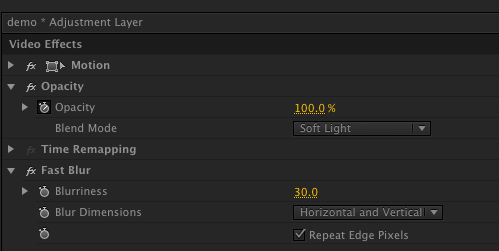
- In the Effect Controls, change the blur to 30, check “Repeat Edge Pixels” (otherwise you will get a halo effect on the edges).
- Click the triangle for Opacity and change the Blend Mode from Normal to Soft Light.
Think of blend modes as opacity on steroids. It allows you to blend the 2 layers together. Experiment with other blending modes like Add and Multiply to get more unique effects.
Your clip now has a more stylized look. You can apply multiple effects to any adjustment layer just like a clip, and I often adjust the opacity if the effect is too strong. You could take this effect even further and add a tint or luma curve effect too.
BEFORE

AFTER

Once you wrap adjustment layers into your post workflow they will become indispensable for quickly achieving unique looks.
Got tips for using adjustment layers? Let us know in the comments!


