
DaVinci Resolve’s Lens Reflections and Film Damage FX

Blackmagic Design’s DaVinci Resolve 15 offers some expanded effects. Here’s what you need to know about two in particular.
Continuing our deconstruction of new features in Resolve 15, today we’re looking at two of the new effects (ResolveFX) now available in Resolve’s extensive effects library.
There have been several new additions to ResolveFX: Film Damage, Flicker Addition, Dust Buster, DeFlicker, Automatic Dirt Removal, Patch Replacer, Lens Reflections, and Aperture Diffraction. (Although only Film Damage and Flicker Addition are available in the free version of Resolve 15.)
I often find that when discussing new effects there’s not much use in just listing the features of the effect. (That’s what the manual is for.) However, many of these effects are entirely shot-specific and are not as universal as explaining how to apply a lightsaber effect at point A and point B. Therefore, we’re going to run through the Lens Reflection and Film Damage effects to try to match a reflection that appeared in a previous shot, as well as making the clip look like archival war footage.
Let’s take a look.
Lens Reflections
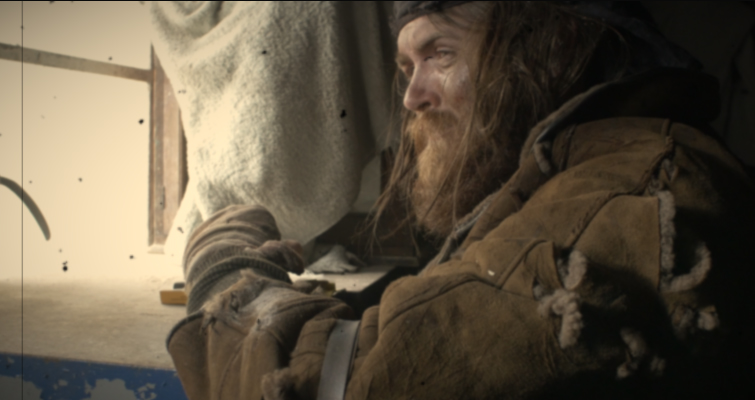
Lens reflections (not lens flares) are visual elements that you typically need to eliminate before you begin recording. A number of things can cause reflections, such as light leaks or, as you can see in the still below, a reflection in a variable ND filter. This is a common problem caused by stacked polarizing filters.

Adding a reflection in post-production is slightly different from adding a lens flare. With a reflection, we’re going to see elements of the scene itself reflected in the image. In the still above, we can see part of the window frame flipped in the lower right corner.

In Resolve 15, we get a Lens Reflection effect that can help with this problem. Just like working with flares, there are some constraints to using the effect. For example, you’re going to need a bright light source in the frame for the effect to take hold. Without one, the effect won’t even appear. Let’s look at how you can apply the reflection FX to a clip.
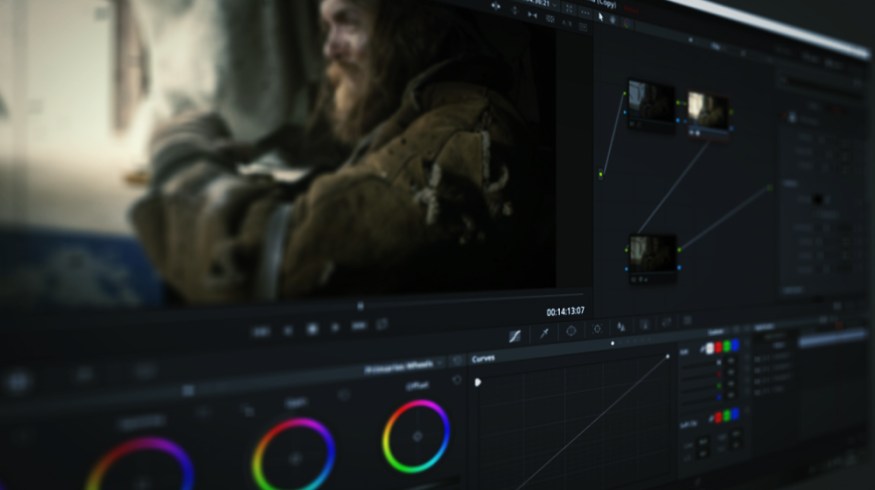
First, we need to head to the color page because you cannot use this effect on the edit page. With a new node created, open the effects panel, and scroll down to “ResolveFX light” to find “Lens Reflection.” Generally, Resolve has presets and plugins that need only a few tweaks here and there. This effect, however, isn’t one of them. You need to customize the reflection it generates to make it look believable in your shot.
By default, the lens reflection effect will look a little something like this.

However, you’ll find that when you apply the reflection effect to a different a shot, the generated reflection will differ. That’s because the reflection depends on the luminance values of your shot. That’s why it’s essential to have a bright light source within the frame, or this effect won’t work. Also, unlike a lens flare, reflections do not require any tracking. Resolve automatically moves the reflection in correlation to the highlight in the shot.
The default effect, at the moment, looks nothing like the real reflection. Thankfully, there is a variety of presets to start from, and you’ll find that the plain preset will give you a less stylized effect.

The Reflection FX panel presents different control settings, but the main ones you’ll use to make your reflection look realistic are the isolation controls and the global controls. The isolation controls determine which highlights generate the lens reflection, while the global controls give you overall command of the reflection’s properties, such as the brightness and colorization.

When I compare the generated reflection to the organic reflection, we can see that it’s not as sharp. Therefore, to decrease the sharp edges, I’m going to increase “smooth” to the maximum value. The original reflection is also quite transparent, whereas the generated reflection is predominantly visible. However, you won’t find an opacity parameter in the control settings. Why? Well, remember the effect depends on the highlights of the frame; therefore, to lower the opacity of the reflection, you need to decrease the brightness or increase the gamma. An increase in gamma will reduce the opacity value, and a decrease in brightness will lower the opacity value but also decrease the area of the reflection.

The reflection is starting to look a lot more realistic. To finish, I’m going to add a slight green tint to match the original, and I’m also going to add grain to this node to make the reflection appear more organic.

Film Damage
Making your footage look like you shot it on celluloid (or like a VHS transfer) is undoubtedly one of the most popular post-production techniques. Several resources can help you achieve this look — from buying scanned film grain from websites like RocketStock.com to film-generated plugins like FilmConvert. However, while these resources will add luscious film grain to your footage, what about making it look old and worn? In Resolve 15, we now have a Film Damage plugin that will make your clips look like long-lost relics of the early 1900s.
Let’s use the effect to make our clip look like it’s from a WWII archive (with some creative leeway). When you first apply the effect, it doesn’t look right. It looks like generic stock footage.

This is another effect where we have to dig deep into the settings to get the results we want. We have four control panels to work with: blur and shift, add dirt, add scratch, and add vignetting.

The first panel is where you will alter the foundation of the overall image. We can do that with a blur increase or decrease, a temperature shift, and a tint shift. The default temperature and tint does an okay job of giving the footage a sepia feel, but I still think the sharpness of today’s technology is too much, so we should increase the film blur from 1.5 to 2.

The dirt panel, of course, controls the dirt, and the scratch panel controls the scratch. The default dirt is where my problem with the preset originates. It looks very false. Therefore, I’m going to decrease the density, decrease the dirt size, and increase the dirt blur — so it blends more organically with the original media.
I think the default scratch value is fine. However, I will increase the blur to match the dirt. The final control panel is for the vignette, and I’m only going to increase the vignette focal factor.

To finish, I’ve added a black and white film grade, some camera shake, and a 4:3 letterbox.
Before

After

I’m quite happy with the finished result, and this required no external plugin or additional expense.
Lewis McGregor is a certified DaVinci Resolve trainer.
Looking for more information on Resolve? Check out these articles.


