

Your Guide to Working with Project Files in DaVinci Resolve

Interested in Resolve’s capability as an NLE? These guidelines will help you navigate working with project files in this renowned app.
When you initially open Resolve, you’ll see the Project Manager window. Here, you can load an existing project or create a new project from scratch. However, you may notice that you don’t get to choose where the project file will be stored.
Even when saving your project through the “Save Copy As” function, you still don’t get to choose the location—only the name. This is because Resolve operates within an industry-standard database system. Any item that isn’t a media file will be stored in the database.
Admittedly, if you haven’t worked with a system like this, it can seem daunting at first. A quick Google search for “DaVinci Resolve save location” will bring up hundreds of frantic search queries from worried users.
In hindsight, I can say it makes a lot of sense. All projects are stored in the same place on your system drive, but if you need to back up, transfer, or import a project, you do so within Resolve and not in explorer or finder, as you would with Premiere. Renaming or moving projects outside of Resolve can result in a project becoming corrupted. It’s a big no-no.
Let’s look at what you can expect to see when you open up Resolve, then we’ll show how you to execute these tasks. Let’s get to it!
Transferring and Restoring
Right-click on a project and select Export Project Archive in your Project Manager.
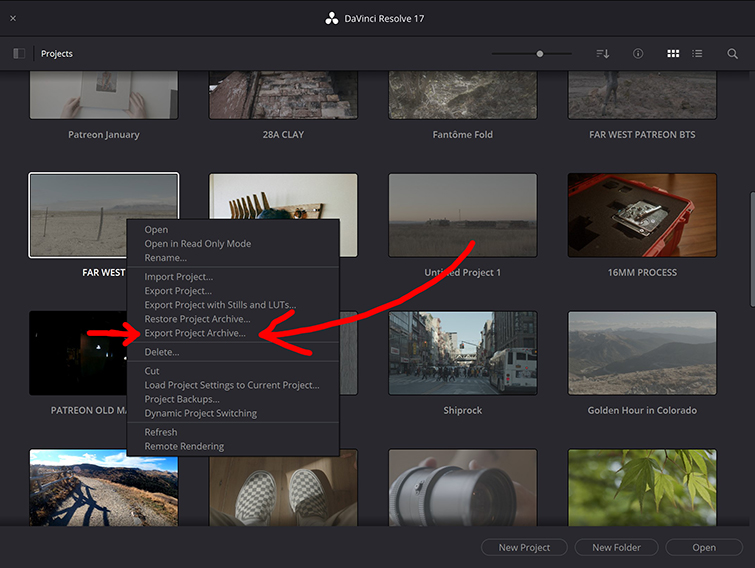
This will copy all of the media in your project to the destination folder. Rest assured, the original media will remain untouched in its original location.
It’s important to note that if you’re using hundreds of gigabytes of media, the process is going to take a while, but you’re also going to have to make sure the new drive has enough available space. Because when you create these “.dra (DaVinci Resolve Archive) files,” you’re essentially bringing everything that makes up that project—so that’s “Media Files, Render Cache, and/or Proxy Media,” hence the significant storage requirement.
If you want some more info on the difference between the main types of hard drives, check out our breakdown and guide to picking which one is best for you:
With your project fully archived, you need to restore it to use in Resolve. Back in the project window, right-click anywhere, and hit Restore. Navigate to the archived project folder, and select open. Resolve will then import the project, bins, and media precisely as you left them before archiving.
If you were previously a Premiere Pro user, you might find yourself in familiar territory with this process. So, why would you want to do this?
If you need to archive a project because you need to pause working on it or plan on coming back to something in the future, this is a manageable option for you. Also, if you want to send the project file to a client or colleague, this is the route you can take, as well.
Import and Export
In the above tutorial from Casey Faris, you’ll see what the general layout looks like.
When you open the contextual menu in the project manager, you’ll also see an option to import and export a project.
At first, this may seem like the same thing as archiving and restoring, but the primary difference is that you are only exporting the project files—the timelines, bins, and settings, everything but the media. I’ll say it again, these only export the project files, NOT the media.
This is for when you need to work from a different computer and you already have the media on the other machine. If you’re hyper-cautious, you could also use this function to make a backup of your project to store in the cloud or on a flash drive. I often tend to do this for fear of a slip-up in file management on my part.
A quick note regarding this process: If you export a project, then place it on the desktop of a new computer, you’ll be unable to open the project directly from the file itself. It doesn’t matter if you associate the file type with Resolve, it still won’t open the software. Even if you have Resolve open, the project will not load. You have to import it back through the project window.
So, this “importing and exporting” option is an important step no matter how far into the edit you’re into. Think of it as the door you need to step through.
However, when you import a project from another computer, you’ll notice that all media is offline—even if you have the same media on your computer. Therefore, you’ll need to relink your media.
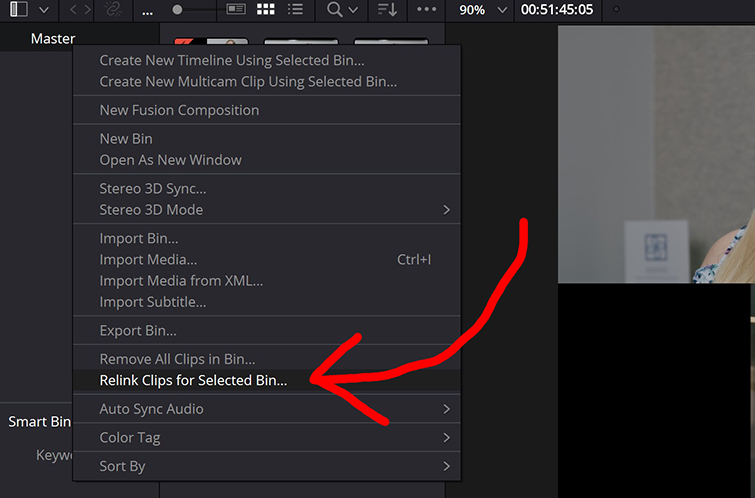
Thankfully, this is a straightforward process. You don’t want to individually relink media clips, as that’s a tedious process—as is relinking individual bins. Instead, right-click on the master bin, and select Relink Clips for Selected Bins. Navigate to your media folder, click Open, and Resolve will relink the missing files. Voila!
So, naturally, I’ll stress again the importance of knowing where your files are and cohesively naming them.
Backing Up Projects
First, let’s distinguish between creating a backup and autosaving. Above, I said I sometimes use the export option to back up a project file off-drive because I’m incredibly paranoid about losing an edit. However, in Resolve 17, we also have a reliable backup system.
When Resolve automatically saves your project, it overwrites the existing save with a new version that includes all the changes since the last save—the basics, right? A backup, however, will be of an older variation of the project, depending on when you create it.
For example, Resolve can create backups every X minutes, every X hours, and every X days. If you generate backups every twenty minutes, you’ll have three backups until the creation of the hourly backup. The first hourly backup will inherently be different from the third hourly backup.
This system is ideal if you accidentally delete a vital timeline and don’t realize it until it’s too late. With backups, you can revert to an earlier version of the project. This is useful if you have to make edits for a client, only to have them change their mind in-between revisions.
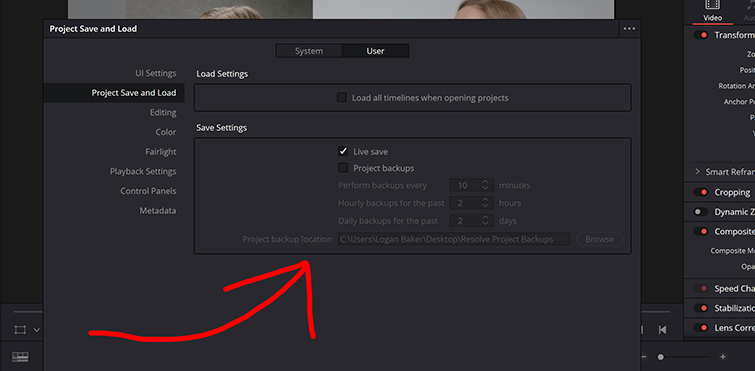
To find the project backup option, hit Ctrl+ to open the Preferences panel (also located under DaVinci Resolve in the top menu) and select Project Save and Load.
Resolve will save multiple backup projects comparable to the grandfather-father-son backup rotation with this setting activated. By default, this setting is inactive; therefore, if you’re loading up Resolve for the first time and want to back up your projects automatically, you’re going to need to turn this feature on.
While this might seem like a tedious task for every project, once you get in the swing of adding this step into your workflow, the security and peace of mind this brings will be worth it in the end, I promise.
As you can see from the menu, there are many backup options, and after a day of editing, you’re going to have many backups of your project. You don’t have to worry about there being too many, as they only generate when changes are being implemented—and they write over themselves on a first-in-and-out basis. Once you reach your maximum X-minute backups, the first one will get replaced with the next X-minute backup, and so on.
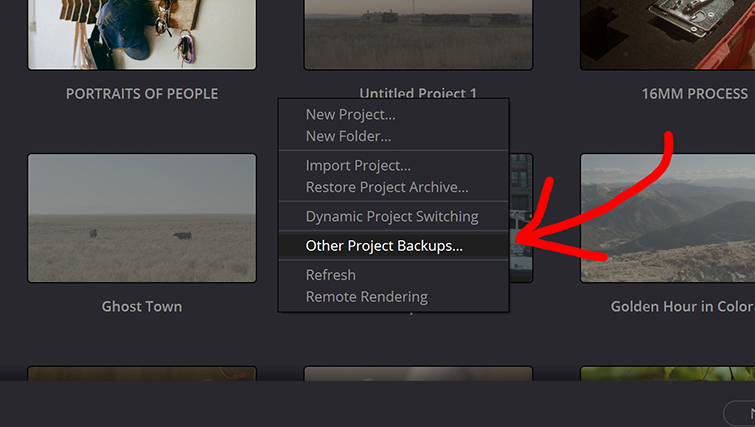
To find your backups, head to the Project Manager, right-click, and hit Other Project Backups. From here, you can load and delete individual backups. In regards to opening up archived projects? It’s simple.
Remember earlier when we archived the project? By right-clicking in the open area of your project window, and hitting Restore Project Archive, then you’ll be able to open that archived project as a “new” project, and you can save it as something else.
Exporting
Finally, we have the Export function of the project folders. Previously, this was known as the Save As function. I’m sure everyone will know how Save As works, but it’s essential to know that when you use Save As, you will immediately switch over and begin editing the new copy, not the original.
So, this is beneficial for anybody wanting to give a copy of this project folder to one of your collaborators.
Deleting
Perhaps the most crucial information about how Resolve handles project files is their deletion, as deleting a project from the Project Manager is permanent. I need to clean up my own Project Manager, but I’m scared to do it because of how permanent it is.
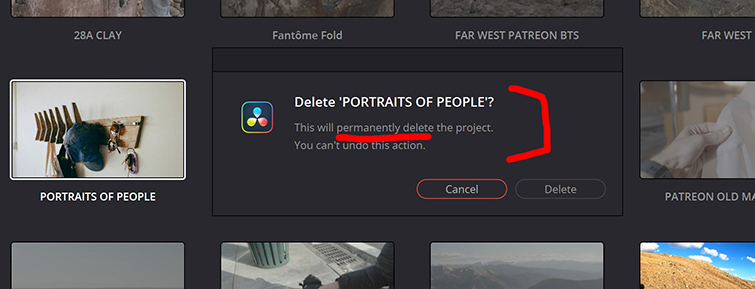
As you can see in the popup above, you cannot undo the action—you won’t find the project file in the recycling bin, and if you go to the database folder on your hard drive, you won’t be able to bring it back by hitting Ctrl+Z.
So, it’s important to back everything up that you even remotely think you’ll be needing in the future.
Looking for more on Resolve? Check out these articles.
- Using DaVinci Resolve on the M1 vs. a Beefy PC
- How to Add YouTube Chapters Directly from DaVinci Resolve
- One Year After Giving up Premiere Pro for DaVinci Resolve
- How to Effectively Reduce Noise in DaVinci Resolve
- How to Stabilize Footage in Post-Production Using DaVinci Resolve
Cover image via Sutipond Somnam.


