
Autodesk Smoke: Action Node

The heart of 3D compositing inside Autodesk Smoke is the Action Node. Find out what makes this node so powerful and how you can use it in ConnectFX.
In a recent blog post, Nodes vs Action, I talked about how using Action inside ConnectFX is often a better and easier way to composite inside Autodesk Smoke. In order to better understand why that may be, let’s explore some of the features of Action. [Click on images below for larger view]
Smoke’s Action Node
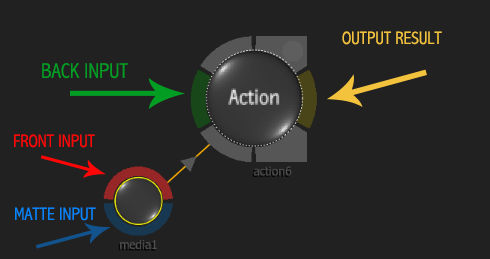
Action contains 4 main areas of focus: the Media List, the Object/Image controls, the Node Schematic, and the Output List.
The Media List is a collection of all of the available media for your scene. The Media is numbered and listed in a layer format, but it is not a layer by layer representation of your scene. Since Action is a true 3D compositor, media in the scene is defined by its position in Z-Space. The media list allows you to use the clips within as images in your scene and as diffuse and reflection maps for other images and 3D text or models.
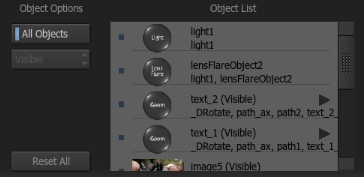
The Media List:
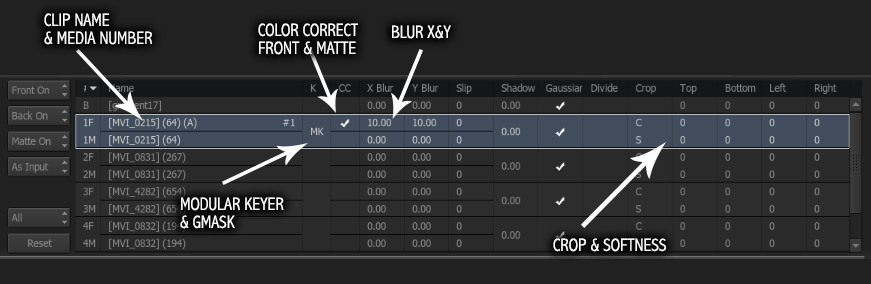
Certain effects are placed at the media level in your scene. Each media clip can contain an alpha/matte channel which will automatically work as a luminance key. You can blur (Gaussian or Box) the front and matte images separately via the X and Y axis. You can crop with hard and soft edges along the Top, Left, Right, Bottom of the image. You can activate a Color Correct or Color Warper for each media layer and each media also has access to the Modular Keyer for Chroma-Keys.
Inside the Modular Keyer you have Gmask controls with tracking. So any masking is done at the media layer level, before any transforms are done on the image in the scene.
The Object/Image Controls:
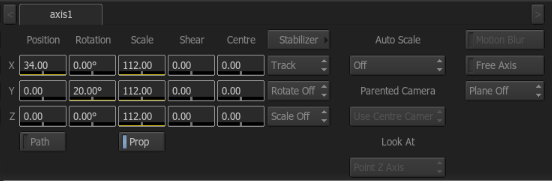
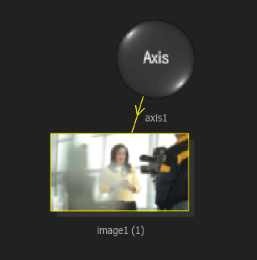
Each clip in the Media List when added to the scene will be displayed in the schematic with an AXIS node and the media’s Image.This is known in Smoke as Axis/Image. The Axis controls are similar to those of the Axis effect in the Timeline. Each Axis has XYZ controls for Position, Rotation, Scale, Skew, and Centre (Anchor Point). The Axis controls the position and rotation and size of the image in 3D space. Every Axis node has access to Smoke’s Stabilizer for tracking.

The Image is actually a mapping of the video clip to an image plane matching the resolution of the clip.
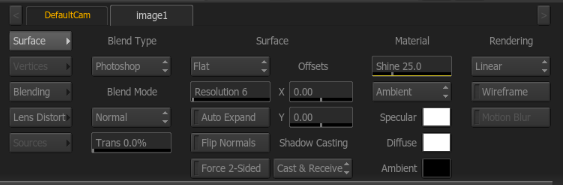
Since the image is mapped, many effects can be done to the image plane in 3D space. Each Image can be set as Flat (Default), Bilinear, Bicubic, and Extended Bicubic. The Bilinear, Bicubic, and Extended Bicubics allow you to physically bend the image plane based on the option selected. The Extended Bicubic has an option to subdivide the image allowing you pull the vertices on the face of the image in 3D.


As I stated, the image of your clip is being texture mapped to a flat 3D surface, much like the mapping of material textures in 3DS Max or Maya. Since this is the case, each image has Material options for Specular, Ambient, and Diffuse Color Controls.
There is also a Shine value you can assign to the image which will change how reacts to Lights in the scene. Images can also use all of the Photoshop Blend modes as well as the legacy Flame blend modes. Transparency is also handled at the image level.
The Node Schematic:
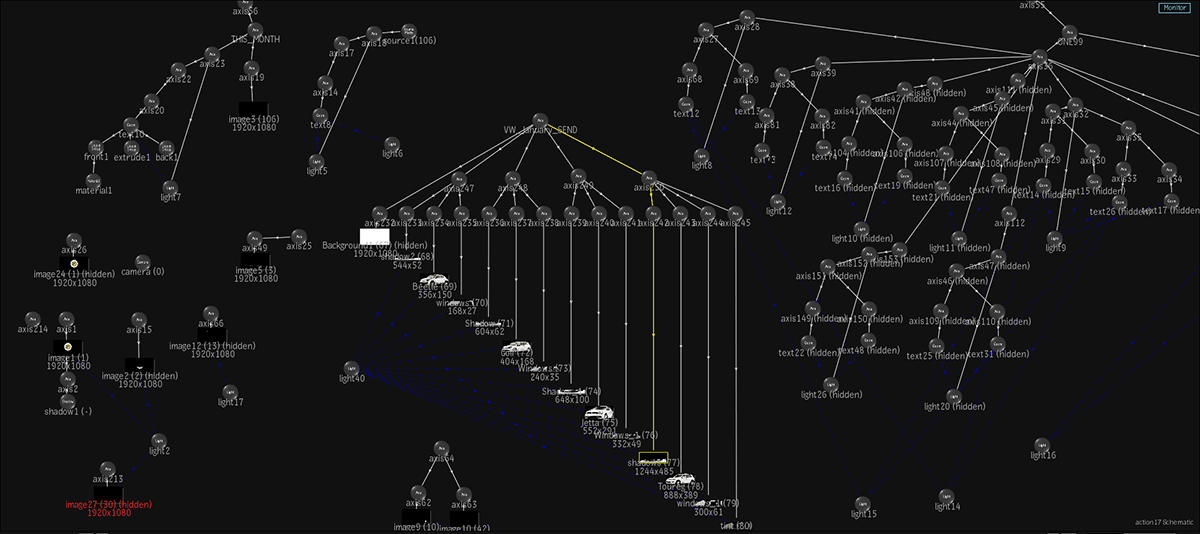
The Action Schematic View is where you build your scene. It’s similar to how the CFX nodes are linked together, but Action has it’s own workflows and connection rules.
![]()
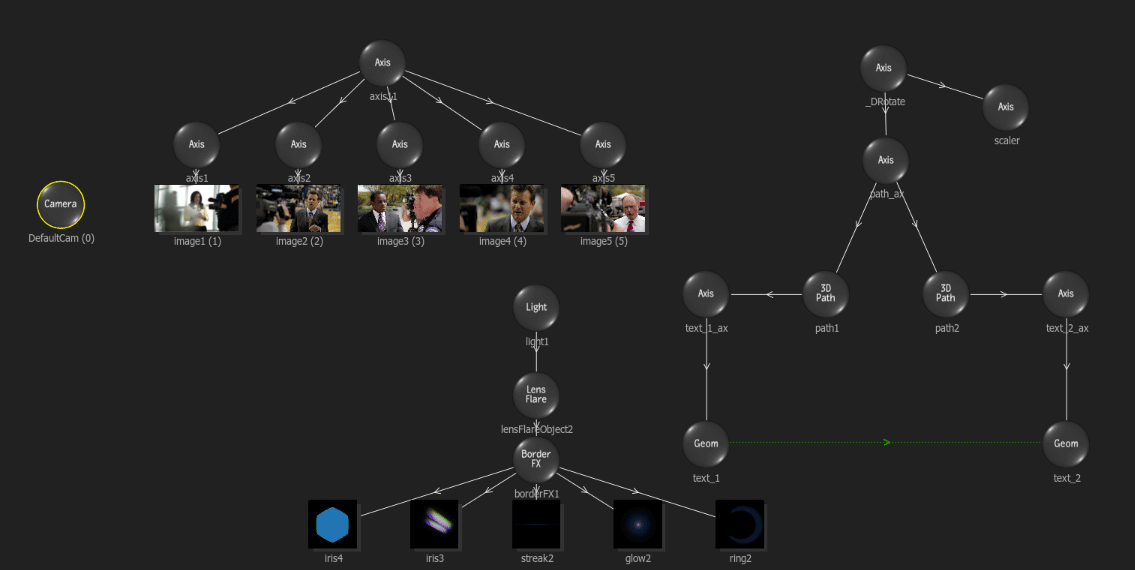
When objects are linked together, an arrow is seen in the connection line that shows you the direction of control. With the basic Axis/Image connection, the Axis is connected to the Image and you can see the arrow pointing from the Axis to the Image. So any manipulation of the Axis controls will be applied to the Image. This is how you reposition, rotate, & scale the Image. This is the fundamental workflow of how the node connections operates. Since your images are not layers, you can perform complex actions fairly easily in the schematic. Here are some examples:
1. Several Axis Connected to 1 Image for Multiple Instances Of That Image
In this case, any adjustments made to the Media via the Media List or the Image controls will be applied to every instance of the Image in the scene. So if you applied blur to the image, every instance is blurred and adjusting the transparency will adjust the transparency of every instance.

2. Axis Nodes Controlling Multiple Images (Global Axis)
You can add an axis to another axis which will cause a cascade of transform controls to be applied to the final image. You can use these axis to control multiple images which may have sub animations on the axis nodes below.

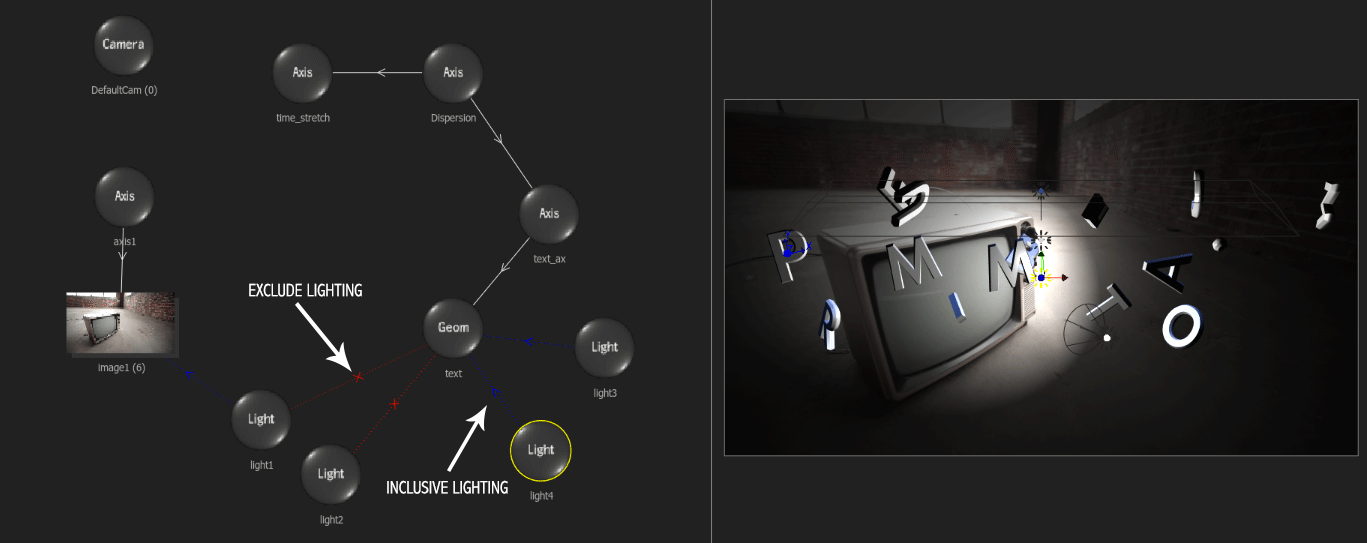
3. Selective Lighting
By using the Light Link (Shift+L) you can connect a Blue selective link to cause a light in the scene to only light the object/image connected. By holding ALT, you can create a Red link which will exclude the light from lighting an object.
There are many nodes in Smoke that perform special functions. There are special objects like 3D Path, 3D Text, Front and Matte Sources. Lens Flares contain many sub maps for glows, glints, rays, iris to build custom flares. Then there are the image maps for both images and 3D Text and other 3D models. These are Diffuse and Reflection maps as well as the Displacement map. The nodes are grouped by Tabs in the Action Node bin.
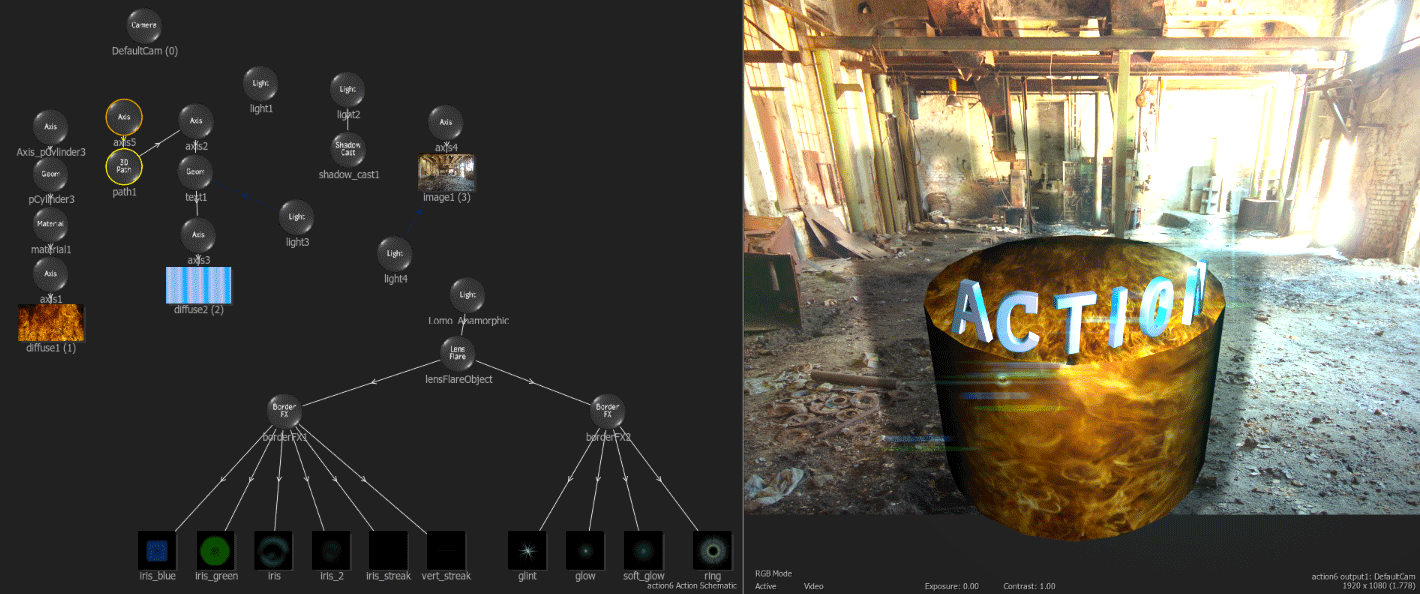
Here is an example of a complex Action setup using 3D Text, Lights, and Photoshop Images. Often these schematics can get quite complex. And of course each Action scene can contain a moving Camera or multiple Cameras that you can move through your 3D scene.

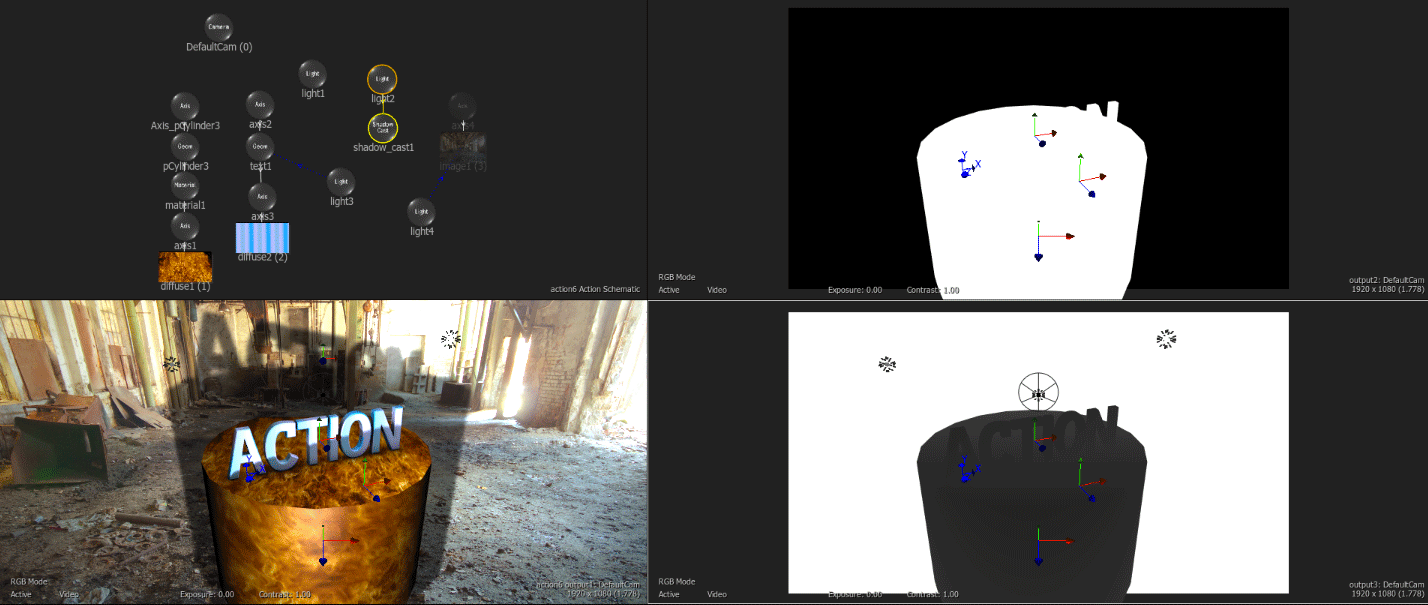
Smoke Action Output Menu
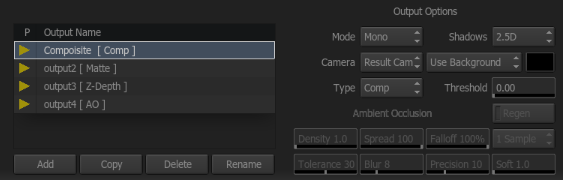
Action has the ability to output several different passes to send along to other nodes in your ConnectFX setup. You can output the Front Composite Images, the Matte Images for each Media, a Zdepth pass to send to the Depth of Field Node, and a Shadow output from the Shadow Cast node in your scene. You can also output an AO or Ambient Occlusion pass. Many of these passes are similar to passes you may export from a 3D application.
You can create multiple outputs and select which images get selected by using ALT+E to select those images in the schematic.
When you are in the Output menu your schematic is dimmed, and when you ALT+E and select an image along with it’s connected axis, the image is output and placed in the output list.
This selection allows you to output just parts of your image for further manipulation by other nodes later in the ConnectFX pipeline.
Action is a very deep and complex node in Smoke. And this post is meant only as an introduction to show you the power and options available to you. This is why Action is meant to be the center pieces of the compositing inside ConnectFX. You can have multiple Action nodes in your CFX schematic. I tend to think of these as separate comps in After Effects. Each Action can have it’s own resolution so you can create larger Action comps that can be fed into another Action node that matches your sequence settings.
In upcoming blog posts I’ll dive deeper in to the Action Nodes and focus on 3D Text, 3D Texturing, and Lens Flare creation. Until then, any comments or questions are welcome so feel free to post them below.


