Cinematography Manual: The Ultimate Guide to Becoming a Director of Photography

This guide for cinematographers will teach you all the basics of cinematography while linking you to tons of other great resources for more in-depth coverage.
Cinematography is an all-encompassing branch of filmmaking. It can be incredibly complex and confusing for beginners, which is why we have created this manual to help you tackle all things related to shooting a motion picture.
Cinematography is defined as the art or science of motion picture photography. It is a derivative of the Greek word kinema, meaning movement. Much like a language, cinematography must be learned well before you can really communicate.
A great director of photography will define light and space to create the ultimate image. Not only does this include everything moving on the screen, but also the camera movements that are used to communicate with the audience.
Director of Photography

Image: Director of Photography Emmanuel Lubezki via tasteofcinema.com
The Director of Photography, also known as the DoP or DP, is the chief cinematographer. They are responsible for working with the film’s director to bring a story to life. They are the second most powerful creative person on set. If the director was the president, the DP is the vice president. Many of the world’s greatest DPs belong to the American Society of Cinematographers (ASC).
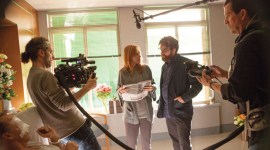
The Director of Photography manages several production departments. Primarily, they are the chief of the camera crew. The camera crew is made up by several positions, all of which are responsible for setting up and using the camera itself. The DP is also in charge of the grip and electric departments. These departments, also called G&E, are responsible for providing the necessary power, lighting, and support gear for the camera.

Image: Gravity – Director of Photography Emmanuel Lubezki via Evan Richards
Unlike other creative positions on set, you can actually breakdown everything a DP does. You may not know why a director made certain decisions, but by studying film and examining every frame, you can breakdown the work of the DP. Not only do you see the actual camera movement and character blocking on set, you can breakdown the type of lighting used and its placement. You can make a very accurate guess to what type of lenses where used, as well as support gear like a Steadicam or dolly.
There are tons of great cinematographers to study. One of my favorite resources is the cinematographer index from Evan Richards. Studying a film requires you to pause a movie and examine it. Richards has taken the time to take incredible stills from some of the most talented cinematographers. He then compiles complete breakdowns for some of the best films ever made. I can’t recommend this site enough.
There are also resources from cinematographers themselves, like Roger Deakins, who has a filmmaking forum on his site, and Shane Hurlbut, who has created in-depth tutorials in his Inner Circle.
Director of Photography Resources:
- Camera Crew Breakdown
- Grip & Electric Departments
- 8 Cinematographers Behind Famous Directors
- Roger Deakins’ Forum
- Evan Richards’ Cinematographer Index
- Shane Hurlbut’s Inner Circle
Cameras and Lenses

Image via ARRI
The Director of Photography will be responsible for choosing the camera used during production. Keep in mind that your camera choice will then affect every other camera decision — film or digital, types of lenses, camera settings, and available support gear.
There are so many camera options available, it’s easy to get lost. The camera choice for every production will be limited by budget. Even if you have a large budget, that doesn’t mean the most expensive camera is the best option. You’ll have to factor tons of other items into the budget. Will you need film stock or memory cards? How many lenses will you need? There are even many who agree that spending your money on lenses rather than cameras will serve you in the long run. I’m inclined to agree.
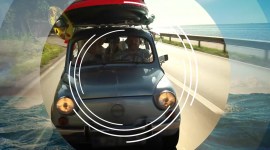
Your camera choice can be guided by technical capabilities, but not decided on specs alone. Storytelling should be the deciding factor. Take a look at The Martian, a film with a budget over $100 million dollars that frequently used GoPros — cameras that cost around $500. GoPro cameras were not chosen for their capabilities, but because they perfectly fit the story.
If you want a particular scene to feel larger than life, then once again you will need to pick the right camera. For The Dark Knight, director Christopher Nolan and Director of Photography Wally Pfister decided to shoot many of the major action scenes on IMAX. Once again, this was primarily a storytelling decision, but on the technical side it allowed them to capture a much larger frame.

Image: Christopher Nolan and IMAX camera via Collider
Film vs Digital
Choosing a camera is no easy task. There are a multitude of options. Will you be shooting digital or film? While film cameras had been the dominant camera choice for decades, the technical advancements of digital camera sensors are nothing short of amazing. To the average audience, they would never be able to tell if a movie was shot on film or digitally. ARRI, the company behind nearly every recent film nominated for Best Picture, makes film and digital cameras.
It’s more about the texture that fuels the story. For each different project or scene, I try to find what color, what texture, what will work. And definitely the format you shoot affects that. Digital has a certain look to it. Let’s say it’s more clean. It doesn’t have the movement of the film grain. It doesn’t have that sensation that film gives you. And there’s certain things that digital cameras can do — with a shutter, for example. On a film camera you can’t go with a wider shutter than 180 degrees. So, I used that on The Wolf of Wall Street for certain scenes. I used the shutter nearly 360 degrees to blow the images. I like both. I like the depth of film. I love the film grain. It’s something that I do gravitate to, but I also appreciate the benefits of digital for certain things. – Cinematographer Rodrigo Prieto to IndieWire
Many filmmakers will often get caught up in the debate of film and digital, but like we previously mentioned — storytelling is key. There are plenty of cinematographers who will use multiple types of cameras for a production. You just need to pay attention to the right factors. One of the biggest factors will be the codec used with digital cameras. The file format will determine how much control you’ll have over altering and grading the footage in post-production.
Also, if you are shooting digital, make sure you have a designated Digital Imaging Technician or DIT. Like a film loader, a DIT manages the footage already recorded. Unlike a film loader, the DIT is also responsible for backing up the content, distributing footage to editors, and creating dailies.
Camera Settings

Image via Blackmagic Design
There are several camera settings a cinematographer needs to take into account before shooting. Know the camera’s dynamic range, which is the ability to capture lights and darks at once. Cameras used for major motion productions have at least 12 stops of dynamic range. Also note the frame rate you will be shooting with.
Frame rate is the frequency at which film is recorded and displayed. It is measured in frames per second. The industry standard is 24 frames per second, or 24 FPS. This means that 24 single images compose one second of film. The term come from film production, but is used in digital cameras too. To be even more technical, the frame rate is more specific when a film is prepared for television broadcast.
In the Americas and parts of Asia, the standard is NTSC. The National Television System Committee slowed film rates by a fraction to achieve a better broadcast standard. To determine the NTSC rate, you will multiply the FPS by 1000 and then divide by 1001. If a film was shot at 24 FPS, the actual rate broadcast will be 23.976 FPS in NTSC countries. For films shot at 30 FPS, the NTSC standard becomes 29.970 FPS.
In most European and African countries, the standard is PAL. Phase Alternating Line was introduced in response to NTSC, because the NTSC standards did not broadcast well in many of the countries with extreme terrain or weather. PAL has a 20% higher resolution than NTSC, and the FPS is actually increased. A 24 FPS film will be increased to broadcast at 25 FPS.
The final setting we will briefly cover is ISO, for International Standards Organization. Adjusting the ISO changes the camera sensor’s sensitivity to light. ISO was originally listed on the film stock, as different types of film were made. In the transition to digital, the ISO is now a camera setting used to change the amount of light the sensor captures. A lower ISO will achieve the best look, as a higher ISO level will introduce noise and grain.
Lenses

Camera lenses are used in conjunction with the camera body to capture light, essentially creating the image. Prime lenses are the ones most often used in film production. Prime lenses have a fixed focal length, unlike zoom lenses, which have variable focal lengths.
The focal length is the distance between the lens and the camera sensor. It is often measured in millimeters. Prime lenses will list one focal length, because they have a fixed distance. The most common prime lenses used on set are the 21mm for ultra-wide shots, 28mm up to 30mm for wide shots, 50mm for standard and medium shots, and 85mm up to 105mm for portrait shots.
Zoom lenses will list both the lowest and highest focal length. Zooms can capture just about any focal length in between, but that doesn’t mean you will get the best image. A 50mm prime lens will almost always give a better image than a zoom lens set to 50mm.
The second number you will see on a lens is the f-stop. The f-stop will let you know how much light the lens will let in to the sensor. A lower f-stop will allow more light than a higher f-stop.
Finally, you will need to take note of the type of mount the lens uses. Nearly every manufacturer uses their own lens mount, but they can be interchangeable with a speed booster or adapter. The Canon EF-mount is one of the most versatile and used mounts on independent productions. In major studio productions, you will often see the PL-mount from ARRI. There are plenty of other mounts as well, but these two will be seen most often.
Camera and Lens Resources:
- Questions to Ask When Buying A Filmmaking Camera
- Cameras Used on Oscar-Nominated Films – No Film School
- Aperture, F-Stops & T-Stops
- Lens vs Camera: Which is a Better Investment?
- What’s the Difference Between Lens Mounts?
- How Expensive Are Real Cinema Lenses?
- Cinema Lenses You Can Afford
- A Tedious Explanation of the f/stop – Matthew Cole
- How Dynamic Range Affects Video – Make Use Of
- How Do Camera Shutters Work?
- Digital Cinema Pocket Guides – The Black and Blue
- The Evolving Role of a Digital Imaging Technician
Camera Movement

Image: Cinematographer and Steadicam inventor Garrett Brown via Tested
After finally setting up the camera and choosing a lens, it’s time to start planning a shot. By taking a look at the film’s storyboard, a cinematographer will have a good grasp on what the director is envisioning. One of the many benefits of having a storyboard is seeing the listed camera movements and director’s notes.
A storyboard will often let a cinematographer and camera crew know when they need to zoom in or follow a character. By knowing what a scene calls for, they can choose the right support gear necessary to pull off a camera move. The primary piece of gear is the tripod. If the camera is supposed to be locked in — meaning no movement at all — or just a simple pan, tilt, or zoom, the tripod is going to be the golden standard piece of gear you need.
Tripods really are great for a pan, tilt, or zoom. For a pan, or panorama, simply turn the tripod head (and camera) to the left or right. To achieve a tilt, move the tripod head up or down. For a zoom, you will actually lock the tripod in place and then use the camera lens to zoom in or zoom out. If you are using a prime lens, then the tripod will need to be set on a dolly to move in or move out. This is no longer a zoom, but a dolly zoom.

Image: The Alamo cinematographer on camera dolly via Wikipedia
A dolly is typically a flat platform with wheels that travels along a set of tracks. A camera operator then rides on the dolly to capture smooth movement, often used to capture tracking shots. A dolly doesn’t always have to be an expensive cart on rails In fact, many creative cinematographers build their own with the tools they have available.
The term to dolly refers to moving directly toward or away from a subject. Unlike zooming, the focal length of the lens does not change. It is the camera itself that moves in or out. If moving alongside a subject from left to right, the correct term is truck. This should not be confused with panning. Panning is looking left or right from a fixed position. Trucking is physically moving the camera left or right.
When the first automobiles where created, the Hollywood studio industry was one of the first to adopt the technology. The early vehicle dolly was the predecessor to the camera car. Now these machines feature futuristic cranes and robotic arms that are used by cinematographers to capture high speed action.

Image: Director of Photography Robert Richardson on a crane via EOSHD
Speaking of cranes, the crane is another camera gear staple. A camera is placed on a crane or jib to frame characters from high above and/or far away. There and hundreds of different types of cranes. Some feature platforms for a cameraman to operate the camera, while others are all digitally controlled. Cranes are often used for pedestal movements, where a camera moves vertically up or down. Now, cranes are frequently being replaced by drones on independent productions.
Finally, we have to mention handheld stabilizers. There is a whole new industry out there since the first Steadicam appeared in the 1970s. The first Steadicam was a stabilizer attached to a spring loaded arm mounted to a camera operator’s chest plate. The weighted stabilizer helped keep balance, while the spring arm absorbed shock and movement. The Steadicam revolutionized the film industry, because it allowed cinematographers to follow subjects and capture footage like never before.
The Steadicam totally changed tracking. Tracking is a movement that constantly follows the action from the same distance. Before, tracking was limited to a dolly’s tracks. With the Steadicam, a camera operator could follow a character anywhere. One of the earliest and most famous uses of this new type of tracking shot was the iconic stair climb in Rocky.
Over the past few years, there has been a technological revolution in stabilizers. Now, with state of the art gimbals, camera operators can run with a smaller and lighter load. It has also caused a dramatic price drop, which has allowed cinematographers of every level the ability to own a handheld stabilizer.
Camera Movement Resources:
- Questions to Ask When Picking a Camera Stabilizer
- Camera Cars & Trailers
- Awesome Robots Behind the Camera
- How to Use a Steadicam Shot
- How to Utilize Dynamic Tracking Shots
- Stabilizer Rigs for Run and Gun Gigs
Framing

Image: Cinematographer Robert Richardson framing shots via Variety
Framing a shot is a cinematographer’s calling card. The typical audience member’s understanding of cinematography is how the film looks. They don’t take into account camera choices, lenses, and lighting. They view cinematography as just framing, but in their defense — framing is a major factor in the overall look of the film.
Framing may be one of the most talked-about subjects on this site. Not only have we briefly run down the standard shots a cinematographer uses, we have since gone back to go incredibly in-depth on each shot.
Extreme Wide Shot

Image: Inglourious Basterds Extreme Wide shot via The Weinstein Company and Universal Pictures
An extreme wide shot showcases the surroundings of a character. It prominently features scale, distance, and location. It is often taken from a long distance. This shot is often also used as an establishing shot. It typically features landscapes or massive building exteriors.
Wide Shot

Image: Hugo Wide Shot via Paramount Pictures
The wide shot frames a character from head to toe. It is also referred to as a long shot or a full shot. These shots are used to show the audience the context and space of a scene by featuring scale, distance, and location.
Take a further look at the Extreme Wide Shot and Wide Shot by breaking down the work of master cinematographer Robert Richardson.
Medium Long Shot

Image: Skyfall Medium Long Shot via Sony Pictures
The medium long shot frames the subject from the knees up, and often the focus is on the location rather than the character. The shot is also called a three-quarters shot… obviously it frames three-quarters of the character. The medium long shot is often used as an establishing shot, as it shows a character in relation to their surroundings.
Medium Shot

Image: No Country For Old Men Medium Shot via Miramax
A medium shot frames a character from their waist up. It should be considered a personal shot, as it frames a character so it appears that the audience is in a conversation with them. This is why the medium shot is often used in interviews. It is a relatable angle that everyone is used to.
Medium Close-Up Shot

Image: The Big Lebowski Medium Close-Up via Working Title Films
The medium close-up shot frames a character from the middle of their chest and up. It is sometimes called a head and shoulders shot. The emphasis is on the character’s facial expressions, but their body language should complement the overall composition.
Take a deeper look at the Medium Shot, Medium Long Shot, and Medium Close-Up by breaking down the work of master cinematographer Roger Deakins.
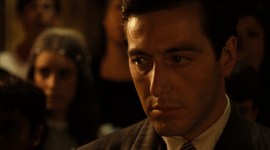
Close-Up Shot

Image: The Good, The Bad and The Ugly Close-Up via United Artists
The close-up shot tightly frames a character or object. Typically, close-ups are used to portray a character’s emotions, while only framing their face. They can also used to show a highly specific action.
Extreme Close-Up Shot

Image: The Good, The Bad and The Ugly Extreme Close-Up via United Artists
An extreme close-up is a view so tight that the audience can only see some features of a character or object. The entire screen is filled with a single feature, like a character’s eyes or mouth.
Take an in-depth look at the Close-Up Shot and Extreme Close-Up Shot by looking at the work of Sergio Leone.
These shots are the building blocks of every film. A cinematographer can build on top of these shots by adjusting the camera angle. Create a warped or unnatural feeling with a Dutch angle. Enhance a situation or character with a low-angle shot. There are so many additional cinematography techniques built upon these standard frames.
Framing Resources:
- 7 Standard Shots Every Cinematographer Must Know
- How to Frame a Wide Shot Like a Master Cinematographer
- How to Frame a Medium Shot Like a Master Cinematographer
- How to Shoot Close-Up Shots Like Sergio Leone
- How the Pros Frame a Close-Up
- 7 Iconic Hollywood Cinematography Techniques
- How to Frame a Low-Angle Shot
- Warp Your Reality With Dutch Angles
Lighting
Lighting has a direct effect on the overall look of a film, which is why the lighting department reports to the Director of Photography. Here is a brief rundown on the basics of set lighting.

Light is measured in Kelvin (K), which measures temperature on the absolute scale. The lower the K, the more red the light will appear. The lowest Kelvin measurement is for candlelight, which falls between 1000K – 1900K.
Going higher on the Kelvin scale will progress to yellow light, white light, and blue light. Incandescent and Halogen lights are found around 2500K – 3000K. Daylight is found around 5600K. A clear blue sky can be found at 10,000K.
Types of Lights

Image: Set Lighting via Central Booking Service
There are many types of lights, but for film purposes, you should be familiar with Tungsten, HMI, Fluorescent, and LED. Also, don’t forget about the sun.
Tungsten bulbs produce an orange hue around 3200K. The lamps require a lot of power and do get very hot, but they are dimmable. They are usually used for lighting interiors. Add a blue gel to tungsten lights to create daylight.
Hydrargyrum Medium-Arc Iodide (HMI) lights are the most common light used on set. HMI lamps are up to four times more powerful than traditional incandescent bulbs. They can be dangerous, so it is highly advised to have a professional lighting technician on hand. HMI lights emit an ultraviolet light with a blue hue.
Fluorescent bulbs were once notorious for flickering and their ugly orange-green hue. Now fluorescent bulbs are flicker free and offer multiple color temperatures. The very soft light is more efficient that an incandescent bulb and can offer a similar look to HMI lights.
Light Emitting Diodes (LED) are very common on smaller sets. White LED lights are most popular, but LEDs are actually manufactured in every color. The diodes are designed to offer directional light, but they are limited in overall output.
Three-Point Lighting

Image: Three-Point Lighting diagram via Skillman Video Group
Three-point lighting is the standard lighting setup for video production. The name gives away the fact that you will be using three light sources. Note that I said three sources, not three lights. You can use the sun if you want to, but three-point lighting is mostly used indoors.
The primary light source is called the key light. This light shines directly on a character or subject from the front right or front left. This light should establish the overall look and feel of the shot. The second light is the fill light, which fills in the character or subject with a softer light. If the key light is used on the front right, then the fill light will be used on the front left. The fill light should always be positioned on the opposite side of the key light. Finally there is the back light. Like the name infers, this light is used in the back of the subject. This light is used to separate the subject from the background. Is should create a rim of light around the subject, which is why it’s also called a rim light.
Keep in mind that three-point lighting is just the beginning. As a cinematographer, you will need to break some rules to achieve the best overall look. This includes turning off lights, or adding more. You can also move the light’s location and use high-key lighting or low-key lighting. You can also use a flashlight or torch to get that popular lens flare.
Lighting Resources:
- Understanding Set Lighting and Color Temperature
- An Introduction to Three-Point Lighting – Vimeo
- How to Use High-Key Lighting
- How Low-Key Lighting Can Make Your Film Dramatic
- 5 Practical Cinematic Lighting Tutorials
- Lighting Tips to Consider Before Shooting Your Next Film
Getting Started as a Cinematographer
Now that you have all this information, it’s time to start shooting. Seriously. The only way to become a cinematographer is by shooting work, no matter what type of work it is. In this interview from DP/30, Oscar winning cinematographer Wally Pfister talks about some of his early work shooting for MTV and small budget horror films.
I highly recommend also checking out this video from Zacuto and Kessler, where legendary cinematographers share their insights and inspirations. It hits the nail on the head of everything a cinematographer will experience.
Authors Note: I hope you find this guide helpful on your journey as a cinematographer. If you feel like these resources still aren’t enough, be sure to let us know in the comments below. We’d love to keep writing future pieces on cinematography to help you learn anything you need to.