Homemade VFX: Create and Film a DIY Meteor Strike

Computer-generated visual effects are useful, but they aren’t perfect for every shot. Learn how models and good cinematography can create great visuals.
With a decent camera, some elbow grease, and ingenuity, you can create a wonderful photographic illusion. Take my word for it – I just built my first miniature, and I think the shot works well. Let’s take a look at how you can rely on models and solid filmmaking to get the effects you want — without relying completely on your computer.
The inspiration for this occurred to me recently as I was looking through a book by L.B. Abbott called Special Effects – Wire, Tape and Rubber Band Style and saw a couple examples of in-camera effects shots. One was a “glass painting” and the other a “hanging miniature.” These were nifty “trick shot” techniques that filmmakers used prior to the advent of the optical printer. These shots involved creating composites with separate elements in post production.

Image: Ted Withers working on a “glass painting.”
A glass shot is an outdoor technique using a large pane of glass between the camera and the background — the glass serves as the painter’s “canvas.” Filmmakers align the glass with some topographical element that needs enhancement: a sky replacement, a distant city, or (in this case) an Italian villa.

The Germans were especially adept at in-camera effects shots, Fritz Lang’s incredible Metropolis is a monumental photographic achievement. In addition to glass paintings and hanging miniatures, Metropolis made extensive use of the Schüfftan process, a technique that involves a front surface mirror placed at a 45-degree angle to the camera. The mirror reflects a miniature or a painting with an area scraped clean to reveal the live action. Pretty heady stuff for 1927.
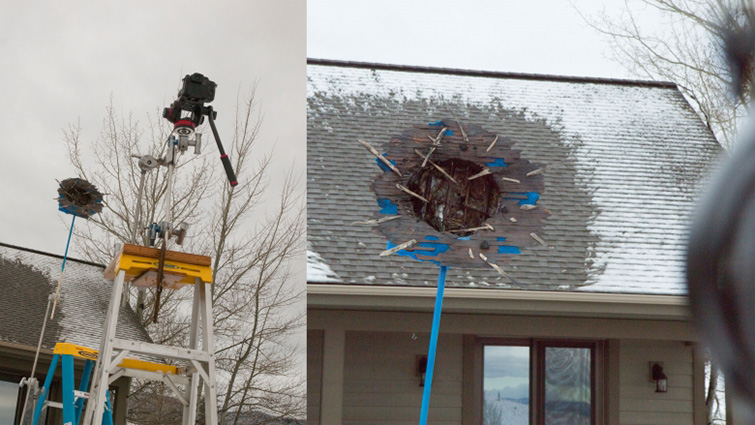
A hanging miniature is a model suspended between the camera and the background to pull off a big-time illusion without a big-time build. A hanging miniature gives the director more time in the day for the shot because the light and shadow will correspond to the live-action background.
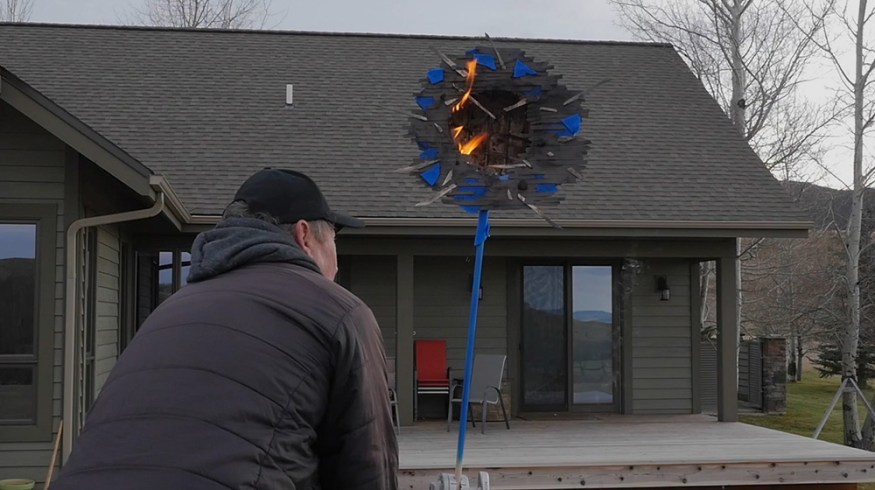
I’m building a hybrid hanging miniature. Instead of hanging it with the pick points out of the camera’s view, I’m mounting the lightweight miniature on a blue rod I can key out.
The blue patches on the face of the miniature will allow the real roof to “print through” and help the blend. You’ll need to shoot the shot without the model first. You will use this clean shot later to fill in the blue patches and replace the mounting rod.
My loadout for this project: LUMIX GH4, 25mm lens, f 14, ISO 800 = 96fps

I needed less than fifty dollars of craft supplies to construct this 1/16th scale (3/4″ to 12″) miniature.

In the old days, this model would have hung from thin wires or adhered to a large pane of glass.

Adding patina to the miniature. Finessing the miniature so that it blends with the background can be the most important and time-consuming part of the entire process.

Here’s the finished product after three test shots and many rounds of supplemental degradation of the miniature. It started to look pretty good after the failed fire test almost destroyed the model.
Mark Vargo, ASC started his career in VFX, with his first credit going to The Empire Strikes Back. He joined the team at ILM to work on the films Raiders of the Lost Ark, Dragonslayer, Star Trek II: The Wrath of Khan, and Return of the Jedi. He continued working in VFX, earning an Oscar nomination for his work on Ghostbusters.
In the late 1990s and early 2000s, he shifted focus to working as a director of photography, leading the Second Unit on films like The Green Mile, The Patriot, 3:10 to Yuma, and Rise of the Planet of the Apes.