Creating an Interconnected Icon Tree in After Effects + 30 Free Icons
Learn how to make an interconnected icon tree using 30 FREE animated icons in After Effects.
To build an interconnected icon tree, you first need some icons. You may choose to draw and animate your own, but in this tutorial, we’re using the excellent Technicons freebie pack from RocketStock.
GET 30 FREE ANIMATED ICONS FROM ROCKETSTOCK
After you’ve downloaded or created your icons, import them into your AE project.
We will also be using a script called Connect Layers from Motion Boutique. It is available here at pay-what-you-want pricing. The script does a lot of math that connects layers with shape layer lines.
Now that you have all your assets, let’s get started.
Make Individual Icon Comps
Each icon should have its own composition. Start by dragging the first icon you intend to use onto the new composition icon in the project panel. This will create a composition the exact size, duration, and frame rate of the source files.
![]()
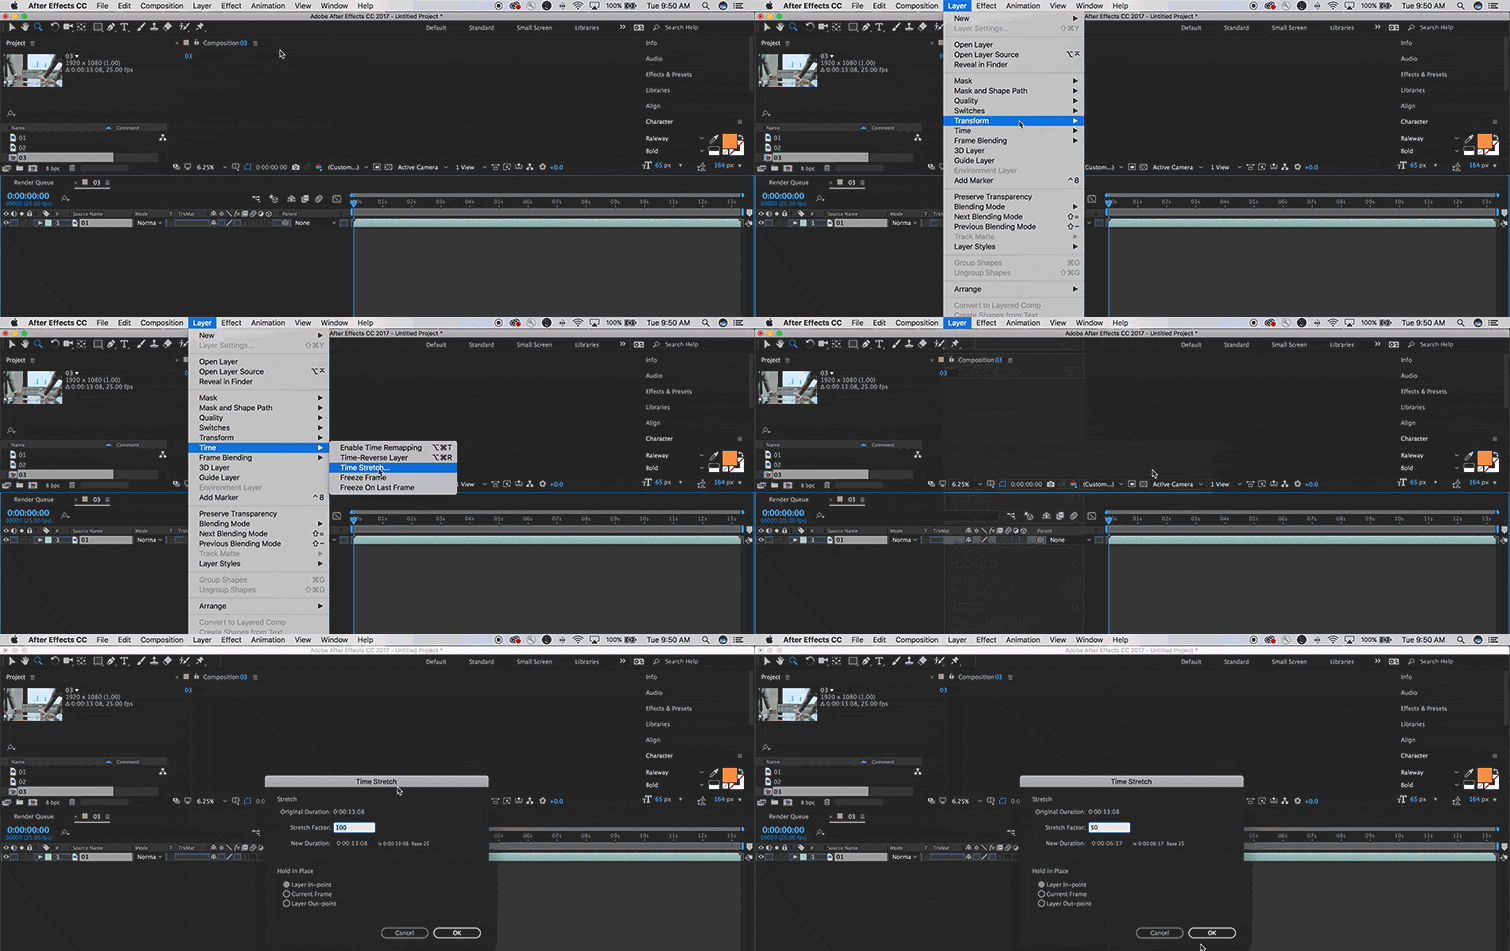
Inside the new composition, we will use the Time Stretch to speed up the .mov file.
Select the layer, and in the top menus, go to Layer > Time > Time stretch. Enter a value of 50 to double the speed.

With the .mov layer shortened, we want to trim the composition to that new layer’s length. Set the playhead at the end of the layer, and hit “n” to set the work area’s end at that point, and then trim the composition to fit the new work area.
This container is also where we want to add a background circle for our icon to sit on, to separate it from the background. Make an ellipse by double-clicking on the shape layer ellipse with no layers selected (otherwise you’ll make a mask or shape on an existing layer).
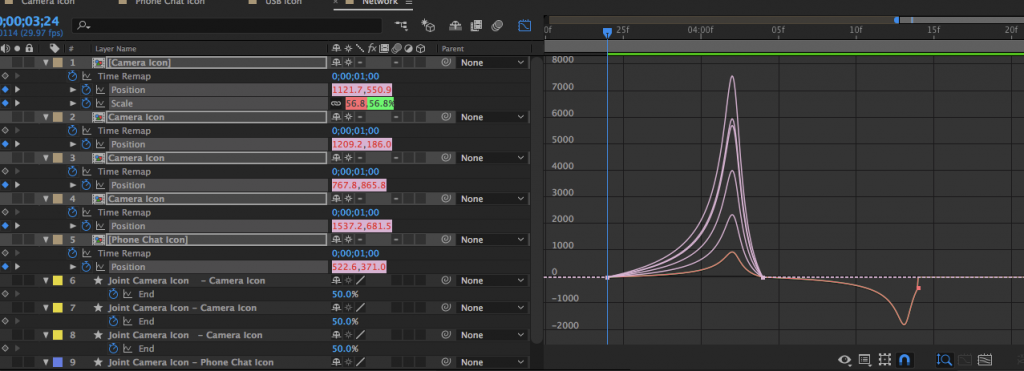
Twirl into the contents and ellipse parameters to access the ellipse size. Set keyframes at 0 frames and 20 frames for [0,0] and [350,350] respectively, and adjust the value graph in the graph editor as you see below to achieve a popping-on look. Don’t worry that the circle goes beyond the outside of the composition.
![]()
If you’re only making a network of one type of icon, then you’re done. But otherwise, you will need icon comps with different contents. First, rename your composition something you will remember, then duplicate it.
Open the duplicate and swap out the source of the .mov for another by selecting the layer to replace, holding alt, and dragging from the project window. Then rename the composition and repeat as necessary.
Putting It Together
Create a new composition that is the same frame rate as your earlier comps — for us that’s 29.97. This is the composition where everything will come together.
Drag out your first icon to the timeline and adjust where in time you want the animation to start. We want the icons to shift and drift on their own in their cloud, so we will use expressions to automate their movement. Apply the following expressions by holding alt and clicking the stopwatch to the position:
wiggle(.1,100)
and scale:
x=wiggle(.1,10)[0];
[x,x]
Now we can position and scale the layers as we like, and they will still have some variance over time. Set the scale values to roughly 60%.
Duplicate the first icon, and replace it using the previous method of holding alt and dragging in another comps. Continue this until you have all the icons you would like to connect.
Connecting the Network
With your icons out on the timeline, you can now connect them with the connect layers script. Select the layers you want to connect to each other.
Then run the script from the File > Scripts > Run Script file, and select the Connect Layers file you’ve downloaded previously. This will open a dialogue window with options. This will present you three modes of connecting layers. If you have only a few icons you want to connect, I recommend the tree method. Or you can use the triangulation method and delete the piece you don’t need.
This will create many rectangles that are pointing from one layer to another. To animate and format the layers, twirl into the content and twirl into the stroke. Increase the stroke thickness as necessary and change the line cap and joint to round. To animate the stroke, we will use the trim paths setting keyframes on the end of the existing trim paths from 0 to 50%. Since the “line” is made of a rectangle, we only need to stroke half of the shape.
If the line is animating in the wrong direction, adjust the offset to 180 degrees. Ease the trim path keyframes for smoother motion. The animation of each line may vary by length, but they should be around 10 frames.
Finally, time up the lines so they emanate from an icon after it has animated on completely. The icon the line is animating to should begin animating one or two frames before the line has completed its animation.
Finishing Up
To pack up the network for an easy transition, you can set keyframes on the position of all the icons so they move to the middle of the frame. Set position keyframes to end, in this case, at 960,540. As the icons are moving to the middle, have the middlemost icon (presumably the most central of the network, and the topmost layer) scale up to cover the incoming icons.

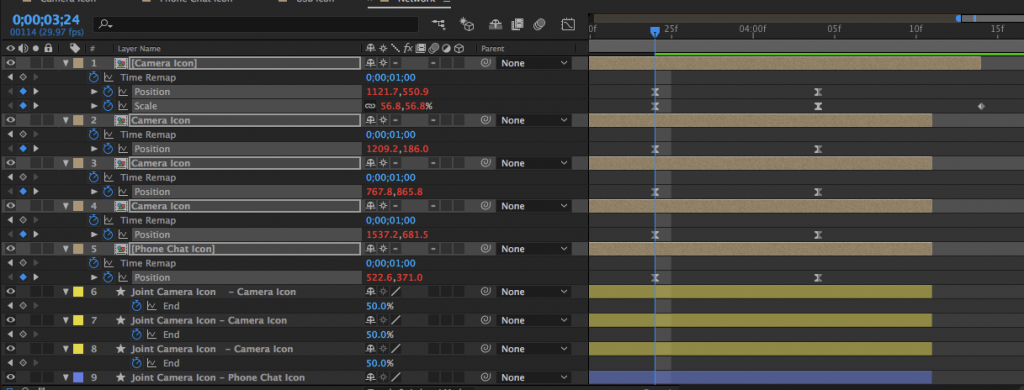
At the apex of the scale, trim all the other layers to end. Then set the last remaining icon scale to zero. Adjust the keyframes in the graph editor, and set to speed graph as you see below to get a nice swell and quick out for the piece.


