Learn How to Animate Twitter Conversations in After Effects

In this tutorial, we explore how to create the elements of a Twitter feed and animate them for a realistic recreation of the platform.
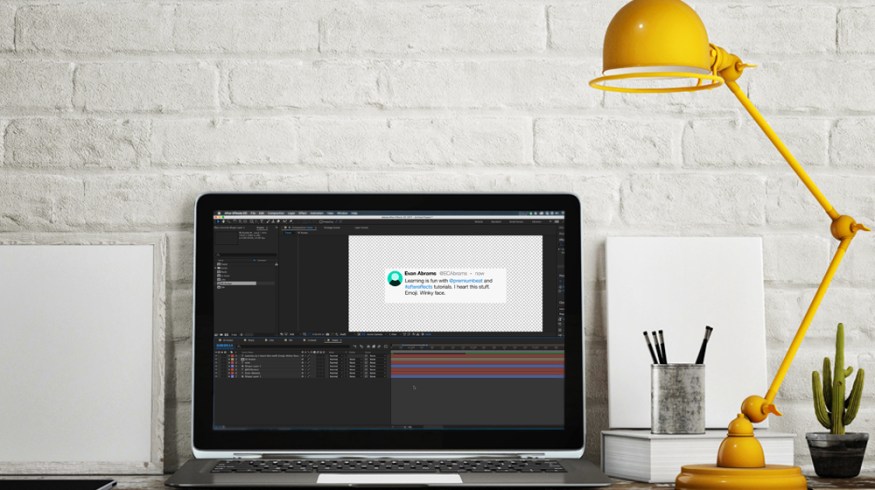
In this video tutorial, I am going to show you how to create a Twitter conversation in After Effects. We’re going to create a tweet (with all the icons), a reply, and another reply. Here’s a quick glance.
Pretty cool huh? I’ll cover everything from creating the avatars and animation, down to the text and running RT and Heart counter.
Ready to get started with the After Effects Twitter tutorial? Let’s dive in.
Lower Icons
Begin this project by creating all the smaller elements that you will assemble into the final piece. It’s good to have many little details like the retweet, reply, like and DM icons. Each one should animate on in a unique way.
![]()
Reply Icon
Start by creating a rounded rectangle with the shape layer to get the general size and shape. Right-click on the rectangle path, and convert it to a bezier path before adding some extra points with the pen tool and extending the point of the speech bubble.
To animate the bubble on, move the anchor point of the group inside the contents before setting keyframes for the rotation and scale. Move the stroke below the group to maintain the stroke thickness throughout the animation.

Like Icon
The like icon is a simple heart. We draw that shape with the pen tool and add a trim path. Only draw half of the heart, and use the repeater to make the second half using the scale of the repeater. The trim path will the end from 0% to 100%. Edit the speed graph so the trim path slows gradually to a finish.
Before the trim path is complete, we can scale up the group’s scale (not the layer’s scale property) to cause the beating. Group the keyframes closer at the beginning and spread them out toward the end. The values are 100, 90, 120, 95, 100 — be sure to ease the keyframes. Move the stroke below the group to maintain the stroke’s width through the scaling.

Retweet Icon
Create a rounded square with the shape layer tool, and convert that path to a bezier path. Select the lower line of the shape, right-click on it, and choose Mask and Path Shape > closed to open the path, then delete the disconnected points of the curves and stretch the lines a little. Use the trim path to animate this line on animating the start and end to go from 0 and 0 to 45 and 100 respectively.
We’ll make an arrowhead with lines by drawing the shape with the pen tool, and then we’ll animate that line on using the trim paths — similar to what we did with the heart to make the line come on from the middle. At the same time, we want this layer to follow the path of the curved line. Copy the shape layer path from the curved line, and paste it on the position property of the arrowhead. Adjust the keyframes to line up with the speed and duration of the trim paths used on that line layer.
Finally, create a null object. Duplicate the arrow and line. Parent the new duplicates to the null object and rotate it 180 degrees to form the other half of the icon.
DM Icon
The DM icon is made of a rounded rectangle and a chevron drawn with the pen tool. The trim path brings both on, but we use the offset in the trim path of the rectangle to move the line around the curve as it comes on.
We want the rectangle to complete at the point where the chevron starts to create the illusion that the chevron is part of the rectangle’s line.
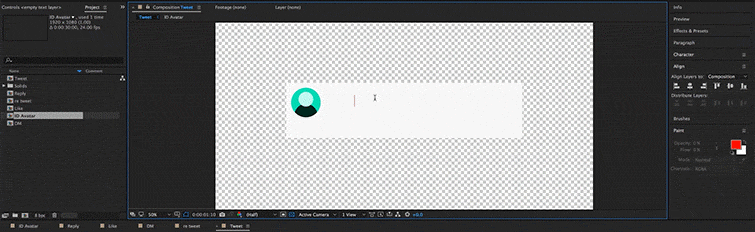
Avatar ID
![]()
Every tweet needs an avatar. This fake tweet is no different. Create a new composition, and make a circle with the ellipse tool by double-clicking on it. We’re going to use this circle to define the visible space of the entire composition, so the color isn’t very important.
Set the circle to animate on from a size of 0,0 to 150,150. Ease those keyframes, and open their graph editor. Then, pull the influence handles of the value graph to pop the circle on quickly to beyond the final value (as pictured below) before settling to the end state.
![]()
Finally, set this layer to Stencil Alpha before adding in other details of the avatar. This could be your own branding, someone else’s branding, or even simply abstract shapes. Whatever you put in here is only going to be visible in the space covered by the circle.
I’ve put in a grey background and a couple circles to look like the head and shoulders of a person and animated the position slightly as the circle expands.
Background Block
In a new composition, create a shape layer rectangle that is 1200,280. Add an expression to the position of the shape layer rectangle by holding shift and clicking the stopwatch. Drag the pick whip to the size, and divide that by two so the rectangle is always moving away from the upper left as it changes size. That expression should look like this:
content(“Rectangle 1”).content(“Rectangle Path 1”).size/2
Animate the rectangle to grow from 0,280 to 1200,280 and use the value graph to introduce some bounce to the movement as the value goes beyond the ending value before settling at 1200.
Attach the Null to the Corner
We’re going to resize the large background block, and we want the icons to stay at the bottom of that block. To do that, we’ll use a null object parented to the rectangle. Apply this expression to the position of the null objects:
x=0;
y=thisComp.layer(“Shape Layer 1”).content(“Rectangle 1”).content(“Rectangle Path 1”).size[1];
[x,y]
Next, position the lower icons you created earlier relative to the bottom of the rectangle.
Handle, Name, and Time
Click and drag with the text tool to create a text block. Type in your desired text block, extending the bottom boundary as necessary. Select any text, such as links and hashtags, and change the text color in the character window.
To animate, use the “typewriter” preset. It will change the opacity of the letter as if it’s being typed into place. Adjust the timing to taste. As the text takes up more lines, you’ll want to adjust the height of the background block. Set keyframes just before you need the box to expand and a little after. Use the speed graph to intensify the motion toward the beginning of the change in size.
Text Countup
The text counters are text layers with the numbers 1 through to the highest value they will reach on separate lines. The font size is 35, and the line spacing is 55. Add a mask to the numbers you want to see — like a window.
Inside that text, add an animator for the position. Animate that position (not the position of the layer) by 55-pixel increments to slide the text inside the mask. Ease the position changes, and manipulate the influence handles in the speed graph to achieve the desired characteristics of motion. Parent these to the null and position them in line with the lower icons.
Putting it Together
With all the parts in place, and everything timed to your liking, you can take this Twitter composition and drop it into another comp. You could also duplicate the composition and edit all the text fields, retime the box expansion text animators as necessary.
Grainy Gradient Background
To make the grainy background, create a solid and apply a Gradient Ramp effect, moving the start and end points to opposite corners. Set the ramp to scatter up to the maximum 512, and choose bright contrasting colors (#1E5EDE blue and #A300EF pink). Apply a Noise HLS effect after the gradient set to uniform and 1% in Hue, Saturation, and Lightness to increase the graininess.
Looking for more After Effects tutorials? Check out these articles
- How to Apply Animation Presets in Adobe After Effects
- Creating an Interconnected Icon Tree in After Effects + 30 Free Icons
- Working with Illustrator Files in Adobe After Effects
- Setting Custom Composition Displays in After Effects
- How to Create a Pen Camera in Adobe After Effects
Check out our entire library of After Effects tutorials here.