Creating a Storyboard Edit in Premiere Pro CC 2015
Here’s a quick tip that comes in handy when creating a storyboard edit in Premiere Pro CC 2015.
A storyboard edit is a method of quickly assembling a sequence by selecting the in and out points within a series of clips in a bin, arranging the clips into the right order, and then creating a sequence from those clips based on their in and out points. A storyboard edit is a great way to snappily produce a fast first assembly of a scene.

The quick tip we’ll get on to is how to change the default poster frame of a given clip, which is helpful if you have a clip that contains an action or movement that changes the look of the shot completely, and you’re assembling a complex sequence. It’s also just a handy thing to be able to do! But first, how to create a storyboard edit.
How To Create A Storyboard Edit in Premiere Pro

In order to create a storyboard edit, get the clips that you need for the scene into their own bin or folder. Double click on that bin to open it up in its own window and stretch it out to give yourself plenty of room to work with.
If you’re used to Final Cut Pro 7, you’ll remember that you used to be able to drag icons around anywhere in a window and they just ‘floated freely’ in the window. This made storyboard edits a little more visually responsive, but you can still achieve the same results in Premiere’s more orderly interface, which locks the placement of clips into neat rows.
With the new bin window open, turn on Thumbnail view, adjust the size of the icons to your liking, and then ensure that ‘User Order’ is selected in the ‘sort icons’ drop down menu. This means you will be able to drag them about, rather than being arranged by, for example, clip name.

Next, arrange the clips into the right order for the scene’s edit. To do this, click and drag a clip to move it about in the sorting order. You’ll see the cursor icon change to a hand, and white bars appear showing you where the clip will land when you let go. If you compare the image above with the one at the very beginning of the post, you’ll see I’ve re-arranged the clips.

Now set the in and out points of each clip by using these keyboard shortcuts: I for In point and O for Out point. You can play through your clips by either hover-scrubbing through the clips, or clicking on a clip and using the J, K, and L keyboard shortcuts to play forward (L), pause (K) or play backwards (J). Pressing the Spacebar will also play and pause your clip.
When you click on a clip in the bin window, a small blue bar will appear with a mini-playhead in it (see image above). This shows you which portion of the clip has been selected with the In and Out points.

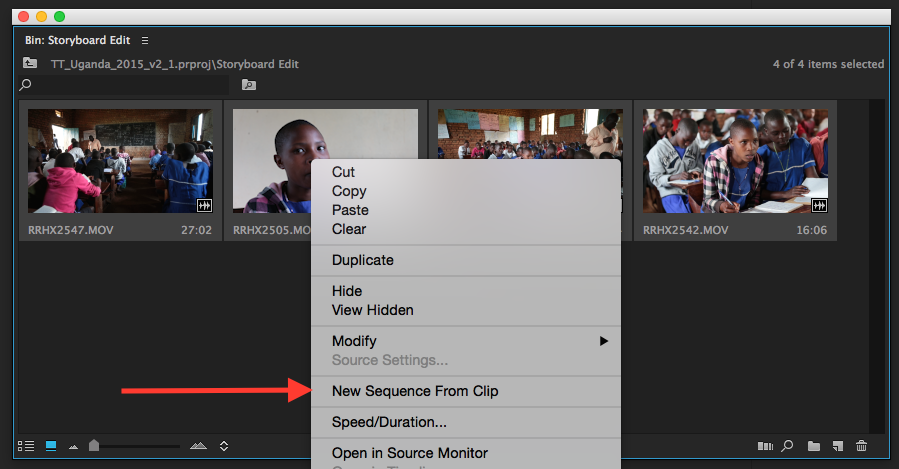
Lastly, select all your clips by pressing CMD+A. Right click on one of them and choose ‘New Sequence From Clip.’ This will create a new timeline, matching the format and frame rate of your selected clip, and create an edit of your clips in the order you chose. This is a fast way to order your clips and create a simple first edit.
Changing the Poster Frame of a clip in Premiere Pro

Often if a shot contains an action or camera movement that substantially changes the content of that shot, then being able to change the poster frame to more accurately portray what’s in the clip is a useful thing to be able to do. It’s also useful if you wanted to make the poster frame a shot of the clapperboard (like when syncing rushes).
As you can see in the image above, it appears this is a scenic shot of some hills and trees, when actually it has some children walking through the shot, which is what it’s really about.

To set a new poster frame for a given clip, hover scrub or move the clip’s playhead to the desired image.
Then simply press Shift+P (Windows) or CMD+P (Mac) to set a new poster frame. You can also simply right click on the clip and choose ‘Set Poster Frame’. If the keyboard shortcut doesn’t work, check that it is set under Premiere Pro CC > Keyboard Shortcuts > Set Poster Frame.

Hopefully this quick tip will help you with your storyboard edits in the future. Here are a few more Premiere Pro articles from your friends at PremiumBeat:
- How to Find Where You Used a Clip in Premiere Pro
- Print Your Own Premiere Pro Keyboard Shortcuts!
- Quick Tip: How To Find Black Flash Frames in Premiere Pro CC 2015
Got any useful tips for your fellow Premiere Pro users? Share them in the comments below!


