
Working with DaVinci Resolve 14’s Powerful Face Refinement Plug-in

The Face Refinement plug-in is a hidden gem in DaVinci Resolve 14. Here’s what you need to know.
The Face Refinement plug-in is a tool that you can only find in the studio version of Resolve, but it may be one of the more powerful plug-ins that you get for the price. The Face Refinement tool allows colorists and editors to adjust people’s complexions, from retouching lip color to removing eyebags — it can pretty much do anything to an actor’s face.
I thoroughly recommend watching the video tutorial below so you can see the plug-in in action; however, if you are limited for streaming data, you can find an abbreviated version of the rundown below.
While the plug-in itself is very sophisticated, using it could not be simpler. The program breaks each area of the face down into its own panel, and the sliders speak for themselves.

Let’s jump back to the edit page, and imagine that the editor has left us some notes in the metadata. Here it says, “Could you please fix the skin tone, sharpen the eyes, and give her blushy cheeks?”

With our task at hand, we’re going to go to the color page to get started. You can add this plug-in from the effects library on the edit page; however, at the moment it’s somewhat unoptimized and tends to crash, especially when adjusting the eye controls. The plug-in works perfectly on the color page. The first step is to add a node, and then open the effects library to search for the Face Refinement plug-in. Then, as with all effects, you drag it onto the node.

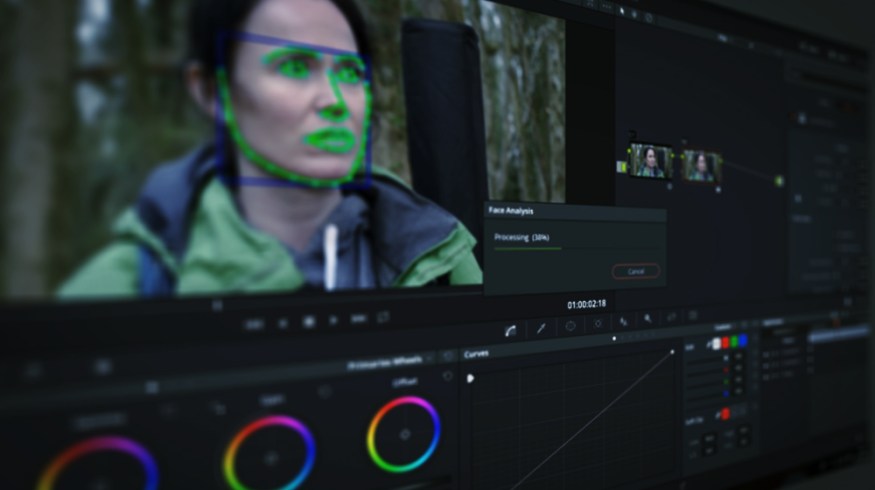
In the effects settings panel, we now have our Face Refinement controls, but before we can adjust anything, we need to analyze the clip. Very simply, hit analyze, and let Resolve work its magic. You should see a mask path appear over the actor’s facial features; if you don’t, it’s likely that you don’t have the OpenFX visuals active within the viewer. You can activate this in the drop-down menu underneath the viewer.

Resolve has now fully analyzed the actor’s face and the movement, and the face is ready to be refined. However, we’re going perform a double check to make sure that the face is entirely masked, which you can do by selecting Show Mask. We can see that Resolve has done a great job, and Resolve in general is world-class at tracking and analyzing data, but I can see around the chin area — it’s slightly cut off. To expand the mask region, simply adjust the Mask Size slider — as I said, these sliders are aptly named.

First, the editor wants the eyes sharpened. The entire Face Refinement control panel breaks down areas of the face, so you just need to find the eye settings and expand the panel. Previously, without the Refinement plug-in, you would have had to create two power windows, sharpen each eye individually, then track the movement. That’s a lot of work for such a simple tweak. The Face Refinement plug-in streamlines all of that. At the very top of the Eye Retouching panel, there is an option to sharpen. This setting just needs the slightest tweak to produce beautiful results.

Next, we have to neutralize the skin tone. You can find operations that are to relevant to the overall color and luminance of the face in the color grading panel. To fix the tone, we’re going to introduce a little bit of green by sliding the tint left.

Finally, the editor wants the actress to have rosy cheeks because she’s been climbing. Although there is a segment for cheek retouching, we’re going to use the Blush Retouching controls. We’re going to increase the saturation by 0.500. Since Resolve has automatically analyzed where the blush would fall on the actor’s face, you don’t have to touch a thing.

Although we’ve only adjusted three settings of the face, hopefully, you should see just how powerful this plug-in is. Given that the studio version of Resolve itself is just a fraction of the price of some beauty plug-ins, such as Beauty Box, it really makes the studio version worth your while if you’re looking for a digital makeup assistant.
Looking for more on Resolve? Check out these articles.


