

Editing Features in DaVinci Resolve and Resolve Lite

Did you know you can perform basic video edits in Resolve and Resolve Lite? In this post we’ll guide you through the fundamentals. Let’s go!

Video editing in Resolve 10 feels very similar to an NLE. The added features of this release give you the ability to modify edits without going back to your NLE. Currently, Resolve 10 is $995 & Resolve Lite is free. You can compare the features here.
You can also just start an edit in Resolve 10. I can see those new to the industry embracing Resolve 10 Lite, as it is free and can do a lot on it’s own or combine it with Final Cut Pro X. For $300 that gives you a crazy amount of post power for the money.
In this post we tackle the basics of video editing Resolve:
1. Walkthrough of Editing Features & Interface in Resolve
2. Performing Video Edits in Resolve
3. Resolve 10 Video Editing Shortcuts
4. Trimming in DaVinci Resolve
Note – If you’re new to Resolve 10, check out the section on Editing in the Manual (pages 165-248). Resolve is powerful, but not the most intuitive app. An example is that at times you may see Menu selections grayed out, like Video Scopes and Safe Areas. This is because you are not in the correct page. Video Scopes and Safe Areas are accessible when you are in the Color Page (not the Edit Page).
I also suggest going though all the menus, and memorizing the shortcuts you often use. Resolve 10 is not as “right clicky” as most NLE’s, so often you will need to go to a menu or know the shortcut to be efficient.
Walkthrough of Resolve Editing Features & Interface
Keyboard Layout: You can choose to use popular NLE keyboard layouts in Resolve. Modify this setup in Project Settings > Editing (gear icon on the bottom left).

Spend some time in the Project Settings and customize Resolve 10 to best suit your workflow (just as you would in any video editing application)…
Transitions and Preroll/Postroll settings: Project Settings > Editing
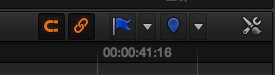
Snapping and Linked Video/Audio: Icons in Toolbar
Timeline View Options and Audio Meters: Icons in Timeline

Match Frame: Use the shortcut “F” or click the icon in the Source or Timeline Viewer

Access the Audio Mixer: View > Audio Mixer
Titles and Transitions: Toolbox, below Media Pool

Speed Changes: Retime a clip by using the shortcut Command (on Mac) or Control (on PC) + R. Constant & variable changes can then be made on the clip from the Timeline. You can also change constant speed and retiming options in the Inspector.

Performing Video Edits in Resolve
Resolve 10 adds the Edit Page, a portion of the app geared specifically geared toward video editing.

You can edit directly from the Media Pool in List View with Filmstrip. Resolve has a hover scrub ability, so drag your playhead to view the clip, then press I and O to set in and out. Note: the Media Pool is equivalent to a project/browser in a NLE.

You can drag and drop the clip into the Timeline, or right click and choose “Insert Selected Clips to Timeline”.
You also have the choice of “Append Selected Clips to Timeline”, which is an editing feature in FCPX.

Additionally, you can double click on a clip in the Media Pool to load a clip into the Source Viewer. Set your in and out in the Source Viewer (using the I and O shortcuts). Then drag into the Timeline in Normal Edit Mode (use the pointer, shortcut is A).

Resolve 10 Video Editing Shortcuts
Resolve 10 offers the standard editing functions found in NLEs. Note: The tools and types of edits are also under the Edit Menu. Here’s a few of my favorite video editing shortcuts for Resolve:
| Razor | Select the razor in the toolbar or press B. B cuts one track, while Command + B (on Mac) or Control + B (on PC) cuts multiple tracks. |
| Insert | Select the insert icon in the toolbar or press F9. |
| Overwrite | Select the overwrite icon in the toolbar or press F10. |
| Replace | Select the replace icon in the toolbar or press F11. This uses the playheads in the Source and Timeline Viewer to perform the edit. |
| Place on Top | Press F12. This behaves like the Superimpose Edit in FCP7. |
| Fit to Fill | Press Shift + F11 |
| Append to End | Press Shift + F12 (similar to FCP X) |
| Left or Right Arrow | Move one frame (add shift to shortcut to move in 1 second increments) |
| Up or Down Arrow | Jumps to previous or next edit |
You can lock and target tracks in the Timeline and from the Edit Menu:

Trimming in DaVinci Resolve
Press T to get into “Trim Edit Mode or click on the Trim icon.

You have one trim tool that performs ripple, roll slip and slide. What determines the type of trim this is where you place the mouse…
| Rolling | Put mouse between 2 clips. Perform split edits by holding Option (on Mac) or Alt (on PC) before you click. |
| Ripple | Put mouse on the side of the clip you want to Ripple |
| Slip | Put mouse over the Clip thumbnail |
| Slide | Put mouse over the Clip Name (bottom of clip) |
Have you tried the editing features in Resolve 10 Lite? If not, what are you waiting for, it’s free (grab the download on the Blackmagic site here).
Share your thoughts in the comments section below!


