Is the ERA 4 Noise Remover a Simple Solution to Noise Removal?
Today we’re going to look at Accusonus’s ERA 4 Pro bundle and discuss how it operates within Resolve, focusing specifically on noise removal.
As a solo filmmaker, I do my best to steer away from audio noise removal, as I’m never able to produce adequate results. As a result, I end up with a limited setup. Without a boom operator, I’m forced to tighten shots, keeping the mic in close to pick up that pleasing audio.
However, I’m still prone to mistakes. In my recent short film (linked below), I made a slight…hiccup, should we say.
Hopefully, you shouldn’t notice the issue (although I still can). But, upon recording the scene with the actress, I was misreading my audio levels. We’ll blame my incompetence on bright sunlight, lack of coffee, and filming in a rush before the car park filled with beachgoers. In doing so, I accidentally had my headphone level up and audio gain decreased. As such, it sounded like the actress was more than audible. But, if I had correctly checked the levels, I’d have noticed the gain was inherently low. Her voice levels recorded at around -30db. As a result, I needed to increase the volume in post, which also increased the noise — primarily that of the road and the windy tree.
One of the primary aspects veering me away from any form of post-audio processing is that, well, I’m not that versed in advanced elements of audio processing. Give me a noisy image, and I’ll have those blacks rendered noiseless in a few minutes. Audio needs fixing? How about we crank up the soundtrack for this scene.
ERA 4 Operations
I got my hands on the ERA 4 Pro bundle from Accusonus. So, we’re going to look at how it operates within Resolve, but specifically the noise removal. Of course, a few years back, Resolve added the Fairlight page. It’s a dedicated audio page that also came with its fair share of audio tools. However, if new users think the edit page has a steep learning curve, the Fairlight page is a different creature. While you can still add Fairlight plugins on the edit page, the controls are daunting for someone who isn’t versed in audio tools. ERA 4 looks to solve that with a simplistic approach to the design of the plugins and how the controls operate.
They say,
Say hi to the ERA Bundle Pro 4! Multi-patented, next-generation audio repair tools that offer both fast and high-quality processing. As a professional in post and music production, you deal with impossible deadlines. Our smart tools will help you save tons of studio time by doing most of the work for you. Get access to the fastest repair technology for complex audio issues.
We’ve already covered a full breakdown of all the tools within the ERA 4 bundle for Premiere Pro — reviewed by Charles Yeager — and you can find that here. In Charles’s review, you can hear clear examples of every tool found within the ERA 4 bundle and how they perform. I think it’d be somewhat redundant to do another review in Resolve, because it performs exactly the same and looks the same as in Premiere. We’d essentially be reviewing the same beer but in a different restaurant.
Instead, I want to look at how Resolve’s built-in DeNoiser compares to ERA 4’s in the level of simplicity.
DeNoiser: Resolve vs. ERA 4
This is the audio clip with nothing but a gain increase of 16db.
The audio would have worked if this scene was of an actress on a park bench. But, she’s inside the car with all the windows up, so it’s a little too noisy.
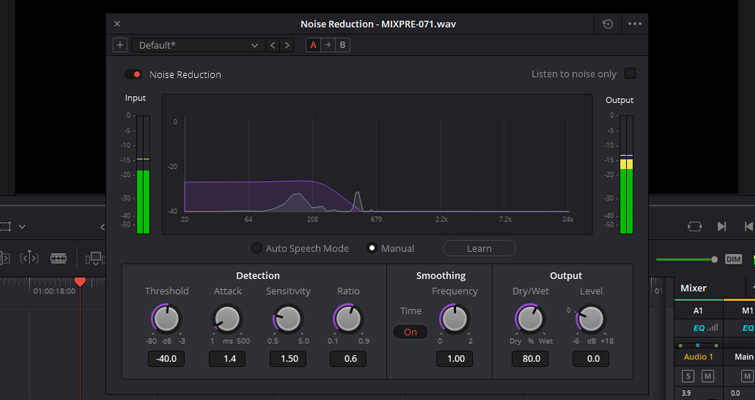
You can apply both effects on the edit page by opening the effects library and scrolling down to the Audio FX panel. You’ll find Resolve’s built-in Noise Reduction under FairlightFX, whereas the ERA 4’s Noise Remover will be under VST Effects. Resolve’s DeNoiser isn’t bad at all. It’s great! It is, after all, a Fairlight VST. It’s just not very new user-friendly. When added to your audio clip, here’s how it looks. (Side note, you can get this pop-up box to open again by finding the effect in the inspector panel.)
We have a visual pop-up, If you tend to stray away from audio-based UIs, this can look like the operation controls to the Millennium Falcon. So, let’s break it down. The graph shows a spectral analysis of the audio being targeted — the purple/pink line represents the noise being focused.
Underneath, the settings are divided into three sections: detection, soothing, and output.
- The threshold relates to the signal-to-noise ratio. Audio with a weak audio signal will require a higher threshold value.
- The attack is a setting primarily used in auto speech mode, and will control the duration in which the noise profile is analyzed.
- Sensitivity affects the value of the detected noise profile. Higher sensitivity means more noise is removed, but also more damaging to the audio needed to be kept.
- Ratio controls the attack time of the signal profile.
- The frequency smoothing will smooth the signal to compensate for harmonic ringing in the audio, after the noise has been removed.
- Dry/Wet controls the output mix of “dry” (or original signal) to “wet” (or processed signal).
- Makeup Gain is the tool you can use to compensate for the audio level that may be lost due to the noise reduction operation.
There are also built-in presents based on various factors, and you can toggle to listen to the noise only.
Again, it’s a great tool. Audio itself is anything but simple and requires just as much work as the visual. For new editors — or those slightly outside of the audio realm — it’s somewhat complicated. You can get excellent results, but quite like balancing a gimbal, it takes a lot of precision-balancing with the tuning knobs.
This is the result.
ERA 4 Noise Remover
Conversely, the ERA 4 Noise Remover ultimately simplifies the process while maintaining a high level of noise reduction.
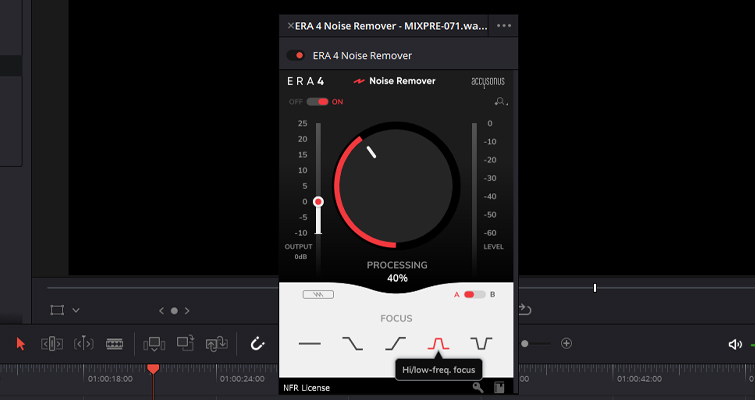
The ERA 4 Noise Remover will appear as a one-knob pop-up UI when you add it to an audio clip. It’s simplistic and automated. As stated by Accusonus,
Most of the time, you don’t have to do anything else. Just dial in the amount of processing you want, and you’re done!
But, is it as simple as that?
Honestly? Yes.
The value of the processing ranges from 0 to 100 percent, and the only task the user needs to do is refine that amount. However, underneath the processing knob is a selection of processing frequencies you can use to fine-tune the noise removal. For example, if the noise is the low rumble of vehicles from a distant road, select the low-frequency focus. An annoying hiss? Select the high-frequency focus. Alternatively, if the noise in your clip is the discrete but noticeable hum of an AC unit, hit the power icon.
I usually love to demystify tools that “does exactly what it says on the tin” because, often, they don’t. However, the ERA 4 Noise Remover does precisely what it professes to. I’d love to know how, but they state that,
Based on the multi-patented Accusonus noise suppression algorithms, Noise Remover simply works and allows for efficient removal of the most common noise sources.
So, perhaps it’s a tightly guarded secret. While the bundle does come with a cost, it certainly jumps straight over the complexity of Resolve’s Noise Remover.
This is the clip with ERA 4’s Noise Remover.
I’d argue that the ERA 4 Noise Remover is a lot cleaner than Resolve’s. Resolve sounds like it removed a little too much high-frequency signal from the actress’s voice. Again, I would presume that it’s possible to get this level of noise removal from Resolve, you just need a better understanding of the audio workflow and interface. For those, like myself, who are not versed in this practice, the ERA plug-in is a great alternative.
Now, to remove that distracting clicking noise. The road never ends.
Cover image via Accusonus.
Looking for more pre- and post-production tips? Check these out.


