The Top 3 Ways to Shoot Vertical Video of Your Film Project
In this write-up, we’ll look at three common methods for creating a 9:16 vertical video cut of your project — and how each one measures up.
Vertical video deliverables are a curveball filmmakers have been dealing with over the last couple of years. Clients want their “cinematic” widescreen content, but they also want a vertical version of their content for use on Instagram, Snapchat, and Facebook. Assuming you’re not just recording on your phone . . . here are three common methods to give your clients what they want.
1. The Post Method
The post method, or center cut, is the most common method. The DP and the director might not even know that the client is going to present their project in vertical mode — instead, the post-production house gets a request for a 1080×1929 center cut of the final approved edit, then uploaded to Instagram and other social media channels.
The issue with this technique is that it usually feels claustrophobic. The framings feel off, and they’re very tight — unless the DP has framed with verticality in mind (usually to the detriment of the 16:9 widescreen).
It’s possible to shoot this way and have a decent image in both aspect ratios, but it takes planning. Most monitors, and some cameras, let you load custom guides or overlays so you can frame for both vertical and horizontal frames.
2. Flipping the Camera

Shooting a second take with the camera on its side.
A less compromised solution to vertical video is shooting a second version of your takes with the camera on its side, giving you additional footage to edit. This isn’t as time-consuming as it might seem — at least on set.
Once you’re happy with a take, flip the camera and monitor on its side and do one more version. You or the editor can incorporate this footage into a different cut.
This will almost double your time in post, since there’s a new project to make, but it’ll look infinitely better than a center cut because you’ll be able to choose the appropriate lens and framing for your shots.
This is definitely best used for short-form content — like thirty-second commercials — since it’ll eat into your prep, shooting, and editing time.
3. Stacked Camera Method
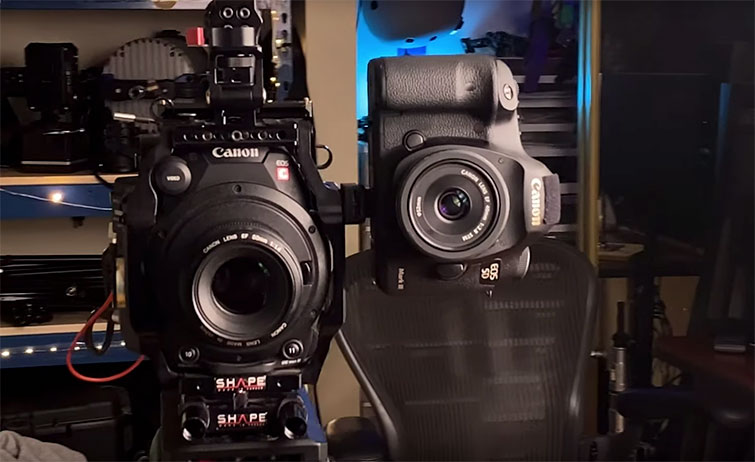
If you don’t have time for re-takes, you’ll need two cameras operating at the same time.
If you don’t want to (or can’t) do additional takes, you’ll need to record horizontal and vertical versions simultaneously. This could mean having a second camera right next to your A camera that’s showing vertically, or to attach another camera to the main camera and roll on both at the same time.
The best practice is to add another camera person to do the operating, and to sync the second camera via timecode so that the editor can edit both as one.
Since clients are often reluctant to foot the bill for the extra manpower, attaching a camera to the side of the A camera’s cage works pretty well, if the operator doesn’t have to focus it during a shot and can keep the settings unified.
Whatever method you use, vertical video is here for the foreseeable future, so it makes sense to learn how to get the best image possible.
Looking for more video production tips and tricks? Check these out.