Get a Grip on Lighting With a C-Stand
Learn the basics of a C-stand to make sure you know how to properly light up the set. It’s so much more than righty tighty, lefty loosey.
A C-stand is one of the most versatile tools you can have a a filmmaker. You can direct light in any way with ease, making you an true director of photography.
The term C-stand comes from the early days of filmmaking, when a 100 inches — a century — was the normal size of reflectors. The joke on set is that you can use a C-stand for over 100 things. Here’s how to get started.
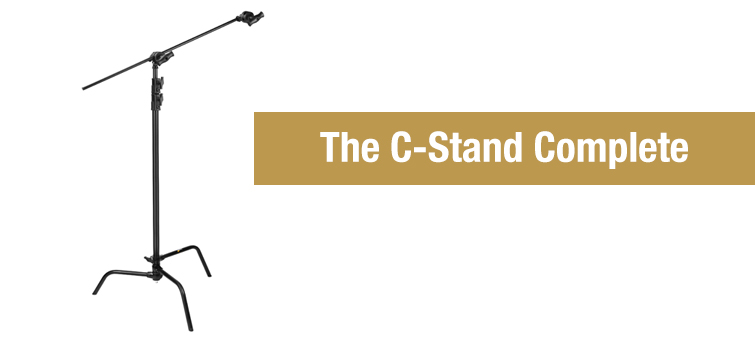
The C-Stand Complete
The term C-stand complete refers to a C-stand with an extension arm. In the image above, you’ll see a C-stand complete. Let’s break down the C-stand, top to bottom.
Grip Head and Extension Arm
At the top of a C-stand complete is a grip head that holds the extension arm. At one end of the extension arm, you’ll typically find another grip head. That second grip head will typically hold a flag — a tool used to block, diffuse, or direct light.

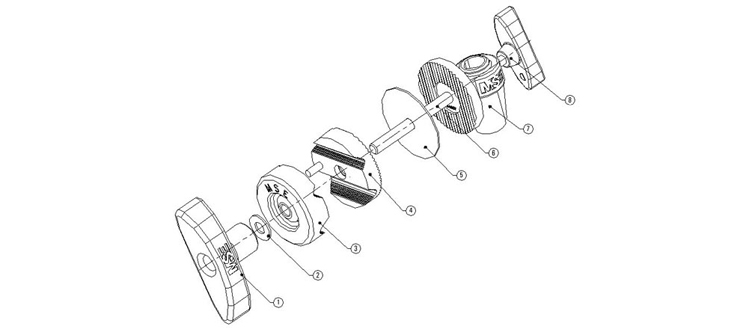
Image: Grip Head Parts via Matthews Studio Equipment
In the breakdown image above, you’ll see that the two outermost parts are knobs. These T-handles will allow you to tighten and loosen the grip head. Always remember — righty tighty / lefty loosey.
Risers
The extension arm attaches to the risers — a series of columns used to extend the height of the C-stand. The risers also use T-handles to extend. Think of risers the way you think of extendable tripod legs.
Base
The base of the C-stand is made up of three legs of varying heights — high leg, medium leg, and low leg. The legs collapse flat for easy transportation. They are designed to hold an incredible amount of weight. The high leg is the primary leg that will face in the direction of the flag or light. For added balance, add a sandbag to the high leg.
C-Stand
A regular C-stand is made up of the base legs and risers. It does not include the extension arm. This standard setup is almost always used for holding light fixtures.
Here is a quick look at the parts with Joe McNally for Adorama TV.
Properly Setting Up and Using a C-Stand
In this excellent video for Matthews Studio Equipment from Shane Hurlbut, you will see how to properly set up and use a C-stand.
Here are a few quick notes from the video:
Pass off the stand by holding both the stand and extension arm in your hand. Don’t hold just the stand, or you are likely to have your fingers smashed.
You want to set up everything on the right side, starting with the grip heads. That way, a flag, foam core, or any diffusion you may have attached will actually tighten the grip knuckle as it settles in place. If it’s on the left, it will loosen the knuckle and everything will come falling down.
Also, be sure to keep weight over the tall leg, as it provides the most support. Even if the payload is high, you can easily add a sandbag to the tall leg.
Finally, when raising a C-stand, be sure to start with the top riser. Otherwise you risk not getting your flag high enough and have to lower every section to get back to extend the top. Save yourself the hassle.
You can just remove the extension arm to use the C-stand as a light stand.
Suggested C-Stand Brands for Purchase
When it comes to buying C-stands, you definitely don’t want to go with a cheaper version just to save some money. C-stands are some of the most dependable and long-lasting tools on set. A quality C-stand will last for years, if not decades.
They other main point is that the stand will probably need to hold a lot of weight, even after taking plenty of abuse during transport. Don’t risk a flimsy cheap stand, especially when you’ll have actors and crew members under these fixtures.
If you are looking for a standard C-stand, look for a 40″ double riser — and be sure to get the extension arm too.
The most dependable C-stands come from:
Bonus Tip
When carrying around C-stands or other grip tools of significant length, be sure to shout “Points” when walking around set and turning corners. This warns anyone on the other side of the corner that you are headed in their direction. Shouting “points” is a great way to avoid stabbing someone’s eyes out.
Got any C-stand tips for the community? Share them in the comments below!


